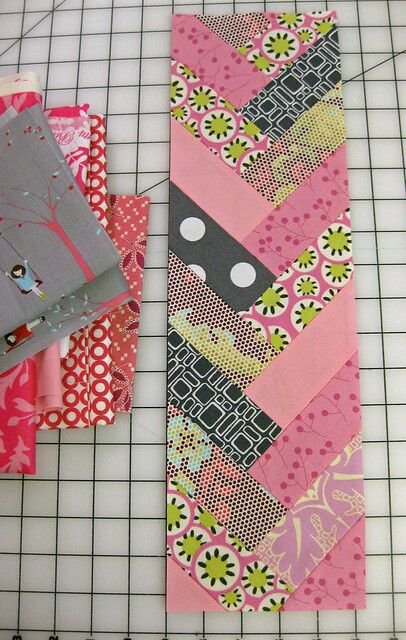
The French braid quilt block – Pattern is a timeless favorite in the quilting community, known for its ability to create a sense of fluid movement and sophisticated color progression. This specific design mimics the appearance of a woven hair braid, utilizing rectangular strips of fabric that lean against one another in a rhythmic, staggered fashion. By engaging with a French braid quilt block – Pattern, quilters can experiment with gradients, scraps, or curated collections to produce a visual effect that looks far more complex than the actual assembly process requires.
Whether you are looking to create a striking table runner or a full-sized bedspread, the French braid quilt block – Pattern offers a versatility that few other designs can match. The magic of this block lies in the “braiding” technique, where each new piece of fabric is sewn onto the previous ones at an angle, typically starting from a small center square. This French braid quilt block – Pattern is particularly effective for using up “jelly rolls” or leftover strips from other projects, making it an eco-friendly and budget-conscious choice for the modern textile artist.
In the following sections, we will delve deep into the mechanics of the French braid quilt block – Pattern to help you achieve professional results in your home studio. We will define and explain the two core components of this craft: the French braid quilt block, which refers to the individual unit of construction that can be repeated and joined, and the Pattern, which serves as the essential set of instructions, measurements, and templates required to guide your needle. Mastering this French braid quilt block – Pattern will not only sharpen your precision sewing skills but also open up a new world of geometric possibilities for your future quilting endeavors.
1. Preparing Your Materials for the French braid quilt block – Pattern
The first step in successfully executing a French braid quilt block – Pattern is the careful selection and preparation of your fabric. Because the “braid” effect relies on contrast and flow, many quilters choose a color story that moves from dark to light or through the colors of the rainbow. To ensure your French braid quilt block has the best impact, opt for high-quality quilting cotton that won’t fray excessively during the many diagonal seams required by the pattern.
Before you make your first cut, it is vital to starch your fabric. The French braid quilt block – Pattern involves sewing on the bias, which is the diagonal grain of the fabric that tends to stretch. Applying a light layer of starch gives the fabric more stability, ensuring that your French braid quilt block remains flat and square rather than becoming wavy or distorted as you add more strips to the design.
The primary tool you will need for the French braid quilt block – Pattern is a reliable rotary cutter and a long acrylic ruler. Precision is the name of the game here; if your strips vary by even an eighth of an inch, the entire braid will eventually lean to one side. By following the Pattern measurements strictly, you ensure that the central “spine” of your braid stays perfectly aligned from the bottom to the top.
When selecting the center square for your French braid quilt block, consider using a “fussy cut” fabric. This means choosing a specific motif—like a flower or a small animal—to be the focal point at the very start of the braid. This small detail, often suggested in a premium French braid quilt block – Pattern, adds a touch of personality and professional flair that makes your handmade project truly stand out.
Don’t forget the importance of your thread choice. Since a French braid quilt block – Pattern involves many intersecting seams, using a fine but strong 50-weight cotton thread will help reduce bulk. This allows the seams to lay flatter when pressed, which is crucial when you eventually join multiple French braid quilt block units together to form the larger quilt top or a decorative border.
Lastly, ensure you have a large enough workspace to layout your strips before sewing. The French braid quilt block – Pattern is much easier to manage if you can see the color progression laid out in front of you. Organization is key to the French braid quilt block; many quilters find it helpful to label their strips according to the order specified in the Pattern to avoid any confusing color jumps or mistakes.
2. Understanding the Geometry of the French braid quilt block – Pattern
The structural logic of a French braid quilt block – Pattern is based on the repetition of rectangular units around a central square. Unlike a traditional log cabin block that moves in a square spiral, the French braid quilt block moves upward in a “V” shape. Each pair of strips added to the block creates a new chevron-like layer, which is what gives the finished piece its characteristic braided appearance and sense of vertical motion.
To grasp the French braid quilt block – Pattern, you must understand the “anchor” concept. The very first piece is usually a small square, and the subsequent strips are added in a specific sequence—left, then right. This alternating rhythm is what keeps the French braid quilt block symmetrical. If you lose track of the sequence provided in the Pattern, the braid will lose its balance and the visual “flow” will be interrupted.
One technical aspect of the French braid quilt block – Pattern that often surprises beginners is the “extending” nature of the strips. As the braid grows, the strips actually need to be slightly longer or placed differently to cover the expanding width of the block. A well-written Pattern will account for this growth, providing you with the exact dimensions needed so that you aren’t left with gaps at the edges of your French braid quilt block.
Angles play a massive role in the French braid quilt block – Pattern. Most braids are constructed using 90-degree angles for the strips themselves, but they are positioned so that they create 45-degree visual lines. By understanding this geometry, you can manipulate the French braid quilt block to look thinner and longer or wider and shorter, depending on the length-to-width ratio of the strips you choose to use from the Pattern.
The “spine” of the French braid quilt block – Pattern is an imaginary line that runs right through the center of the squares and the meeting points of the strips. Keeping this spine straight is the biggest challenge for many quilters. If your seam allowance isn’t a perfect quarter-inch, the spine of the French braid quilt block will start to curve. Consistency is the most important skill you will develop while following this specific Pattern.
Finally, the French braid quilt block – Pattern usually concludes with a “squaring up” phase. Because the strips are added at angles, the edges of the block will be jagged (resembling a staircase). You will use your ruler to trim these into a straight line. This final step transforms the raw braid into a clean, rectangular French braid quilt block that is ready to be sewn into your final quilt composition.
3. Step-by-Step Construction of the French braid quilt block
To begin the assembly of your French braid quilt block – Pattern, place your starting square right-side up. Take your first strip and align its short end with one side of the square, right sides together. Sew a precise quarter-inch seam. This initial step is the foundation of the French braid quilt block, and taking your time here ensures the rest of the Pattern falls into place without much struggle or need for the seam ripper.
Pressing is the next vital step in the French braid quilt block – Pattern. Always press your seams toward the newest strip added. This prevents shadows from darker fabrics showing through lighter ones and helps the French braid quilt block maintain its structural integrity. Using a dry iron without steam can help prevent the bias edges from stretching out of shape as you move through the Pattern steps.
Now, take your second strip—usually the same color as the first for a symmetrical look—and align it across the top of both the square and the side of the first strip. This is the “interlocking” moment of the French braid quilt block – Pattern. By sewing this second strip, you begin the “V” shape. Each subsequent layer in the French braid quilt block will follow this same left-then-right or right-then-left logic until you reach your desired length.
As you progress through the French braid quilt block – Pattern, you will notice the block getting longer and longer. It is helpful to “pin” the intersections where the strips meet the center line. This prevents the fabric from shifting under the presser foot. A high-quality French braid quilt block should have crisp points where the colors meet, and careful pinning is the best way to honor the precision required by the Pattern.
Once you have added all the strips required by your French braid quilt block – Pattern, your block will look like a long, colorful spearhead. Now comes the trimming. Place your long ruler so that it creates a straight line parallel to the center spine, leaving about a quarter-inch of seam allowance beyond the widest point of the braid. Cutting the sides of the French braid quilt block is a satisfying moment that reveals the true beauty of the Pattern.
The final touch in the French braid quilt block – Pattern construction is often adding “corner triangles” or a “top and bottom border.” These help turn the long braided strip into a standard rectangular or square French braid quilt block. Once these are attached and pressed, you have a finished unit that is ready to be combined with others, creating the stunning, woven effect that makes this Pattern so famous in the world of quilting.
4. Design Variations and Tips for the French braid quilt block – Pattern
One of the most exciting aspects of the French braid quilt block – Pattern is the ability to play with “value.” In quilting, value refers to the lightness or darkness of a fabric. By using a “planned chaos” approach with your French braid quilt block, you can mix scraps of similar values to create a “scrappy braid” that still looks cohesive. This variation of the Pattern is excellent for clearing out your fabric stash while creating something beautiful.
If you want a more modern look for your French braid quilt block – Pattern, try using solid fabrics in a monochromatic scale. Imagine a braid that starts with deep navy and fades into the palest ice blue. This gradient effect emphasizes the “weaving” of the French braid quilt block and makes the Pattern look very architectural and contemporary, fitting perfectly in a minimalist home setting.
Another tip for the French braid quilt block – Pattern is to use “accent strips.” Every three or four rounds, insert a strip of metallic fabric or a high-contrast black-and-white print. This breaks up the visual flow and adds a “sparkle” to the French braid quilt block. It is a simple modification to the standard Pattern that can make a huge difference in the final aesthetic of the quilt.
For those who want a challenge, you can create a “double braid” by joining two French braid quilt block units together so that the “V” shapes point toward each other. This creates a diamond or “herringbone” effect that is absolutely mesmerizing. While it requires more careful alignment of the Pattern pieces, the resulting French braid quilt block is a true showstopper that demonstrates advanced quilting expertise.
The size of the strips you use in your French braid quilt block – Pattern will also change the feel of the project. Using very thin strips (1 inch wide) creates a delicate, intricate French braid quilt block that looks like fine needlework. Using wide strips (2.5 or 3 inches) makes the Pattern work up quickly and creates a bold, graphic look that is perfect for large bed quilts where you want the colors to be seen from a distance.
Finally, always keep a project journal when working with the French braid quilt block – Pattern. Note down the fabric brands and color names you used. Because the French braid quilt block is so addictive to make, you might find yourself wanting to replicate a specific colorway months later. Having the technical details of your Pattern saved will make your future quilting sessions much more productive and enjoyable.
Frequently Asked Questions (FAQ)
Is the French braid quilt block – Pattern suitable for beginners?
Yes, it is considered an “advanced beginner” project. While the sewing is mostly straight lines, the challenge lies in maintaining a consistent quarter-inch seam and handling the bias edges of the fabric. Following a well-explained Pattern makes the process much more manageable for those new to the craft.
How do I prevent the braid from curving?
Curving usually happens due to inconsistent seam allowances or stretching the fabric as you sew. To keep your French braid quilt block straight, use a walking foot on your sewing machine and follow the French braid quilt block – Pattern carefully without pulling on the fabric strips.
Can I use a jelly roll for this pattern?
Absolutely! A jelly roll (a pre-cut bundle of 2.5-inch strips) is perfect for the French braid quilt block – Pattern. It saves you the time of cutting and ensures that all your strips are exactly the same width, which is the most important factor in a successful French braid quilt block.
What is the “spine” of the quilt block?
The spine is the center vertical line where the left and right strips meet. In a high-quality French braid quilt block – Pattern, the spine should be perfectly straight. It acts as the anchor for the entire visual design.
Do I need to use a foundation paper for this block?
While you can use paper piecing, most French braid quilt block – Pattern versions are “traditionally pieced,” meaning you sew the fabric directly to itself. Foundation paper can help with accuracy, but it isn’t strictly necessary if you are careful with your measurements and pins.
How do I calculate how many strips I need?
The amount of fabric depends on the desired length of your French braid quilt block. A standard Pattern will usually give you a “strips per inch” estimate. Generally, a 40-inch long braid made with 2.5-inch strips will require about 20-24 strips per side.
Conclusion
Mastering the French braid quilt block – Pattern is a rewarding experience that combines mathematical precision with artistic color play. We have explored the essential steps, from starched fabric preparation to the final squaring-up process, ensuring you have the tools to create a beautiful French braid quilt block.
By understanding the geometric “V” shape and maintaining a consistent “spine,” you can produce a quilt that captures the eye and demonstrates a high level of craftsmanship. Whether you use a gradient of solids or a wild mix of scraps, the Pattern is flexible enough to accommodate your personal style and skill level.