The Ghost quilt – Pattern is a charming and slightly spooky twist on traditional quilting, perfect for those who love Halloween or simply want to add some playful seasonal decor to their home. With its whimsical ghost motifs, this pattern turns scraps of fabric into cozy, spirited keepsakes that can be used year after year.
This quilt project is beloved not just for its visual appeal, but also for its versatility. Whether you’re making a full-sized quilt, a wall hanging, or a throw for your couch, the Ghost quilt – Pattern is a beginner-friendly yet endlessly customizable craft. With the right color combinations and a bit of creativity, you can create a quilt that’s cute, spooky, and totally unique.
In this article, we’ll guide you through everything you need to know to make your own Ghost quilt – Pattern. From gathering materials to assembling ghost blocks, finishing techniques, and even selling or gifting your creation—we’ve got you covered. Let’s dive into the ghostly fun of this delightful quilt project.
1. Materials and Prep Work for the Ghost Quilt – Pattern
Before you begin stitching your Ghost quilt – Pattern, you’ll need to gather the right supplies. This project doesn’t require complex tools, but having quality materials will help your quilt come together smoothly.
Start by choosing your fabrics. For the ghosts, white or off-white cotton works best. You can also use subtle patterns like polka dots or soft stripes to give your ghosts a unique personality. For the background, consider darker or themed fabrics—black, deep purple, orange, or even Halloween-themed prints add great contrast.
In addition to fabric, you’ll need batting for the middle layer of your quilt and backing fabric for the bottom. Cotton or cotton-blend batting is ideal for this type of quilt, offering just the right amount of warmth and structure.
You’ll also need basic quilting tools: a rotary cutter, cutting mat, quilting ruler, pins or clips, and a sewing machine. If you’re hand sewing, make sure you have strong thread and quality needles. Don’t forget an iron for pressing your seams flat.
A printed or digital Ghost quilt – Pattern template is helpful to keep your block sizes consistent. Most ghost blocks range between 6”x6” to 12”x12”, depending on the final size of your quilt. Choose a size that matches your vision.
Finally, pre-wash and press all your fabrics. This step helps prevent shrinking later and ensures accurate cuts. Once your prep is done, you’re ready to start building your ghostly quilt one block at a time.
2. Constructing the Ghost Quilt Blocks
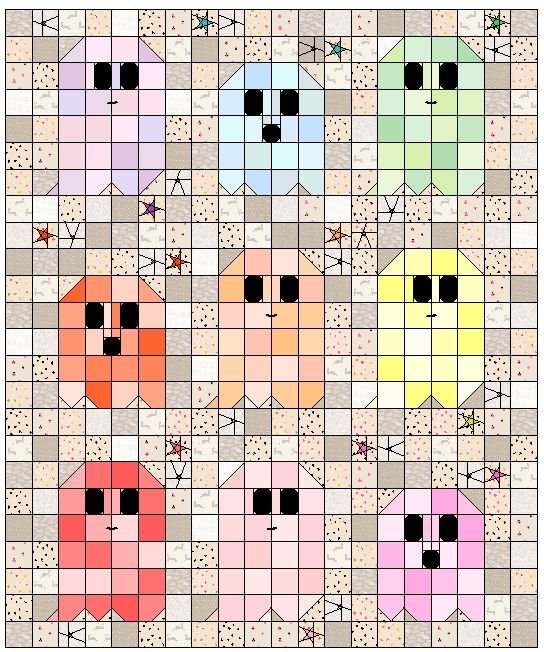
The foundation of the Ghost quilt – Pattern is the ghost block itself. These adorable little figures bring your quilt to life and set the tone for the entire project. Thankfully, they’re easy to construct and fun to personalize.
Start with a background square and build your ghost shape using a combination of white fabric pieces. Ghost shapes are typically simple and cartoon-like, making them perfect for beginners or experienced quilters looking for a quick project.
You’ll need to create the ghost’s “body” using either pieced or appliqué methods. In piecing, you sew small white rectangles or triangles directly into the block. With appliqué, you can cut the ghost shape from a single piece of fabric and stitch it onto the block using a zigzag or blanket stitch.
Don’t forget to give your ghost a face! This is where the magic happens. Use black fabric, buttons, or embroidery thread to create eyes and a mouth. Some quilters even add a small bow tie or rosy cheeks with fabric paint or thread.
Repeat the block creation process multiple times to create a full quilt. Depending on the size, you may need anywhere from 9 to 36 blocks. You can alternate ghost blocks with plain or patterned ones to add variation.
Make sure each block is pressed flat and trimmed to the same size before assembling the rows. Accuracy here is key to a polished final quilt top.
Once all your ghost blocks are finished, lay them out on a flat surface to decide the final arrangement. Play around with different layouts until you find the most visually pleasing design.
3. Assembling and Quilting Your Ghost Quilt – Pattern
Once all your ghost blocks are done and arranged, it’s time to assemble your Ghost quilt – Pattern. This part brings your spooky masterpiece to life as the individual blocks come together in a cohesive layout.
Sew the blocks into rows, making sure to line up corners and seams. Press the seams between each row in alternating directions to reduce bulk and help the rows nest neatly together.
After all rows are completed, sew them together carefully. Use pins or clips to ensure your blocks stay aligned as you stitch across longer seams.
With your quilt top assembled, it’s time to create your quilt sandwich: top layer (ghost blocks), batting in the middle, and backing fabric on the bottom. Lay everything out on a large flat surface, smoothing out any wrinkles.
Use safety pins or basting spray to secure the layers together. This step is crucial to keep your quilt from shifting during sewing.
Now comes quilting! You can quilt by hand or machine. Straight-line quilting works beautifully with this pattern, highlighting the ghosts’ shapes. You could also stitch around each ghost or use free-motion quilting for added personality.
Finally, bind your quilt. Choose a binding fabric that complements the rest of the quilt—perhaps a bold orange or stripe for a festive pop. Machine-stitch or hand-finish your binding, then give your quilt a final press.
4. Decorating, Gifting, and Selling Your Ghost Quilt – Pattern
With your Ghost quilt – Pattern complete, it’s time to enjoy your creation—or share it with others! This quilt is versatile and can be used for home decor, gifts, or even sold at craft fairs or online.
Hang your quilt on a wall as part of your Halloween decorations. Its playful ghosts add warmth and charm to any room, whether it’s the living room, hallway, or a child’s bedroom.
Use it as a throw on your couch or bed during spooky season. It’s the perfect cozy layer for chilly October nights with a cup of cider and a classic Halloween movie.
Gifting the Ghost quilt – Pattern is a heartfelt gesture. Wrap it up with a cute tag that says “Boo-tifully handmade for you!” and give it to a friend, child, or family member. It’s great for fall birthdays or just-because presents.
If you’re crafty and entrepreneurial, consider selling ghost quilts. Handmade Halloween items are in high demand during the fall, especially unique decor like this. Offer custom options, such as names embroidered on ghosts or color variations.
You can also use your ghost block as part of other sewing projects. Turn a single ghost block into a decorative pillow, tote bag, or trick-or-treat sack.
Get kids involved too! Let them design a ghost face or help arrange blocks. It’s a fun way to spend time together and pass on a love for crafting.
FAQ – Frequently Asked Questions About Ghost Quilt – Pattern
Q1: Is the Ghost quilt – Pattern suitable for beginners?
Yes! The ghost shapes are simple, and you can use either basic piecing or appliqué. It’s a great pattern for learning quilting techniques.
Q2: How many blocks do I need for a full quilt?
It depends on the block size. For 12-inch blocks, a 3×4 layout makes a small lap quilt. A 5×6 layout makes a larger throw or twin-sized quilt.
Q3: Can I use Halloween-themed fabrics?
Absolutely. Using spooky or festive prints for the background adds seasonal flair. Just make sure your ghost stands out with contrast.
Q4: What size should each ghost block be?
Most common sizes are 6″x6″, 8″x8″, or 12″x12″. Choose based on how big you want your finished quilt to be.
Q5: What’s the best way to quilt this project?
Straight-line quilting works well, but outlining each ghost adds a lovely touch. You can also use stippling or themed motifs like spiderwebs.
Q6: Can I machine wash the finished quilt?
Yes, if you use washable fabrics and batting. Use cold water, gentle cycle, and tumble dry low or air dry flat to preserve it.
Conclusion
The Ghost quilt – Pattern is a fun, festive, and surprisingly easy way to bring a handmade touch to the Halloween season. With just a bit of fabric and creativity, you can craft something cozy, cheerful, and completely unique. Whether you’re a seasoned quilter or just starting out, this project offers the perfect blend of simplicity and spooky charm.
We hope this guide helped you feel confident and inspired to create your own ghost quilt. If you’ve made one already or have tips to share, please leave a sincere comment below with your thoughts or suggestions for others. Happy haunting and happy quilting!