If you’ve ever admired vintage quilts, you’ve likely encountered the beautiful Grandmother’s Flower Garden pattern.
This timeless design is one of the most beloved patterns in the quilting world, known for its vibrant colors and intricate hexagonal shape.
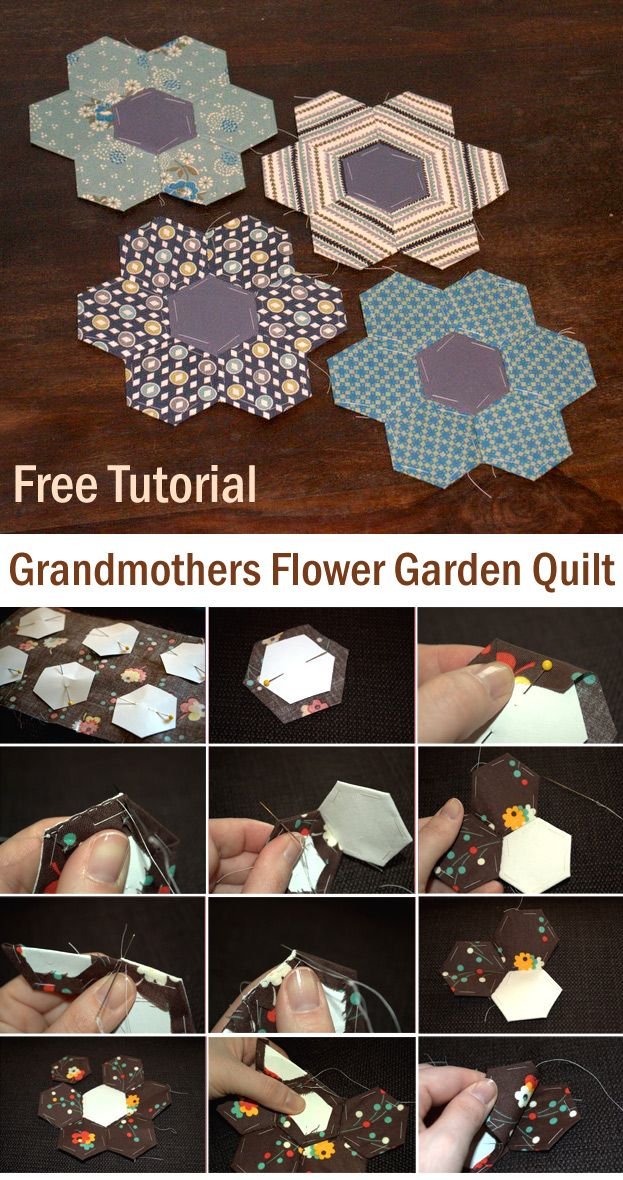
The Grandmother’s Flower Garden Hexagons tutorial will guide you through the process of creating this iconic design step by step, providing a rewarding and enjoyable experience.
The hexagon pattern is made up of small, individual hexagonal pieces that are arranged in a flower-like formation. While it may seem complicated at first, with the right techniques and tools, you can create a stunning quilt that showcases the elegance of this design. In this tutorial, we will walk you through the essential materials, preparation steps, and techniques required to create your own Grandmother’s Flower Garden quilt.
Throughout this article, you’ll find practical advice on how to choose the perfect Grandmother’s Flower Garden Hexagons pattern, tips for cutting and arranging fabric, and stitching techniques to help you achieve precision. Whether you are new to quilting or a seasoned expert, this guide will offer valuable insights into this charming quilting style.
1. Understanding the Basics of the Grandmother’s Flower Garden Pattern
The Grandmother’s Flower Garden Hexagons pattern is a traditional quilting design that has stood the test of time. The pattern is built on a foundation of small hexagonal shapes, often in vibrant, contrasting colors, arranged to create a flower effect. Each “flower” consists of a central hexagon surrounded by six smaller hexagons, and these flowers are repeated throughout the quilt.
The beauty of this pattern lies in its simplicity and versatility. You can use a variety of colors and fabric prints, creating a quilt that reflects your personal style. Some quilters prefer to use soft pastels for a vintage look, while others opt for bold, bright hues for a more modern twist.
Before beginning your quilt, it’s important to familiarize yourself with the key elements of the design. You’ll need hexagonal paper templates or pre-made templates to cut out your fabric pieces. These templates will ensure that your hexagons are uniform in size and shape, making the piecing process much easier.
In addition to the fabric and templates, you’ll need a few basic quilting tools, such as a needle, thread, fabric scissors, and a rotary cutter. Having these tools on hand will make the process smoother and more efficient.
Once you have everything prepared, it’s time to move on to selecting the fabrics for your Grandmother’s Flower Garden Hexagons pattern.
2. Selecting Fabrics for Your Hexagon Quilt
When it comes to creating your Grandmother’s Flower Garden Hexagons quilt, fabric selection is one of the most important decisions you’ll make. The beauty of this pattern lies in the way different fabrics can be combined to create contrast and harmony within the quilt. To achieve a stunning quilt, it’s essential to choose fabrics that complement each other while maintaining a balanced color palette.
You can start by selecting a fabric for the center hexagon of each flower. Many quilters choose a fabric that contrasts with the surrounding petals to make the central hexagon pop. For the outer hexagons, you can use coordinating fabrics that blend seamlessly with the center. The outer pieces can be different colors or patterns, but they should still complement the central fabric to create a cohesive look.
When selecting your fabric, it’s helpful to keep in mind the overall mood or theme you want to achieve. If you’re aiming for a vintage-style quilt, consider using floral or shabby-chic fabrics in soft, muted tones. On the other hand, if you prefer a modern aesthetic, opt for bold, graphic prints and brighter colors.
Additionally, consider the type of fabric you’ll be using. Cotton fabrics are the most common choice for quilting because they are easy to work with and come in a wide range of colors and patterns. Be sure to wash and press your fabric before cutting to remove any wrinkles or shrinkage that could affect the accuracy of your cuts.
Once you’ve chosen your fabric, it’s time to start cutting out the hexagons and preparing them for stitching.
3. Preparing the Hexagons for Stitching
Before you start stitching, you’ll need to prepare your Grandmother’s Flower Garden Hexagons by cutting out the fabric pieces and attaching them to paper templates. If you’re using paper templates, cut them out carefully, ensuring that each hexagon is the correct size. You can either print the templates from a pattern or purchase pre-made templates.
Once you have your paper templates, place them on the fabric and cut out the fabric pieces, making sure to leave a small seam allowance around the edges. This seam allowance will help you fold the fabric neatly over the paper templates when stitching.
Now, there are two main methods you can use to attach the fabric to the paper templates: basting and glue basting. In the basting method, you’ll use a needle and thread to baste the fabric around the edges of the paper, temporarily holding it in place until you’re ready to stitch it to another piece. Alternatively, some quilters prefer to use a fabric glue stick to adhere the fabric to the paper template, which can be a quicker and more efficient method.
After attaching the fabric to the paper templates, carefully press each hexagon to ensure that the fabric is smooth and evenly folded over the paper. This step will make the stitching process easier and give your quilt a neat, polished appearance.
With all your hexagons prepped and ready to go, you can now begin piecing them together.
4. Stitching the Hexagons Together
The final step in creating your Grandmother’s Flower Garden Hexagons quilt is stitching the individual hexagons together to form the overall pattern. This step requires patience and precision, as each hexagon must be sewn together with care to ensure that the quilt lies flat and the seams are aligned.
To begin stitching the hexagons together, start by sewing the hexagons in small rows. Attach the hexagons by hand, using a whip stitch or running stitch along the edges. The whip stitch is ideal for beginners, as it involves taking small stitches along the edge of the fabric and securing the hexagons together. For a more invisible seam, advanced quilters may prefer using a running stitch, where the stitches are placed between the hexagon edges, creating a more seamless connection.
As you sew the hexagons together, take care to ensure that the edges are aligned correctly. It’s essential to stitch the hexagons together with minimal gaps or overlaps, as even small discrepancies can affect the overall appearance of the quilt. To avoid mistakes, use a quilting guide or a ruler to check the alignment as you go along.
Once you’ve pieced together all the hexagons, you can begin assembling the entire quilt. Continue stitching the rows together, and then join the rows to form the final quilt top. Be sure to press the seams as you go to keep the quilt looking neat and flat.
After finishing the top of the quilt, you can add the backing fabric, batting, and quilt it all together. Whether you choose to hand-quilt or machine-quilt, the final steps will bring your Grandmother’s Flower Garden Hexagons quilt to life.
FAQ – Grandmother’s Flower Garden Hexagons
1. What is the Grandmother’s Flower Garden pattern?
The Grandmother’s Flower Garden is a classic quilt pattern made up of hexagonal shapes arranged to resemble flowers. Each flower consists of a central hexagon surrounded by six smaller hexagons, creating a beautiful, vibrant design.
2. What fabric should I use for a Grandmother’s Flower Garden quilt?
Cotton fabric is the most common choice for this type of quilt, as it’s easy to handle and comes in a wide variety of prints and colors. Be sure to choose fabrics that complement each other to create a harmonious and balanced quilt.
3. Can I use a sewing machine instead of hand-stitching?
While hand-stitching is the traditional method for making the Grandmother’s Flower Garden quilt, you can also machine sew the hexagons together if you prefer. However, hand-stitching gives you more control and precision, especially for intricate designs.
4. How do I prepare the hexagons for stitching?
Cut out the fabric pieces and attach them to paper templates, either by basting them with a needle and thread or using fabric glue. Once the fabric is securely attached, press the hexagons to ensure a smooth, even finish before stitching.
5. How long does it take to make a Grandmother’s Flower Garden quilt?
The time it takes to make a Grandmother’s Flower Garden quilt depends on the size of the quilt and your experience level. This project can take anywhere from several weeks to several months, as the process requires patience and attention to detail.
Conclusion
In this Grandmother’s Flower Garden Hexagons Tutorial, we’ve covered the essential steps for creating this beautiful and timeless quilt pattern. From fabric selection to stitching the hexagons together, each stage plays an important role in achieving a stunning result. Whether you’re a beginner or an experienced quilter, the process of making this quilt is rewarding and fulfilling.
We’d love to hear your thoughts! Please share your experiences and suggestions in the comments below. Your feedback helps us continue to provide useful and engaging content for quilting enthusiasts everywhere. Happy quilting!