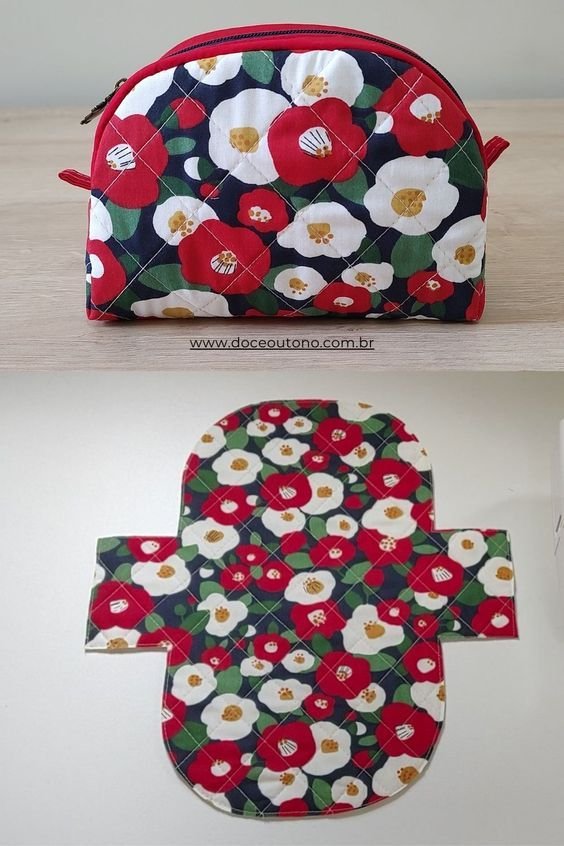
The Half Moon Toiletry Bag – Pattern is a stylish and practical sewing project that combines modern design with everyday functionality.
With its elegant curved shape and compact size, this bag is perfect for holding your daily essentials—whether you’re at home, on the go, or traveling.
The pattern is beginner-friendly, easily customizable, and an ideal gift idea for loved ones who appreciate handmade items.

This pattern stands out for its sleek crescent silhouette, which not only adds a touch of elegance but also makes the bag easy to slip into backpacks, totes, or luggage. Plus, it’s a satisfying make for sewists of all skill levels—whether you’re looking to improve your zipper skills, practice lining a bag, or simply create something beautiful and useful. With the Half Moon Toiletry Bag – Pattern, you can make a practical item that’s both decorative and functional.
In this article, we’ll cover everything you need to successfully create your own Half Moon Toiletry Bag – Pattern. From materials and sewing techniques to creative customization and helpful tips, this guide will ensure your handmade project looks polished and professional. We’ll also include a helpful FAQ section and a detailed conclusion to support you through your crafting journey.
1. Materials and Tools for the Half Moon Toiletry Bag – Pattern
To get started with your Half Moon Toiletry Bag – Pattern, gathering the right materials and tools is crucial. This not only helps simplify the sewing process but also ensures the durability and quality of your finished bag.
First, you’ll need outer fabric. Opt for medium to heavy-weight cotton, canvas, or even faux leather for a sturdy exterior. A fat quarter (18” x 22”) is usually enough. You may also choose to use two coordinating prints—one for the body of the bag and another for the accent or bottom panel.
Next, select a lining fabric. Lightweight cotton works well here. It adds a clean finish to the interior of your bag and protects the seams. Like the exterior, a fat quarter should be sufficient.
To give the bag its shape, you’ll need interfacing or foam stabilizer. Fusible fleece like Pellon 987F or a foam interfacing like Soft and Stable provides structure without adding too much bulk.
The bag uses a zipper closure—typically 9” to 12” long, depending on the size of the pattern. Nylon coil zippers are easier to sew and cut, especially for beginners.
Essential sewing tools include thread, scissors or rotary cutter, pins or clips, seam ripper, measuring tape, and a sewing machine with a zipper foot. An iron is also necessary for pressing seams and applying interfacing.
Finally, consider optional items like a wrist strap, label tags, or embellishments like piping or tassels for extra personality.
2. Step-by-Step Instructions to Sew the Half Moon Toiletry Bag
Creating your own Half Moon Toiletry Bag – Pattern is a satisfying and enjoyable project. The construction process is straightforward, and once you get the hang of it, you’ll likely want to make more for gifting or personal use.
Begin by cutting out your pattern pieces. Most templates include two outer pieces, two lining pieces, interfacing, and a zipper tab if desired. If your pattern includes a gusset or bottom panel, cut those as well.
Apply the interfacing to the wrong side of your outer fabric pieces. This step gives your bag structure and helps it hold its shape. Use an iron according to the interfacing instructions, pressing evenly to avoid wrinkles or bubbles.
Next, install the zipper. Place one outer piece right side up, lay the zipper right side down along the top edge, and then place a lining piece right side down on top of the zipper. Clip or pin everything together, and stitch using a zipper foot. Repeat on the other side of the zipper with the remaining pieces.
Once both sides are attached, topstitch along the zipper for a neat finish. This also keeps the fabric from catching in the zipper during use.
Now, sew the sides and bottom of the bag, aligning the outer and lining pieces right sides together. Leave a small gap in the lining for turning the bag right side out. Be sure to unzip the zipper halfway so you can turn the bag later.
For a more dimensional bag, box the corners or create a bottom gusset if your pattern includes it. This gives the bag extra depth and makes it easier to stand upright when in use.
Finally, turn the bag right side out through the gap in the lining, press the seams, and stitch the lining closed. Give the entire bag a good press, and you’re done!
3. Customization Ideas for Your Half Moon Toiletry Bag
One of the joys of sewing your own Half Moon Toiletry Bag – Pattern is the ability to personalize it completely. Here are some creative ways to make your bag truly one-of-a-kind.
Start by experimenting with fabric choices. Use bold prints, monochrome solids, or mix-and-match patterns to create visual interest. You can even use upcycled denim or old curtains for a sustainable twist.
Add a contrast panel or color block to the bottom or sides of the bag. This technique is not only decorative but also reinforces areas that experience more wear.
Consider sewing on labels, patches, or embroidery to personalize your bag with names, initials, or favorite quotes. This is a great touch for handmade gifts.
Switch up the zipper type and pull tab. Leather pull tabs, beaded zipper pulls, or tassels can elevate the look of your bag and give it a more professional finish.
You can also add a wrist strap or handle for portability. Attach a loop of fabric or use hardware like D-rings and swivel hooks to create a detachable strap.
For a polished inside, add interior pockets to hold small items like lip balm, brushes, or earbuds. A slip pocket or elastic band can keep things secure and organized.
4. Tips for a Professional Finish
To make your Half Moon Toiletry Bag – Pattern look as good as store-bought (or better!), follow these tips for clean lines and sturdy construction.
Take the time to press every seam as you sew. A well-pressed seam not only looks better but also helps with accuracy and reduces bulk in corners.
Use a walking foot if you’re sewing with thicker fabrics or interfacing. This helps feed layers evenly and prevents puckering or shifting.
Trim seam allowances and clip curves before turning your bag right side out. This helps the curved edges lay flat and smooth.
Test your stitch settings on scrap fabric before sewing your final pieces. Adjust tension, stitch length, and needle type as needed to match your fabric and thread.
If you’re nervous about installing the zipper, baste it in place by hand first. This temporary stitch helps keep everything aligned as you sew with the machine.
Don’t forget the finishing touches! A good pressing at the end, a clean label, and removing any stray threads will elevate your bag to professional status.
FAQ – Frequently Asked Questions
1. Is the Half Moon Toiletry Bag – Pattern suitable for beginners?
Yes! This pattern is a great beginner project, especially if you’re looking to practice installing zippers and lining a bag.
2. What size zipper should I use?
A 9″ to 12″ nylon coil zipper works well, depending on the final dimensions of your bag. Check your pattern instructions for the exact size.
3. Can I make the bag larger or smaller?
Yes, you can scale the pattern up or down as long as you maintain proportions. Just remember to adjust your zipper length accordingly.
4. What kind of interfacing should I use?
Fusible fleece like Pellon 987F provides softness and structure, while foam stabilizers like Soft and Stable offer a more padded and professional finish.
5. Can I wash the finished bag?
Yes, if you use washable fabrics and interfacing. Machine wash on a gentle cycle and let it air dry. Avoid putting it in the dryer if you’ve added embellishments or hardware.
6. What other uses does this bag have?
Besides toiletries, this bag can be used as a makeup pouch, pencil case, travel organizer, or even a clutch purse.
Conclusion
The Half Moon Toiletry Bag – Pattern is a versatile and rewarding project that allows you to combine creativity with functionality. From selecting fabrics and sewing the zipper to personalizing the final product, this pattern gives you the opportunity to hone your skills while producing a practical item you’ll use again and again.
We’ve walked through everything you need to know—materials, step-by-step instructions, customization ideas, sewing tips, and a detailed FAQ to guide you through the process. Whether you’re sewing one for yourself or as a thoughtful handmade gift, your finished bag will be a reflection of your creativity and craftsmanship.
If you’ve tried this pattern, we’d love to hear about your experience! Leave a comment with your thoughts, suggestions, or even photos of your finished bag. Your feedback helps inspire others and builds a vibrant, supportive crafting community.


