Bringing festive charm to your dining table is easy and enjoyable with a Halloween Pumpkin Placemats – Pattern. This creative, beginner-friendly sewing project allows you to celebrate Halloween in style while making something useful and decorative. Whether you’re planning a spooky dinner party or just want to add some seasonal fun to your kitchen, these pumpkin-shaped placemats are the perfect solution.
With just a few materials and a dash of creativity, you can transform ordinary fabric into eye-catching, themed placemats that capture the essence of fall. The Halloween Pumpkin Placemats – Pattern can be as simple or detailed as you like—making it ideal for all skill levels. Plus, they’re reusable and easy to store for next year’s spooky season.
In this comprehensive guide, we’ll walk through everything you need to know to create your own Halloween Pumpkin Placemats from start to finish. From selecting fabrics and preparing your templates to stitching, embellishing, and even gift ideas, you’ll find tips to help you craft high-quality, durable placemats that are both festive and functional.
1. Getting Started with Halloween Pumpkin Placemats – Pattern
Before you begin your Halloween Pumpkin Placemats – Pattern, it’s important to gather the right materials and understand the basic design. These placemats are typically shaped like pumpkins, giving them a playful yet practical look perfect for October décor.
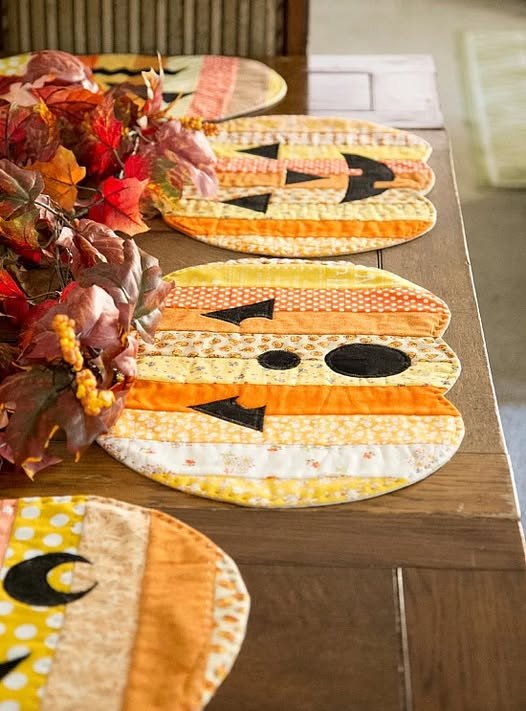
Choose autumn-colored fabrics such as orange, rust, gold, and green. Quilting cottons work great because they’re easy to sew and press, and they come in a variety of patterns—think polka dots, leaves, or even tiny ghosts and spiders. For the pumpkin’s stem, a small piece of green or brown fabric will do just fine.
To make your pattern, you can either download a printable pumpkin placemat template online or draw one yourself. A typical size is around 16″ wide by 12″ tall, giving enough space to hold a plate, utensils, and a napkin comfortably.
Once you have your fabric and pattern ready, trace the pumpkin shape onto the wrong side of the fabric and cut out two identical shapes—one for the front and one for the back. Don’t forget to cut your batting layer as well, which adds thickness and helps protect your table from heat or spills.
Lay out your front fabric, batting, and backing fabric like a sandwich, and pin them together securely. At this point, you can plan your quilting lines. Many people follow the natural ridges of a pumpkin, sewing curved vertical lines to mimic the pumpkin’s segments.
Sew around the edges, leaving a small opening to turn the placemat right side out. Once turned, press it flat, and stitch the opening closed. Your Halloween Pumpkin Placemat is now ready for quilting or additional decoration.
2. Creative Quilting and Decorative Touches
Now that your base placemat is constructed, it’s time to add the quilting and design touches that make your Halloween Pumpkin Placemats – Pattern stand out. Quilting not only holds the layers together but also enhances the visual appeal and texture of your project.
Start by outlining the pumpkin shape with stitching about ¼ inch from the edge. Then, quilt curved lines from the top to the bottom to mimic the natural segments of a pumpkin. Use contrasting thread for a bold effect or matching thread for a more subtle look.
For added dimension, consider using decorative stitches available on your sewing machine. Swirls, zigzags, or even leaf motifs can bring a whimsical Halloween vibe to the project.
Add a small rectangle or curved shape at the top to represent the pumpkin stem. You can stitch this directly onto the placemat or appliqué it for extra detail. A felt or corduroy fabric works well for the stem due to its texture and durability.
If you’re feeling creative, embellish your Halloween Pumpkin Placemats with fabric paint, heat-transfer vinyl, or embroidery. Add jack-o’-lantern faces, spiderwebs, bats, or fun Halloween sayings like “Trick or Treat” or “Spooky Supper.”
Using glow-in-the-dark thread or fabric is another fun idea—especially if you’re hosting an evening Halloween party. It adds a magical touch that your guests (especially kids) will love.
Don’t forget to finish the edges neatly if you’re not turning them inside out. Bias binding in a Halloween print can frame the placemat beautifully and add a nice contrast to the pumpkin shape.
3. Personalization, Variations, and Practical Uses
The beauty of the Halloween Pumpkin Placemats – Pattern lies in how easily it can be customized to fit your style, table setting, or holiday theme. Each placemat can be made to match or intentionally designed with a variety of looks.
Try creating a set with different shades of orange to mimic the natural variety of pumpkins. You can also mix in some white or green pumpkins for a trendy farmhouse aesthetic.
Personalize each placemat with names embroidered on them. This works great for Halloween dinner parties or family meals, turning your placemats into festive place cards.
Use fabric markers or printable fabric sheets to transfer spooky illustrations, ghostly images, or vintage Halloween postcards onto the fabric. These unique designs will make your placemats true conversation starters.
You can also make smaller versions of the pattern to use as coasters, pot holders, or even candy holders. Simply reduce the size of your pumpkin template and follow the same steps.
If you’re crafting for kids, consider using fun novelty fabrics and skipping the quilting step to make it faster. Let kids draw faces on the pumpkins with washable markers so they can personalize them again each year.
Lastly, make your Halloween Pumpkin Placemats reversible by using a fall-themed print on the back. This allows you to flip them over and use them throughout November, getting more use from your handmade creations.
4. Gifting and Display Ideas for Halloween Pumpkin Placemats
The Halloween Pumpkin Placemats – Pattern makes a thoughtful and unique handmade gift. Whether you’re giving a full set or just one as a seasonal gesture, these placemats are sure to be appreciated.
Wrap a stack of pumpkin placemats with a ribbon and pair it with Halloween-themed napkins or utensils for a hostess gift. It’s perfect for friends, neighbors, or teachers who enjoy decorating for the holidays.
Consider making a DIY table runner by joining several pumpkin-shaped placemats end-to-end with buttons or fabric loops. This adds an extra layer of festivity to your Halloween or autumn-themed dining table.
If you run a craft shop or Etsy store, this pattern is great for seasonal inventory. Handmade Halloween Pumpkin Placemats are always in demand around September and October, especially when offered in a variety of colors and sizes.
Use the placemats as part of your Halloween décor display. Place them under jack-o’-lanterns, centerpieces, or candy bowls to tie your theme together and protect your surfaces at the same time.
These placemats also work great as part of a kids’ Halloween table setup. Use them to define each child’s space and make meals or craft time more exciting with their own pumpkin mat.
Hosting a Halloween sewing workshop or group craft day? This pattern is ideal—easy to teach, quick to complete, and super fun to decorate. Each participant can take home a handmade item they’re proud of.
FAQ – Halloween Pumpkin Placemats – Pattern
Q1: What size should Halloween Pumpkin Placemats be?
A standard size is about 16” wide by 12” tall, but you can adjust the pattern based on your table size or desired look.
Q2: What type of fabric works best for this pattern?
Quilting cotton is the most popular choice due to its ease of use and wide range of Halloween-themed prints. Felt and corduroy are great for embellishments like stems.
Q3: Is this project suitable for beginners?
Yes, this is an excellent beginner project. It involves basic cutting, sewing, and optional quilting or decoration—nothing too complex.
Q4: Can I machine wash the finished placemats?
Absolutely! Just make sure all materials used are machine washable, and consider pre-washing your fabrics to prevent shrinking.
Q5: Do I need a special sewing machine or tools?
No special tools are needed. A basic sewing machine, rotary cutter or scissors, pins, and an iron are sufficient to complete the placemats.
Q6: Can I use this pattern for commercial use?
If the pattern is self-drafted or labeled for commercial use by the original designer, yes. Always check licensing terms if you’re using a purchased pattern.
Conclusion
Creating your own Halloween Pumpkin Placemats – Pattern is a fun, festive, and practical way to celebrate the spooky season. Whether you’re crafting for your own table, making gifts, or simply enjoying a relaxing fall afternoon with your sewing machine, this project is both rewarding and easy to complete. From fabric choices and sewing steps to decorating ideas and gift potential, this guide gives you all the tools you need to bring Halloween spirit into your home.
We hope this tutorial has inspired you to try your hand at making some Halloween Pumpkin Placemats this season. If you’ve created your own or followed our guide, we’d love to hear your sincere opinion and see what creative spins you added. Feel free to share suggestions, ideas, or photos in the comments to help fellowmakers enjoy the spooky season in style!