Creating a Hexagon Pincushion – Pattern is one of the most rewarding projects for any sewing enthusiast, combining geometric precision with practical utility. Whether you are a seasoned quilter or a beginner looking to sharpen your skills, this specific design offers a unique aesthetic that stands out in any sewing kit. In this guide, we will explore the intricacies of crafting your own Hexagon Pincushion – Pattern, ensuring that your pins and needles always have a stylish and secure home.
The beauty of a Hexagon Pincushion – Pattern lies in its versatility and the way it utilizes English Paper Piecing (EPP) or standard machine sewing techniques to create a symmetrical masterpiece. Many crafters prefer the hexagon shape because it allows for beautiful fabric scrap utilization, making it an eco-friendly project that turns leftovers into treasure. By following a structured Hexagon Pincushion – Pattern, you can experiment with color theory, mixing vibrant prints with solid tones to create a visual “flower” or a modern geometric mosaic.
Beyond the aesthetics, the Hexagon Pincushion – Pattern serves as an essential tool for organization and safety in your craft room. A well-stuffed pincushion protects your delicate needles from becoming dull and prevents stray pins from ending up on the floor. In the following sections, we will break down the essential components of this sewing pattern, from selecting the right notions to the final stuffing process, providing you with all the knowledge needed to master this timeless DIY sewing project.
1 Understanding the Hexagon Pincushion – Pattern Basics
To begin your journey, you must understand that the Hexagon Pincushion – Pattern is built upon the foundation of six-sided geometry. This shape is iconic in the quilting world, often referred to as a “hexie,” and it provides a sturdy structure for a 3D object like a pincushion. When you download or draw your Hexagon Pincushion – Pattern, you are looking for a template that ensures all sides are of equal length, which is crucial for the pieces to align perfectly during assembly.
The primary term Hexagon Pincushion – Pattern refers to the blueprint or template used to cut your fabric pieces. This pattern usually consists of two large hexagons for the top and bottom, or a series of smaller hexagons sewn together to form a larger surface. Having a precise sewing template is the secret to avoiding puckered seams or an uneven shape once the item is filled with stuffing.
When we talk about the Pattern aspect, we are referring to the instructional steps that guide you through seam allowances and assembly. A good Hexagon Pincushion – Pattern will specify a standard 1/4 inch seam allowance, which is the industry gold standard for quilting. This ensures that your finished project doesn’t shrink too much and maintains its structural integrity over years of use.
Choosing the right fabric for your Hexagon Pincushion – Pattern is just as important as the design itself. Most experts recommend 100% cotton fabric because it is easy to press and doesn’t slip while you are sewing. Since the hexagon involves several corners and points, using a stable material like quilting cotton makes the process much smoother for those new to geometric sewing.
Another key element of the Hexagon Pincushion – Pattern is the scale. You can create a “mighty” large pincushion for heavy-duty upholstery pins or a tiny, delicate one for fine silk pins. The printable PDF pattern usually offers various sizes, allowing you to customize your project based on your specific needs or the amount of fabric remnants you have available in your stash.
Finally, the Hexagon Pincushion – Pattern often incorporates decorative elements like tufting or center buttons. This isn’t just for looks; a center button pulled tight through the middle gives the hexagon its “dimpled” look, which helps the pincushion sit flat on your sewing table. Understanding these structural nuances will help you appreciate the thought that goes into a well-designed sewing tutorial.
2 Materials and Tools for Your Hexagon Project
Before you dive into the sewing, you need to gather the right tools to bring your Hexagon Pincushion – Pattern to life. Quality thread, preferably a 40wt or 50wt cotton, is essential for strong seams that won’t pop when you stuff the cushion tightly. You will also need a pair of sharp fabric shears or a rotary cutter and a cutting mat to ensure your hexagon edges are crisp and straight.
The most vital “hidden” material in a Hexagon Pincushion – Pattern is the filling. While polyester fiberfill is common, many professional sewists prefer crushed walnut shells or emery sand. These heavier fillings provide weight, so the pincushion doesn’t slide around, and the abrasive nature of the shells actually helps to keep your pins sharp and clean every time you poke them in.
For marking your fabric according to the Hexagon Pincushion – Pattern, use a water-soluble pen or tailor’s chalk. Accurate marking is the difference between a hexagon that looks like a circle and one with crisp, defined points. If you are using the English Paper Piecing method, you will also need hexagon paper templates and a temporary glue pen to secure the fabric around the paper before stitching.
Don’t forget the importance of a good iron and pressing mat. In any Hexagon Pincushion – Pattern, pressing your seams is non-negotiable. Because hexagons have many intersecting seams at the center, pressing them flat (or in a circular “twirl” motion) reduces bulk. This makes it much easier to sew the final pieces together without breaking a needle on your sewing machine.
If you want to add a professional touch to your Hexagon Pincushion – Pattern, consider adding a fabric loop or a magnet. Some modern patterns include a small side tab so you can hang the pincushion or attach it to your sewing machine. These small haberdashery additions turn a simple project into a highly functional piece of equipment for your craft room organization.
Lastly, keep a set of hand sewing needles nearby. While most of the Hexagon Pincushion – Pattern can be constructed by machine, the final closure is usually done by hand using a ladder stitch (also known as an invisible stitch). This ensures that the opening used for stuffing is completely hidden, giving your handmade pincushion a high-end, store-bought finish.
3 Step-by-Step Construction Techniques
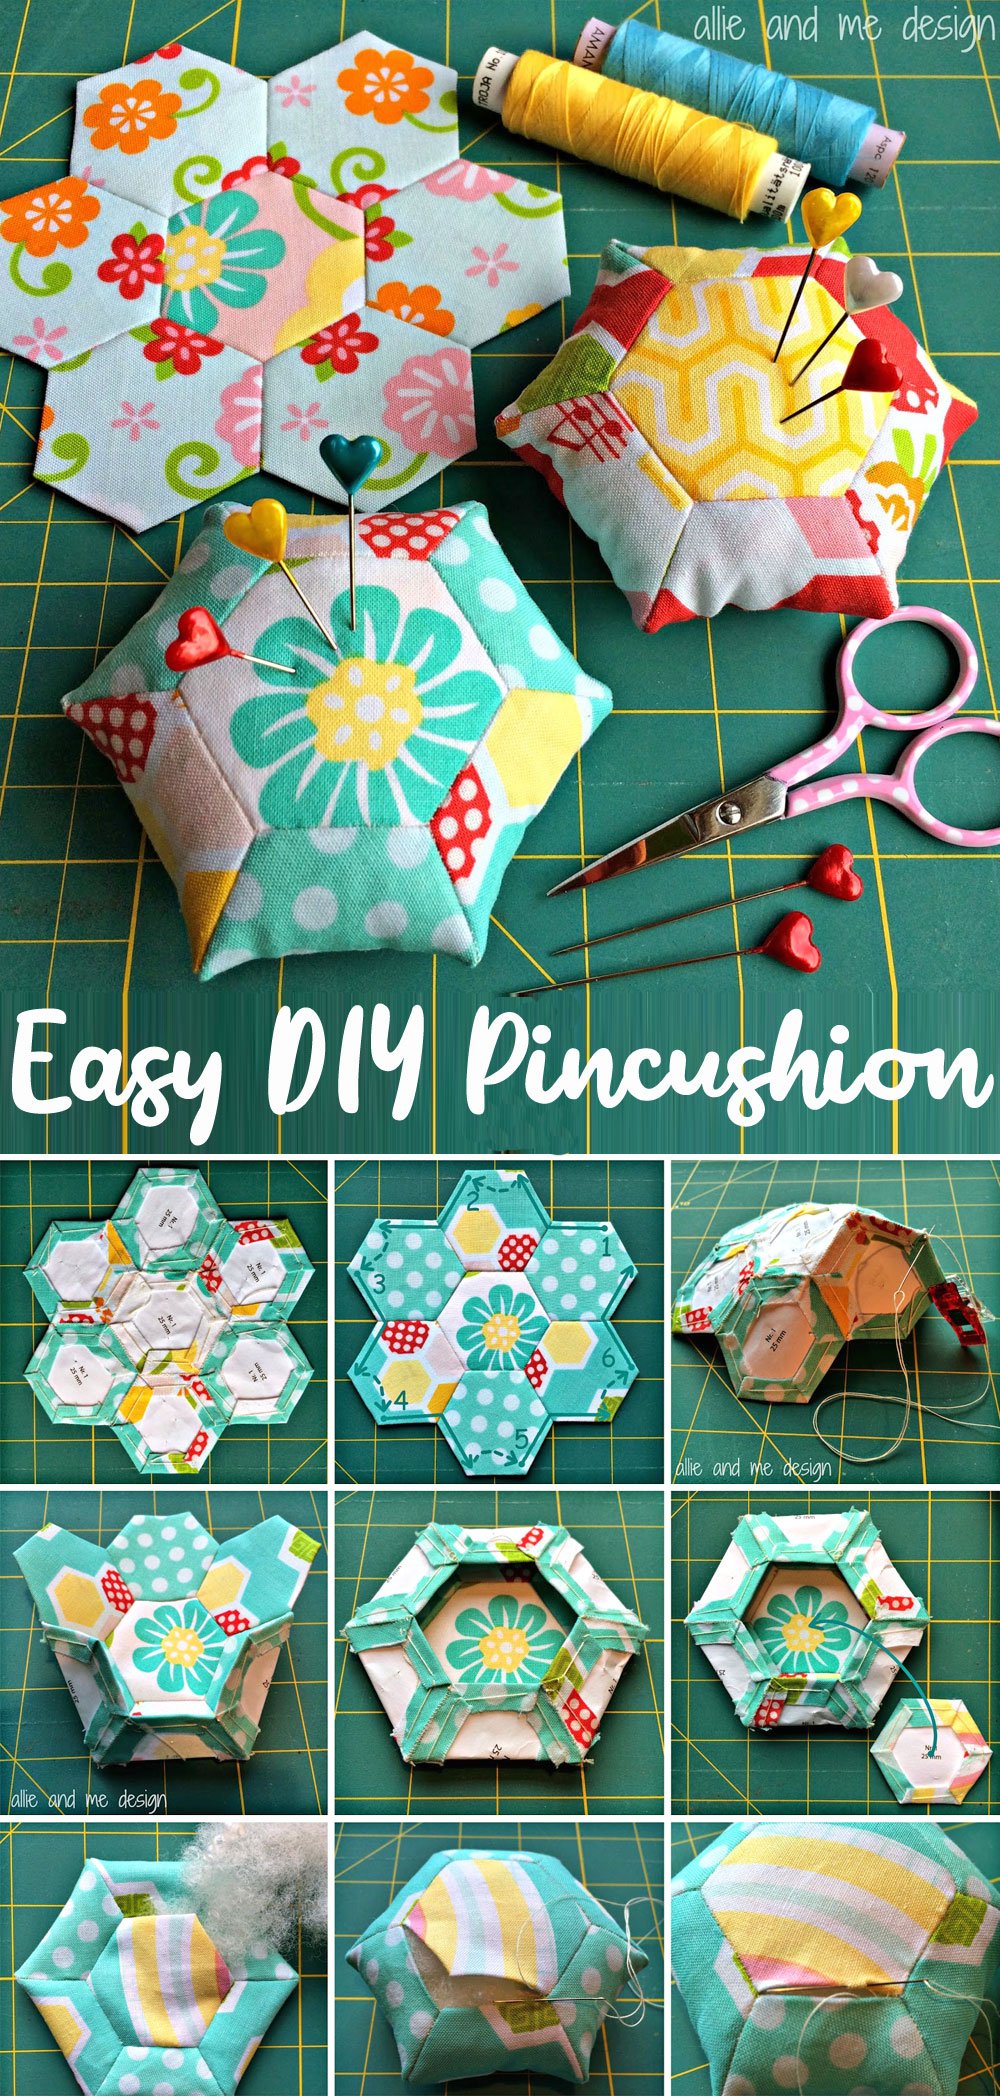
The first step in executing the Hexagon Pincushion – Pattern is the cutting phase. You will typically cut two identical hexagons for a simple version, or seven smaller hexagons if you are making a “Grandmother’s Flower Garden” style top. Precision here is key; even a millimeter off can cause the geometric alignment to fail when you reach the final side, so take your time with your cutting tools.
Once your pieces are ready, align the right sides of the fabric together. If your Hexagon Pincushion – Pattern involves multiple small hexies, you will join them row by row. For the standard two-piece cushion, you sew around the perimeter but must leave a 2-inch gap on one of the flat sides. This gap is essential for turning the project right side out and for inserting your chosen stuffing material.
After sewing, it is time to clip your corners. In a Hexagon Pincushion – Pattern, the points of the hexagon contain extra fabric that can cause bulk. By carefully snipping the excess fabric near the points (without cutting your stitches), you ensure that when you turn it right side out, the points of the hexagon are sharp and well-defined rather than rounded and lumpy.
Now comes the most satisfying part of the Hexagon Pincushion – Pattern: the stuffing. To get a firm, professional result, add your filling in small clumps rather than one large ball. Use a stuffing tool or a chopstick to push the fill into the furthest corners of the hexagon. A well-stuffed pincushion should be firm to the touch; if it’s too soft, your pins will just sink in and get lost.
Closing the gap requires a bit of patience. Using a matching thread, use the blind stitch technique to seal the opening of your Hexagon Pincushion – Pattern. This step is what separates amateur work from expert craftsmanship. Keep your stitches small and tight to ensure that the filling (especially if using fine grain like walnut shells) doesn’t leak out over time.
To finish the Hexagon Pincushion – Pattern, many crafters add a “tuft” in the center. Take a long needle and heavy-duty thread, go through the center from top to bottom, and pull tightly. This creates a beautiful indentation. You can cover the center points with a decorative button or a small felt circle, which adds a wonderful focal point to your finished handmade sewing accessory.
4 Advanced Tips for SEO and Customization
If you are sharing your Hexagon Pincushion – Pattern online, remember that Search Engine Optimization is your best friend. Using keywords like free sewing pattern, DIY pincushion, and quilting for beginners helps other makers find your work. Visuals are also vital; high-quality photos showing the stitch detail and the texture of the fabric can significantly increase the reach of your project on social media and blogs.
Customization is where you can truly make the Hexagon Pincushion – Pattern your own. Consider using embroidery stitches like the French knot or a lazy daisy on each of the hexagon panels. This adds a layer of “slow stitching” charm that is very popular in the current cottagecore and handmade movement trends. Adding a bit of lace trim around the edges can also give it a vintage flair.
For those interested in the technical side, you can scale the Hexagon Pincushion – Pattern using digital software or a simple photocopier. Increasing the size by 200% can turn this pattern into a hexagonal floor pouf or a decorative throw pillow. The geometric principles remain exactly the same, proving just how foundational and versatile the hexagon shape is in the world of design.
In terms of SEO best practices, ensure your article or blog post includes alt-text for images describing the Hexagon Pincushion – Pattern. This not only helps with Google rankings but also makes your content accessible to the visually impaired community. Mentioning specific fabric brands or tool manufacturers can also help you show up in more specific search queries related to sewing supplies.
If you’re making these to sell at craft fairs, the Hexagon Pincushion – Pattern is a high-margin item. Because it uses so little fabric, your “cost of goods” is very low, but the perceived value of a hand-stitched geometric pincushion is quite high. Packaging them with a few high-quality glass-head pins makes for a perfect gift set for any hobbyist or professional dressmaker.
Finally, always keep a master copy of your Hexagon Pincushion – Pattern on cardstock. Paper templates wear out quickly with repeated use, but a sturdy template will allow you to cut dozens of hexies with consistent accuracy. Whether you are making one for yourself or a hundred for your online shop, consistency is the hallmark of a great textile artist and a successful creative entrepreneur.
FAQ – Frequently Asked Questions
1. What is the best filling for a Hexagon Pincushion?
The best filling depends on your needs. For weight and needle sharpening, crushed walnut shells are excellent. For a lightweight, soft feel, use high-quality polyester fiberfill. Some even use wool roving, as the natural lanolin in the wool helps prevent needles from rusting.
2. How do I make sure the points of my hexagon are sharp?
To get sharp points, you must be precise with your seam allowance. When you reach a corner, stop your sewing machine with the needle down, lift the presser foot, and pivot the fabric. Additionally, clipping the excess fabric at the corners before turning it right side out is essential.
3. Can I sew a Hexagon Pincushion – Pattern by hand?
Absolutely! In fact, many people prefer hand sewing for this project using the English Paper Piecing (EPP) method. It allows for greater control and is a very relaxing, portable craft you can do while watching TV or traveling.
4. What size should my Hexagon Pincushion be?
A standard, comfortable size is usually between 4 to 6 inches in diameter. This provides enough surface area for a variety of pins without taking up too much space on your sewing table. However, the Hexagon Pincushion – Pattern can be scaled to any size.
5. How do I clean my handmade pincushion?
Because of the filling, you cannot usually put a pincushion in the washing machine. It is best to spot clean the fabric with a damp cloth and mild soap. If you used walnut shells or sand, getting the filling wet could cause clumping or mold, so keep it dry!
Conclusion
In this article, we have explored everything you need to know about creating a beautiful and functional Hexagon Pincushion – Pattern. We covered the basic geometric principles, the essential materials like fabric shears and filling, and the step-by-step construction techniques needed to achieve sharp points and a professional finish.
We also touched on how to optimize your project for the web using SEO strategies and how to customize your design with embroidery and different scales. Mastering this pattern is a rite of passage for many crafters, offering a perfect blend of utility and artistic expression.