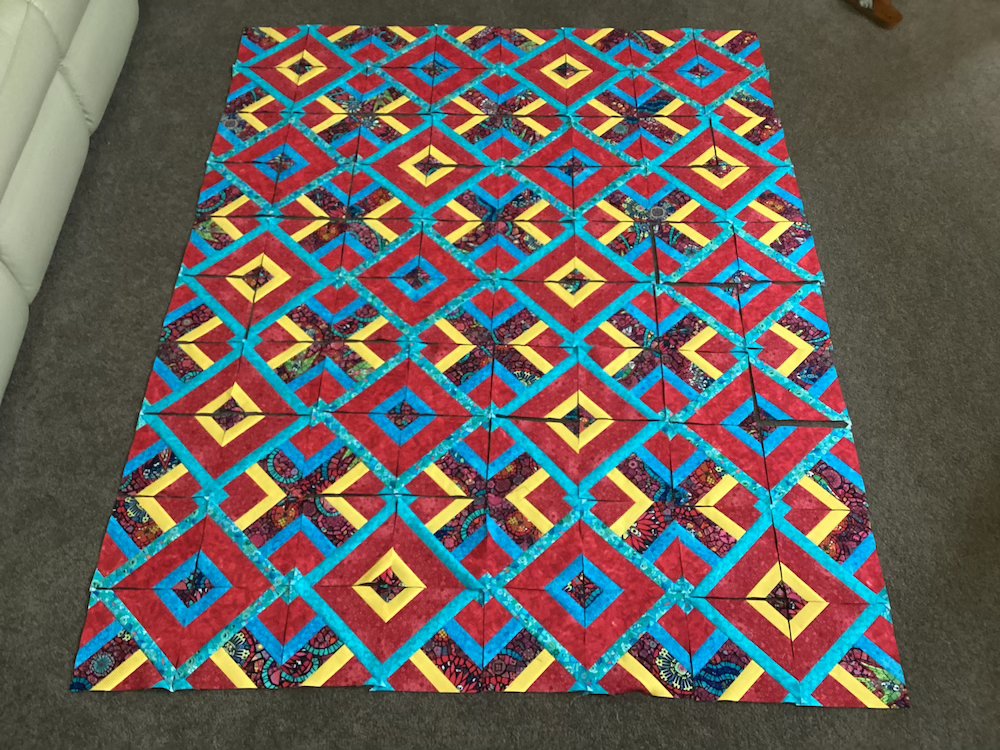
The Hidden Wells Quilt – Pattern is an extraordinary example of how simple strip piecing can be transformed into a complex, optical illusion that captivates the eye and challenges the mind. For many quilters, the initial appeal of this specific design lies in its mysterious appearance; it looks as though intricate curved shapes are emerging from within the fabric, yet it is constructed entirely with straight lines. This “magic” is achieved through a clever process of layering, cutting, and rotating fabric strips, making the Hidden Wells Quilt – Pattern a favorite for those who want to achieve a high-impact look without the stress of difficult curved seams.
Historically, the Hidden Wells Quilt – Pattern has been celebrated as a “deceptively easy” project that allows for incredible color play. By selecting a palette that ranges from light to dark, you create the necessary contrast that makes the “wells” appear to recede or pop out of the quilt top. It is a fantastic stash-buster, but it also shines when using coordinated fabric collections where the prints complement one another. Whether you are aiming for a traditional heritage look or a sharp, modern geometric aesthetic, this quilt pattern provides a versatile canvas for your artistic expression.
In this detailed exploration, we will guide you through the technical nuances of the Hidden Wells Quilt – Pattern, from the initial fabric selection to the final assembly of the blocks. We will discuss why precision in your seam allowance is the key to success and how the “cut and flip” method creates the stunning secondary designs that define this style. By the time you finish reading, you will have a deep understanding of why the Hidden Wells Quilt – Pattern remains a staple in the quilting community and how you can master it in your own sewing room. Let’s dive into the fascinating world of layered strip piecing and visual depth.
1. Selecting the Perfect Fabric for Your Hidden Wells Quilt – Pattern
The success of a Hidden Wells Quilt – Pattern depends heavily on the value of the fabrics you choose. Value refers to the lightness or darkness of a color, and in this specific design, you need a clear progression from one extreme to the other. If your fabrics are too similar in tone, the “well” effect will be lost, and the quilt will look like a jumble of squares rather than a structured optical illusion quilt. Most quilters find that using five to six different fabrics provides the best depth for the final blocks.
Texture and print scale also play a significant role in how the Hidden Wells Quilt – Pattern develops. Small-scale prints, solids, or “read-as-solids” like batiks are generally the best choices because they don’t distract from the geometric lines created by the piecing. A very large floral print might get chopped up in a way that looks messy once you start the secondary cutting process, so it is often better to stick with subtle patterns that enhance the geometric quilt design rather than competing with it.
Color theory is your best friend when planning a Hidden Wells Quilt – Pattern. Many successful versions of this quilt use a “rainbow” effect or a monochromatic gradient. For instance, moving from a deep navy to a sky blue and finally to a crisp white creates a striking “well” that looks like it is illuminated from within. Using a fabric color wheel can help you pick complementary colors that will make the intersection of the blocks look intentional and professional.
Don’t overlook the importance of fabric quality when starting your Hidden Wells Quilt – Pattern. Since this technique involves several rounds of cutting and re-sewing, you need a high-quality quilting cotton that won’t fray excessively. A “tight weave” fabric will hold its shape much better during the “on-the-bias” handling that sometimes occurs in complex quilt patterns. Pre-washing is a personal choice, but ensuring all your fabrics have the same shrinkage rate is vital for the blocks to lay flat.
When calculating your yardage for the Hidden Wells Quilt – Pattern, always account for a little extra. The strip-piecing method is efficient, but because you are cutting the blocks down and then rotating them, there is a bit more “waste” than in a simple charm square quilt. Having an extra quarter-yard of your favorite accent fabric ensures that if you make a mistake during the secondary cutting phase, you won’t have to scramble to find a matching print mid-project.
Lastly, consider the “focal point” of your Hidden Wells Quilt – Pattern. Some quilters like to use a bold, dark fabric for the very center strip, while others prefer a bright, light “glow” in the middle. This choice will determine if your wells look like they are deep pits or rising pyramids. Visualizing the final quilt layout before you sew your first strip set will save you a lot of time and help you achieve the exact mood you want for your finished piece.
2. The Step-By-Step Logic of Strip Piecing and Layering
The first stage of the Hidden Wells Quilt – Pattern is creating your “strata” or strip sets. You will sew long strips of fabric together in a specific order, usually starting with your darkest color on the outside and moving toward the lightest in the center, or vice versa. The most important tip here is to use a consistent 1/4-inch seam allowance. If your seams vary, the strips won’t line up correctly when you move to the next phase of the quilting process, leading to misaligned “wells.”
Once your strip sets are sewn, you will cut them into squares. The size of these squares depends on the width of your original strips. For example, if you used 2.5-inch strips, your resulting squares will be a specific size that must be perfectly square. Using a rotating cutting mat and a high-quality acrylic ruler is essential during this part of the Hidden Wells Quilt – Pattern construction. Precision at this stage ensures that the diagonal lines of the finished quilt meet perfectly at every intersection.
The truly unique part of the Hidden Wells Quilt – Pattern is the layering. You take two of your identical strip-set squares, place them right sides together, but rotate the top one 90 degrees. You then sew all the way around the four edges of the square. This “envelope” method is what sets the Hidden Wells design apart from other strip quilts. It creates a pocket that, when cut diagonally, reveals the hidden layers of fabric inside.
After sewing the perimeter, you make two diagonal cuts from corner to corner, creating four “triangle” units. When you open these triangles and press them flat, you will see the magic of the Hidden Wells Quilt – Pattern for the first time. The strips that were once horizontal or vertical have now become angled, creating a square-within-a-square effect. This is the moment where the quilt block truly comes to life, showing off the “hidden” depths of your fabric selection.
Pressing is a critical “technique within a technique” for the Hidden Wells Quilt – Pattern. Because you are dealing with diagonal seams, the fabric can easily stretch out of shape. Always “press” by lifting the iron up and down rather than “ironing” with a sliding motion. Using a bit of best press or starch can help stabilize the bias edges, ensuring that your blocks stay perfectly square as you prepare to sew them into the final quilt top.
The final step in the block construction of the Hidden Wells Quilt – Pattern is arranging the four units back into a large square. By rotating these units, you can create different secondary patterns—some look like concentric diamonds, while others look like woven ribbons. This flexibility is what makes the Hidden Wells Quilt – Pattern so addictive; you can play with the layout on your design wall until you find the arrangement that creates the most powerful visual impact.
3. Mastering the Secondary Designs and Layout Variations
One of the most exciting aspects of the Hidden Wells Quilt – Pattern is that one set of blocks can yield several different final looks. The “Standard Well” layout creates a series of concentric squares that seem to recede into the distance. However, if you shift the orientation of the blocks, you can create a “Chevron” or “Zig-Zag” effect across the quilt top. This versatility allows you to make multiple quilts from the same pattern that all look completely different.
Adding a “sashing” between the blocks can drastically change the appearance of your Hidden Wells Quilt – Pattern. Sashing acts like a frame, separating the busy geometric intersections and giving the eye a place to rest. If you choose a sashing color that matches the outer strip of your blocks, the “wells” will look like they are floating on a solid background. This is a popular technique for modern quilters who want a cleaner, more minimalist aesthetic.
The size of your strips also dictates the “intensity” of the Hidden Wells Quilt – Pattern. Using narrow 1.5-inch strips will result in a very intricate, high-detail quilt with many “layers” in the well. Conversely, using wider 3.5-inch strips creates a bolder, more graphic look that comes together much faster. Beginners often find that wider strips are easier to manage, while advanced quilters enjoy the challenge of the fine lines produced by narrower strips.
Borders are another way to customize your Hidden Wells Quilt – Pattern. Since the center of the quilt is very geometric, a wide, solid border can help anchor the design. Some people like to use a “pieced border” that incorporates scraps from the internal strips, which ties the whole quilt design together. A dark outer border often acts like a “shadow box,” further enhancing the 3D illusion of the hidden wells.
Don’t be afraid to experiment with the number of fabrics in your Hidden Wells Quilt – Pattern. While five or six is standard, you can do a “high contrast” version with just three fabrics (Black, Grey, White) for a very sharp, architectural look. The “wells” in a three-fabric version are extremely prominent and can look like a series of architectural tunnels. This is a great way to practice value without getting overwhelmed by too many color choices.
Finally, consider the “Negative Space” in your Hidden Wells Quilt – Pattern. By using a light “background” fabric as one of your strips, you can create areas of the quilt that feel open and airy. This is particularly effective if you plan on doing intricate machine quilting or longarm designs, as the solid areas will show off the thread work beautifully, adding another layer of texture to the already complex fabric design.
4. Troubleshooting Common Issues and Finishing Your Masterpiece
If your blocks are coming out lopsided in your Hidden Wells Quilt – Pattern, the issue is almost always “bias stretch.” Because the final blocks have diagonal seams, the fabric is cut on the grain that stretches the most. To prevent this, handle the pieces as little as possible once they are cut. Many experts recommend using fabric stabilizer or heavy starch before you even sew your first strip set to give the cotton more “paper-like” rigidity throughout the Hidden Wells process.
Another common hurdle is “blunted points.” This happens when the corners of your interior squares get cut off in the seam allowance. To avoid this in your Hidden Wells Quilt – Pattern, always sew with your needle just a hair to the right of the intersection of the seams. This “scant quarter inch” allows for the fold of the fabric and ensures your points stay sharp and crisp, which is vital for maintaining the geometric precision of the design.
Squaring up your blocks is a non-negotiable step for a professional-looking Hidden Wells Quilt – Pattern. No matter how careful you are, the “sew-around-and-cut-diagonal” method can result in blocks that are slightly off. Use a large square ruler to trim every block to the exact same size before you join them into rows. This extra 20 minutes of work will save you hours of frustration when trying to get your quilt rows to line up perfectly.
When it comes to quilting the finished top of your Hidden Wells Quilt – Pattern, “Stitch in the Ditch” is a classic choice that highlights the geometric lines. However, if you want to add more movement, a “spiral” quilting design can complement the “well” theme perfectly. The contrast between the straight lines of the quilt piecing and the circular lines of the quilting creates a stunning tactile experience that enhances the overall quilt artistry.
Choosing the right batting for your Hidden Wells Quilt – Pattern is also important. A low-loft cotton batting will keep the quilt flat and crisp, which suits the geometric nature of the design. If you want a more “puffy” look that emphasizes the 3D effect, a wool or polyester blend can add that extra dimension. The batting you choose will influence how much the quilt’s texture stands out against the visual illusion of the pattern.
Lastly, the binding provides the final frame for your Hidden Wells Quilt – Pattern. A “bias binding” in the darkest color used in the quilt is a sophisticated way to finish the edges. It draws the eye inward and provides a durable edge for a quilt that is meant to be used and loved. Following these finishing tips ensures that your handmade quilt isn’t just a beautiful design on paper, but a high-quality heirloom that will stand the test of time.
FAQ – Frequently Asked Questions
Is the Hidden Wells Quilt – Pattern suitable for beginners?
Yes, it is considered an “Intermediate-level” project that is accessible to “Confident Beginners.” If you can sew a straight line and keep a consistent seam allowance, you can make this quilt. The most challenging part is the organization of the blocks and resisting the urge to stretch the bias edges.
How many fabrics do I need for this pattern?
Most Hidden Wells Quilt – Pattern instructions recommend between 5 and 7 different fabrics. The key is to have a clear “gradient” from light to dark. Using too few fabrics can make the design look flat, while too many can make the “well” effect difficult to distinguish.
Can I use “Jelly Rolls” for a Hidden Wells Quilt – Pattern?
Absolutely! Jelly Rolls (pre-cut 2.5-inch strips) are perfect for this project. They save a significant amount of cutting time and usually come in coordinated color stories, which makes the task of picking “light to dark” values much easier for the quilter.
Why do they call it a “Hidden Wells” quilt?
It is called “Hidden Wells” because the final blocks look like deep square wells or fountains. The “hidden” part refers to the construction method, where the final design is hidden within a layered square until you make the final diagonal cuts to reveal it.
What is the best size for a Hidden Wells Quilt?
This pattern is extremely scalable. You can make a small “baby quilt” with just 12 blocks, or a large “king-size” spread by simply making more strip sets. Because the blocks are usually large (10-12 inches), the quilt top grows very quickly once you start assembling the rows.
Do I need any special tools for this pattern?
While not strictly required, a rotating cutting mat and a 12.5-inch square acrylic ruler will make your life much easier. These tools allow you to trim and cut your diagonal lines without having to move the fabric, which prevents the bias edges from stretching or distorting.
Conclusion
The Hidden Wells Quilt – Pattern remains one of the most rewarding projects in the quilting world because of its high-impact visual results and ingenious construction. We have explored the critical importance of color value, the technical steps of the “envelope” sewing method, and the various ways you can arrange your finished blocks to create unique secondary designs.
Whether you use pre-cuts or pull from your own stash, the key to a stunning Hidden Wells masterpiece lies in your precision and your willingness to play with layout. By following the tips on bias management and squaring up your blocks, you will create a quilt that looks like a complex work of art but was actually a joy to sew.