Creating a Homemade conical cat collar made of fabric- Pattern is one of the most rewarding DIY projects for pet owners who want to combine recovery comfort with a personal touch. When our feline friends undergo surgery or suffer from skin irritations, the traditional plastic “cone of shame” can be stressful, heavy, and noisy, often leading to more anxiety for the animal. By choosing to craft a Homemade conical cat collar made of fabric- Pattern, you are providing a soft, breathable, and flexible alternative that allows your cat to eat, sleep, and move with much greater ease while still preventing them from reaching their wounds.
Understanding the mechanics of a Homemade conical cat collar made of fabric- Pattern is essential for ensuring it serves its medical purpose effectively. Unlike rigid plastic versions, a fabric cone uses layers of interfacing or foam to maintain its shape, offering a “buffer zone” that is firm enough to stop licking but soft enough to act as a pillow. This guide will walk you through every step of the process, from selecting the right textiles to following a precise pattern that fits your cat’s unique measurements perfectly, ensuring a professional and safe result.
In this comprehensive tutorial, we will explore the nuances of the Homemade conical cat collar made of fabric- Pattern to help you achieve a high-quality finish. We will focus on the two primary components of your project: the Homemade conical cat collar made of fabric, which refers to the physical soft recovery device, and the Pattern, which is the technical blueprint or template used to cut the fabric to the correct dimensions. By the end of this article, you will have all the knowledge necessary to sew a custom medical aid that is both functional and aesthetically pleasing for your beloved pet.
1. Selecting the Best Materials for a Homemade conical cat collar made of fabric
The foundation of any successful Homemade conical cat collar made of fabric lies in the quality and type of materials you choose to use. Since this item will be in constant contact with your cat’s neck and fur, it is vital to select 100% cotton fabric or soft flannel to prevent skin irritation and ensure breathability. Avoid synthetic materials that might trap heat or cause static, as these can make a recovering cat even more uncomfortable during their healing process.
To give your Homemade conical cat collar made of fabric its necessary structure, you will need a specialized stabilizer. Many DIY enthusiasts prefer using a heavyweight fusible interfacing or a thin layer of flexible foam padding between the fabric layers. This internal support ensures the cone doesn’t just flop down, which would defeat the purpose of the Homemade conical cat collar made of fabric- Pattern by allowing the cat to reach the prohibited area.
Safety is a priority, so ensure all your notions and threads are high-quality and durable. You will need strong polyester thread to withstand the tension of a cat trying to remove the collar. Additionally, consider the closure method for your Homemade conical cat collar made of fabric- Pattern; Velcro strips or plastic snap buttons are the most popular choices because they allow for quick removal in case of an emergency while remaining secure during daily wear.
Don’t forget the importance of washability when picking your supplies for the Homemade conical cat collar made of fabric. Cats can be messy, and wound drainage or food spills are likely to occur during the recovery period. Pre-washing your fabric is a crucial step in the Homemade conical cat collar made of fabric- Pattern workflow to prevent the finished product from shrinking or warping after the first time it hits the laundry machine.
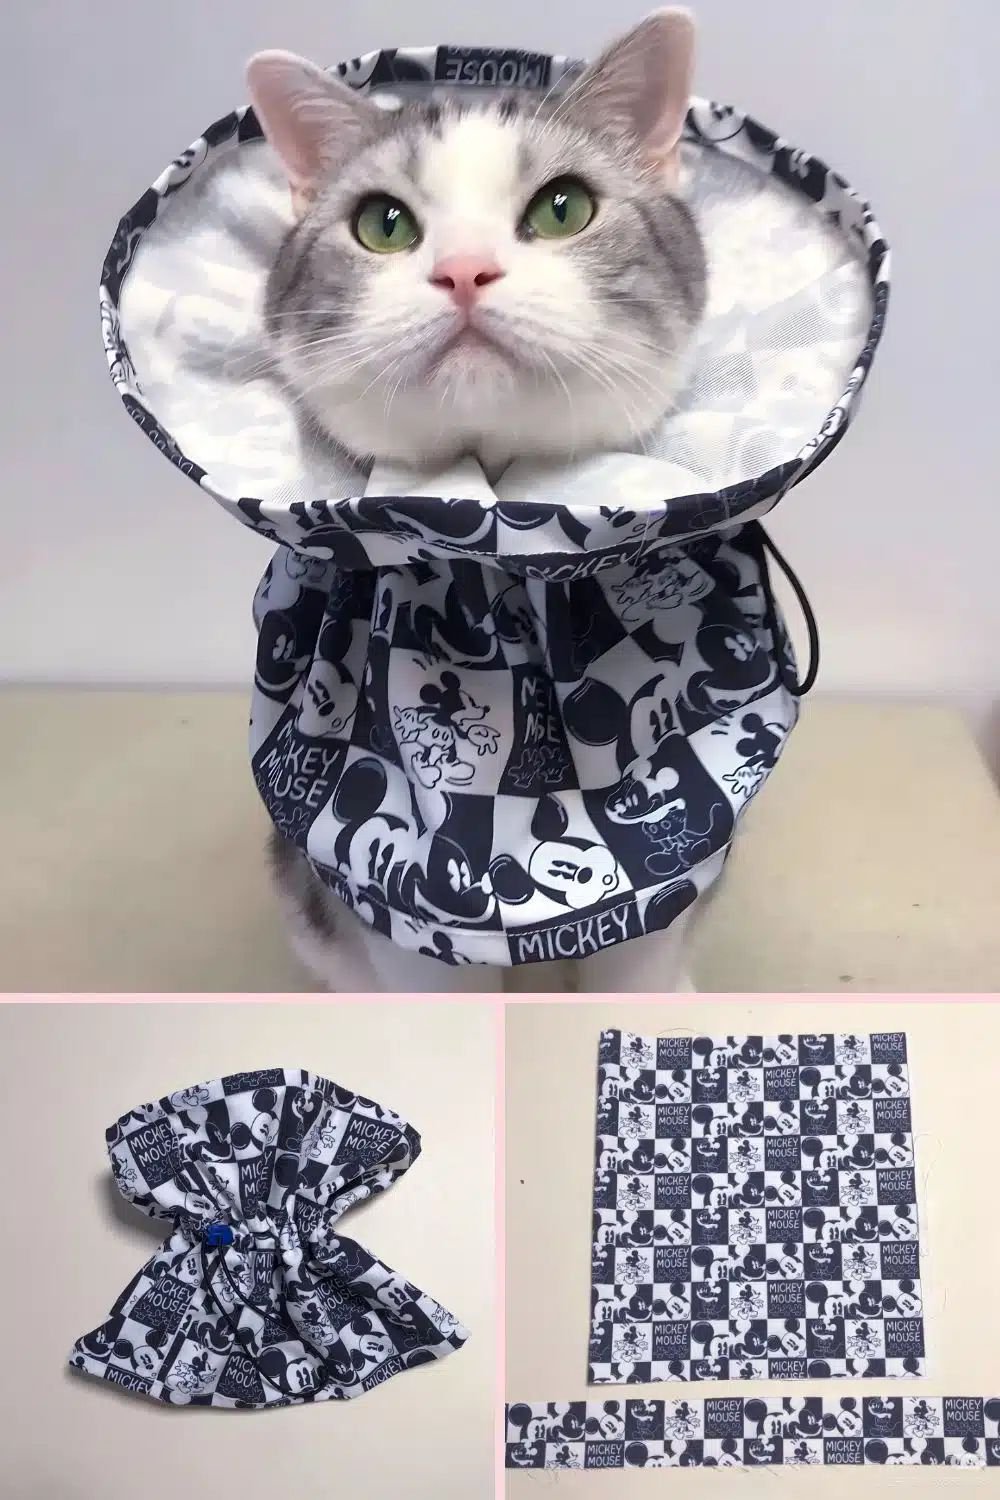
The “conical” aspect of the Homemade conical cat collar made of fabric- Pattern refers to the geometric shape—a truncated cone. To achieve this, your fabric pieces must be cut with a specific curvature. Using a rotary cutter and a cutting mat can help you get those smooth, precise edges that make the assembly process much easier when you start pinning your fabric layers together for the final stitch.
Lastly, consider adding a soft bias tape or a ribbed knit fabric around the inner neckline of the Homemade conical cat collar made of fabric. This small detail provides a cushioned edge against the cat’s throat, preventing chafing. When you follow a well-designed Homemade conical cat collar made of fabric- Pattern, these small comfort features are what truly differentiate a homemade version from a mass-produced, uncomfortable plastic alternative.
2. Drafting and Understanding the Pattern for Your DIY Project
The Pattern is the most critical element of this project, acting as the mathematical guide to ensure the collar fits securely without being too tight. A proper Homemade conical cat collar made of fabric- Pattern usually looks like a large “C” shape or a crescent moon when laid flat. This specific geometry is what allows the fabric to wrap around into a cone shape once the ends are fastened together, providing the necessary coverage.
To draft an accurate Pattern, you must first measure your cat’s neck circumference and the distance from the neck to the tip of the nose. These dimensions are the “input variables” for your Homemade conical cat collar made of fabric- Pattern. If the radius of the inner circle is too small, the collar will choke the pet; if the outer length is too short, the cat will be able to reach around the edge to bite their stitches.
When looking at a professional Homemade conical cat collar made of fabric- Pattern, you will notice markings for seam allowances. This is the extra space (usually 1/4 or 1/2 inch) added to the edges to account for the fabric lost during sewing. Forgetting to include seam allowances in your Pattern is a common mistake that results in a collar that is significantly smaller than intended, so always double-check your template before cutting.
You can create a reusable Pattern by tracing your design onto cardboard or thick parchment paper. This is particularly useful if you have multiple pets or if you plan to donate these collars to local shelters. A sturdy Homemade conical cat collar made of fabric- Pattern ensures consistency and allows you to quickly trace the shape onto your chosen fabric and interfacing without having to remeasure every single time.
Advanced versions of a Homemade conical cat collar made of fabric- Pattern may include “adjustment points.” These are multiple lines for the placement of Velcro or snaps, allowing the collar to be tightened or loosened as needed. Incorporating these into your Pattern makes the finished product more versatile, accommodating slight weight changes or different fur thicknesses throughout the cat’s recovery journey.
Finally, remember that the Pattern should always include a “grain line” indicator. Cutting your fabric along the straight grain ensures that the Homemade conical cat collar made of fabric maintains its shape and doesn’t stretch out of proportion. Following the technical instructions of the Homemade conical cat collar made of fabric- Pattern strictly will result in a professional-grade medical tool that looks like it was bought from a high-end pet boutique.
3. Step-by-Step Assembly of the Homemade conical cat collar made of fabric
Once your fabric is cut according to the Homemade conical cat collar made of fabric- Pattern, the assembly begins with the “sandwiching” technique. You will place your two fabric pieces with right sides together, and then place the interfacing or foam on top of one of the wrong sides. This ensures that when you turn the Homemade conical cat collar made of fabric right-side out, the structural element is hidden safely in the middle, away from the cat’s skin.
Sewing the outer curved edge first is a standard practice in the Homemade conical cat collar made of fabric- Pattern instructions. Use a straight stitch and move slowly to maintain the curve’s integrity. If you are using a thicker foam, you might need a heavy-duty sewing needle (size 90/14 or 100/16) to penetrate all the layers without breaking the thread or skipping stitches in your Homemade conical cat collar made of fabric.
After sewing the perimeter, it is essential to “clip the curves.” This involves making small snips into the seam allowance (being careful not to cut the stitches) along the rounded edges of the Homemade conical cat collar made of fabric. This technique, common in any professional Pattern work, allows the fabric to lay flat and smooth once turned, preventing bulkiness and lumps that could irritate the cat’s neck.
Turning the Homemade conical cat collar made of fabric right-side out can be a bit of a squeeze if you used stiff interfacing. Use a turning tool or a blunt chopstick to push out the edges and ensure the shape matches your original Homemade conical cat collar made of fabric- Pattern. Once turned, give the collar a good press with a steam iron to crisp up the edges and prepare it for the topstitching phase.
Topstitching is not just for looks; it provides extra stability. Sew a line of stitching about 1/8 inch from the edge all the way around your Homemade conical cat collar made of fabric. For even more rigidity, you can sew several concentric circles following the shape of the Pattern. This “quilting” effect keeps the inner stabilizer from shifting and ensures the Homemade conical cat collar made of fabric stands up tall against the cat’s movements.
The final step in the Homemade conical cat collar made of fabric- Pattern is attaching the closures. Align the Velcro or snaps according to the markings on your template. Make sure the “hook” side of the Velcro faces away from the cat’s skin to avoid scratching them. Once the fasteners are secure, your Homemade conical cat collar made of fabric is ready for a test fit, offering a custom, comfortable, and effective solution for your pet’s needs.
4. Tips for Customizing and Maintaining Your Fabric Cat Collar
Personalizing your Homemade conical cat collar made of fabric- Pattern can make a difficult recovery time a bit more cheerful. You can choose fun prints, bright colors, or even add the cat’s name with embroidery. However, always ensure that any embellishments are on the outside of the Homemade conical cat collar made of fabric and are securely attached so they don’t become a choking hazard if the cat tries to groom the collar.
If your cat is particularly active, you might want to modify the Homemade conical cat collar made of fabric- Pattern to include loops for their regular collar. By sewing small fabric loops onto the inner neckline of the fabric cone, you can thread their everyday collar through them. This prevents the Homemade conical cat collar made of fabric from being pulled off over the head, providing an extra layer of security for “escape artist” felines.
Maintaining hygiene is paramount when using a Homemade conical cat collar made of fabric. Since the material is absorbent, it can collect saliva and bacteria. It is a great idea to use your Homemade conical cat collar made of fabric- Pattern to make at least two collars. This way, your cat can wear one while the other is being washed and dried, ensuring they are never left unprotected during their healing phase.
For cats that have trouble reaching their food bowls while wearing a cone, you can adjust the Homemade conical cat collar made of fabric- Pattern to be slightly shorter or more flared. A “soft-fold” design allows the cat to push the collar back slightly when eating, then it springs back into place afterward. This flexibility is the biggest advantage of a fabric-based design over a traditional plastic one.
Storage is also easier with a Homemade conical cat collar made of fabric. Unlike plastic cones that take up a lot of space and can crack, these fabric versions can be folded flat or rolled up. Because you followed a precise Homemade conical cat collar made of fabric- Pattern, you can easily iron it flat again whenever it is needed in the future, making it a sustainable addition to your pet’s first-aid kit.
Finally, always monitor your cat’s behavior when they first start wearing their new Homemade conical cat collar made of fabric. While the Pattern is designed for comfort, every cat reacts differently. Praise them and offer treats to create a positive association with the collar. With your handmade touch and a well-executed Homemade conical cat collar made of fabric- Pattern, your cat’s path to recovery will be much softer and less stressful.
Frequently Asked Questions (FAQ)
Is a fabric cone as effective as a plastic one?
Yes, as long as you use a Homemade conical cat collar made of fabric- Pattern that includes a stiffening agent like interfacing or foam. The goal is to create a physical barrier; if the fabric is too flimsy, the cat can simply bend it to reach their wound. A well-constructed fabric collar provides the same protection with much higher comfort.
How do I clean the Homemade conical cat collar made of fabric?
Most fabric collars can be machine-washed on a gentle cycle. However, if you used a specific type of foam or heavy interfacing in your Homemade conical cat collar made of fabric- Pattern, it might be better to hand wash and air dry it to maintain the shape. Always check that the Velcro is closed before washing to prevent it from snagging other items.
Can my cat sleep comfortably in a fabric collar?
Absolutely. One of the main reasons people use a Homemade conical cat collar made of fabric- Pattern is that it acts like a portable pillow. Unlike plastic cones that “clunk” against the floor and prevent the cat from laying their head down naturally, the fabric version conforms to the surface, allowing for much better rest.
What if my cat is between sizes on the pattern?
If your cat’s measurements fall between sizes, it is always safer to go with the larger size in the Homemade conical cat collar made of fabric- Pattern. You can then add extra Velcro strips to create a more adjustable closure, ensuring the neck fit is snug but the length is sufficient to cover the nose.
How long does it take to sew a Homemade conical cat collar made of fabric?
For someone with basic sewing skills, completing a Homemade conical cat collar made of fabric- Pattern usually takes between 45 minutes to 1.5 hours. The most time-consuming parts are cutting the curves accurately and applying the topstitching for stability.
Can I use this pattern for a dog as well?
Yes, the Homemade conical cat collar made of fabric- Pattern can be scaled up for small to medium dogs. However, for very large or powerful dogs, you may need to use even stiffer materials and reinforced stitching to ensure the collar holds up against their strength.
Conclusion
Creating a Homemade conical cat collar made of fabric- Pattern is a wonderful way to show your pet extra love during a difficult recovery. We have covered everything from selecting breathable cotton fabrics and sturdy interfacing to the technical aspects of drafting a Pattern and the step-by-step assembly process.
By choosing to DIY this essential medical tool, you ensure a custom fit that balances safety with the ultimate comfort for your cat. Remember that a successful project relies on accurate measurements and quality stitching to keep the collar functional and secure.