Learning how to bind an apple core or scalloped edge quilt – pattern can seem challenging at first glance, but with a bit of patience and the right techniques, even curved or decorative quilt edges can be beautifully finished.
Unlike traditional straight-edged quilts, apple core and scalloped edge quilts feature soft curves and dips that require extra attention during the binding process to maintain a clean, professional look.
Whether you’ve spent days or weeks piecing together your apple core quilt or adding those elegant scalloped borders, finishing it properly is essential. The binding not only holds everything in place but adds that final polish that turns your quilt into a masterpiece. And the best part? You can make your own bias binding, perfectly tailored to the curves of your unique project.
In this article, we’ll explore how to bind an apple core or scalloped edge quilt – pattern in detail, covering materials, bias binding tips, stitching techniques, and common mistakes to avoid. No matter your skill level, you’ll walk away with the confidence and know-how to finish your quilt with beautiful, even curves that lay flat and look incredible.
1. Understanding the Edge Shapes and Binding Basics
Before diving into how to bind an apple core or scalloped edge quilt – pattern, it’s important to understand what makes these quilt edges different from standard ones. Unlike straight or mitered edges, apple core and scalloped designs involve smooth, rounded curves that require flexible and carefully placed binding.
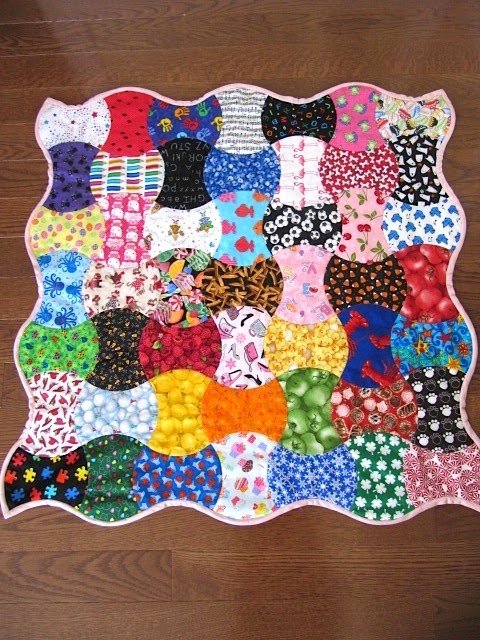
Apple core quilts are made from interlocking curved shapes, often resembling apple slices. When pieced together, they create a soft wave along the quilt edge. Scalloped edges, on the other hand, are intentionally added to the quilt border for decorative flair and create consistent, repeating curves along one or more edges of the quilt.
The key to binding either style is flexibility. That means you’ll be working with bias binding—binding strips cut on the bias (diagonal) of the fabric. Bias-cut strips have more stretch than straight-cut ones, making them ideal for navigating curves without bunching or puckering.
To prepare, you’ll want to calculate the length of binding needed by measuring along the edge, including curves. Add a few extra inches for overlaps and corners. Then, cut bias strips—usually 2.25″ to 2.5″ wide—and join them at 45-degree angles to reduce bulk in the final binding.
Fold your bias strip in half lengthwise and press it with the wrong sides together. This creates double-fold binding, the most common method for curved edges because it offers durability and flexibility for sewing both by machine and hand.
One last essential tip: always use pins or clips generously when applying bias binding to curved edges. Securing your work before sewing helps prevent distortion and ensures a smooth, even finish every time.
2. Preparing and Applying Bias Binding to Curves
Now that you understand the importance of bias strips for curved edges, let’s walk through how to apply them as part of the how to bind an apple core or scalloped edge quilt – pattern process.
Begin by aligning the raw edge of your folded bias binding to the raw edge of the quilt top, starting somewhere along a gentle curve—not at a peak or valley. Leave a 6″ tail for later joining. Use pins or clips to secure the binding every 1 to 2 inches, especially in tight curves or valleys.
Sew the binding to the quilt top using a ¼” seam allowance. Go slowly and lift your presser foot as needed to adjust the binding around tight curves. Never pull or stretch the binding—it should follow the curve naturally to avoid warping.
When approaching an inward dip (valley), gently ease the binding into place without puckering. You may need to slightly ease the fabric underneath the binding. For outer curves (hills), let the natural stretch of the bias binding wrap around smoothly.
As you sew, continue to adjust and reposition the binding as needed to prevent twisting. Take your time. Even experienced quilters pause often during this step to ensure accuracy and smoothness.
When you near the starting point, stop with enough space to join the beginning and end of your binding tails. Open up both ends, align them, and sew them together with a 45-degree seam. Then trim and press the seam open before stitching down the final section to close the loop.
Press the binding away from the quilt top, then fold it to the back and clip it in place, ready for the final stitching step. This part of how to bind an apple core or scalloped edge quilt – pattern really brings the project together.
3. Finishing by Hand or Machine – Tips for Clean Curves
With your bias binding applied to the quilt front, you’re ready for the final stage of how to bind an apple core or scalloped edge quilt – pattern—finishing the binding on the back. This step requires care and a few special tricks for success.
Fold the binding over to the quilt’s back, fully covering the stitching line. Use clips or pins to secure every few inches, paying extra attention at the valleys and curves. Take your time to adjust the binding evenly over the curves so no puckers form.
If hand-stitching, use a ladder stitch or blind stitch for an invisible finish. This method gives you more control, especially around curves. Start at a valley or mid-curve, and stitch from the inside fold of the binding to the quilt back, hiding the thread in the seam.
For those who prefer machine-finishing, stitch “in the ditch” from the front side, catching the folded edge on the back. It’s quicker but can be tricky on tight curves, so go slowly and use a matching thread color to hide any slight misses.
When working curves, make small adjustments as you go. Use your fingers or a blunt turning tool to keep the binding rounded and flat. Don’t let the bias twist—twisting can cause unsightly bulges or bunches along the edge.
Sharp valleys may need a tiny tuck or pleat in the binding to lie flat. This is completely normal in scalloped edge quilt binding, and if done neatly, it won’t be visible from the front or back.
After stitching the entire binding, give your quilt a final press using steam to help the binding settle into the curves. This final touch is often overlooked, but it makes a huge difference in the quilt’s finished look.
4. Troubleshooting and Common Mistakes to Avoid
Even with experience, binding a curved quilt edge comes with potential challenges. Let’s go over common mistakes and how to avoid them in your how to bind an apple core or scalloped edge quilt – pattern journey.
One of the biggest issues is using straight-grain binding. It doesn’t stretch and will cause puckering or distortion on curves. Always use bias binding for any non-straight edge quilt.
Another problem is pulling the binding too tightly, especially around inward curves. This causes the quilt edge to curl or ripple. Instead, let the fabric lie naturally and clip frequently to hold it in place before sewing.
Many quilters also rush through valleys and peaks without adjusting. These spots require extra care. Use pins to shape the binding into the valley and take your time sewing, pivoting slightly as needed to follow the curve.
Improper joining of binding ends can also cause bulk or uneven seams. Use a 45-degree join and press the seam open to reduce bulk and create a smooth, continuous finish.
Avoid using too-wide binding strips. While 2.5″ is standard, thinner curves may benefit from 2.25″ or even 2″ wide strips, especially if you’re hand-stitching the back. This creates a cleaner finish and helps the binding hug the curves better.
Lastly, always test a few curves on a scrap sample before starting on your quilt. Practicing on small scallops can help you fine-tune your method and build confidence for the real project.
FAQ – How to Bind an Apple Core or Scalloped Edge Quilt – Pattern
Q1: Why is bias binding necessary for curved quilt edges?
Bias binding stretches and molds to curves, making it ideal for apple core and scalloped edges. Straight-grain binding lacks flexibility and causes puckers.
Q2: What’s the best width for binding scalloped edges?
A width of 2.25″ is usually perfect, but you can adjust to 2″ or 2.5″ depending on your project and stitching preference.
Q3: Can I machine-stitch the entire binding on curved edges?
Yes, but it requires precision. Stitch the front by machine and then carefully stitch “in the ditch” from the front to catch the back edge.
Q4: How do I handle the inward dips on scalloped edges?
Ease the bias binding gently into the valley without pulling, and clip it well. If needed, add a small pleat for it to lie flat.
Q5: Do I need to prewash my bias binding?
If you’ve prewashed your quilt fabrics, it’s a good idea to prewash the binding too—especially for natural fibers like cotton.
Q6: What’s the best way to hide binding stitches on the back?
Use a ladder stitch for hand-finishing or matching thread if sewing by machine. Either method can produce an invisible finish with care.
Conclusion
Learning how to bind an apple core or scalloped edge quilt – pattern is a rewarding process that enhances the beauty
and longevity of your quilt. With bias binding, the right techniques, and a bit of patience, you can master curves and valleys with confidence.
This guide walked you through the materials, techniques, stitching methods, and common mistakes to avoid—all designed to help you finish your quilt like a pro. Whether you’re working on a heartfelt gift or your next showpiece, curved-edge quilts deserve a beautiful, flowing finish.
Have you tried binding a scalloped or apple core quilt? We’d love to hear about your experience. Please leave your honest feedback or suggestions in the comments and help others on their quilting journey. Happy quilting!