Learning how to sew quilted pumpkin coasters – pattern is a delightful way to welcome autumn into your home. These small, seasonal crafts are perfect for beginners and experienced sewers alike, offering a fun and creative way to practice quilting techniques while making functional and festive decor. Whether you’re crafting for your own table or creating handmade gifts, these charming coasters are sure to bring warmth and cheer to any fall setting.
Using a quilted pumpkin coaster pattern not only helps you keep your sewing consistent but also ensures a beautiful finish that will impress your guests. With just a few materials, a basic sewing machine, and a bit of time, you can make a set of coasters that are both practical and adorable. This project is a great introduction to quilting and shaping fabric, and it’s easy to customize with different fabrics, colors, and details.
In this step-by-step guide, we’ll explore how to sew quilted pumpkin coasters – pattern, covering everything from materials to finishing touches. You’ll discover tips for making your coasters durable, stylish, and perfect for fall-themed decorations. So, grab your sewing kit, and let’s dive into this cozy seasonal craft!
1. Choosing the Right Materials for Quilted Pumpkin Coasters
Before you begin sewing, selecting the appropriate materials is key to achieving a professional look and ensuring your coasters are long-lasting. Choosing high-quality fabrics and the right tools can make the process smoother and your finished product more appealing.
Start by picking out 100% cotton fabric, which is ideal for quilting. You’ll need three layers for each coaster: a top layer with your pumpkin design, a middle layer of batting for thickness and absorbency, and a backing layer. Fall-themed prints such as orange plaids, polka dots, or solids are perfect choices for the pumpkin design.
Batting is what gives your coasters their quilted feel. Opt for low-loft cotton batting for a smoother, more professional result. It’s also more absorbent than polyester, which is great for drink condensation.
Don’t forget to include fusible interfacing if you want extra firmness. This can help your coasters hold their shape over time, especially after repeated washes.
You’ll also need coordinating thread, a rotary cutter or fabric scissors, quilting pins, a sewing machine, and optionally a fabric marking pen for precise cutting and stitching.
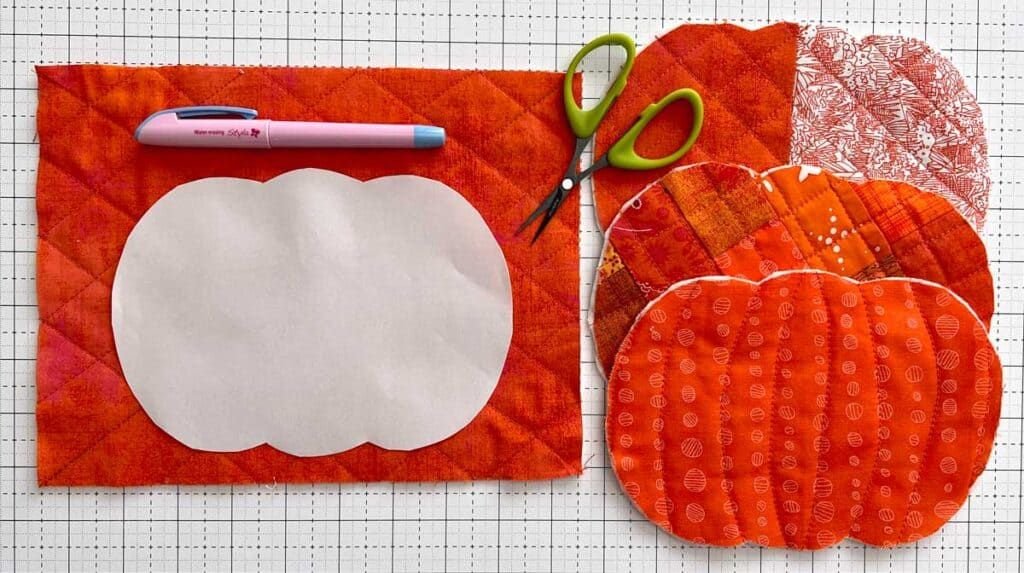
Use a quilted pumpkin coaster pattern that offers curved pumpkin shapes with slight segment lines. Printable templates can be found online or you can create your own using cardboard.
Having quality tools, especially sharp scissors and fresh sewing needles, will make this project much more enjoyable and efficient. Preparing everything before you begin helps keep the sewing process smooth and organized.
2. Cutting and Preparing Your Fabric Pieces
Once you’ve selected your materials, it’s time to move on to cutting and prepping your fabrics. This step is where precision really pays off, especially since you’ll be working with curved shapes.
Begin by using your quilted pumpkin coaster pattern to trace the pumpkin shape onto the back side of your fabric. Cut one piece for the front, one for the back, and one from your batting. Make sure to trace carefully and cut smoothly to ensure your layers line up correctly.
Next, layer your fabric in this order: backing fabric (right side down), batting in the middle, and the top pumpkin fabric (right side up). Align all edges neatly and pin them together using quilting pins or clips.
If you’re using interfacing, attach it to the back of your top fabric layer following the manufacturer’s instructions. This will add structure and make the quilting details more visible and sturdy.
Take a fabric marker or chalk and lightly draw quilting lines on the top layer to imitate the curved segments of a pumpkin. This step adds charm and realism to your project, giving your coasters their pumpkin-like texture.
You can personalize your pumpkins with small embellishments such as felt leaves or fabric stems. Cut small green or brown fabric pieces for stems and leaves and position them at the top center of the pumpkin before sewing.
At this point, all your layers should be ready for stitching. Double-check that everything is aligned and secured before heading to the sewing machine.
3. Quilting and Sewing the Pumpkin Coasters
Now comes the fun part—bringing your pumpkin coasters to life with stitching! This stage adds texture, durability, and the final pumpkin look.
Start by quilting the segment lines you marked earlier. Use a straight or slightly curved stitch to follow the lines. This step enhances the pumpkin shape and secures the three layers together effectively.
Next, sew around the entire edge of the pumpkin, leaving a small opening (around 2 inches) for turning the fabric right side out. Backstitch at both ends to secure the seam.
Once the outer edge is sewn, carefully trim any excess fabric or uneven edges. Clip the curves carefully without cutting through the stitches. This helps the coaster turn out smoothly and prevents bunching.
Turn the coaster right side out through the opening. Use a blunt tool like a chopstick or knitting needle to gently push out all the curves and edges, shaping your pumpkin nicely.
After turning, press the coaster with an iron to flatten and neaten it. Make sure to fold in the edges of the opening neatly, preparing for the final stitch.
Finally, topstitch around the entire edge of the pumpkin coaster. This step closes the opening and gives a clean, finished look. It also adds durability and helps maintain the shape.
4. Finishing Touches and Customization Ideas
With your quilted pumpkin coasters nearly complete, now’s the time to add unique touches that showcase your creativity. This is where you can make each coaster special and personal.
Start by attaching decorative stems and leaves if you haven’t already. You can use felt, embroidery thread, or even twine to create rustic-looking accents that enhance the autumn vibe.
If you want to get fancy, add hand embroidery. Stitch details like leaf veins, initials, or even fall-themed words such as “Harvest” or “Thankful” onto your coaster. This adds a lovely handmade feel.
Another way to customize your coasters is by varying the sizes. Try making a set in small, medium, and large sizes. Larger coasters can double as mini potholders or centerpiece mats.
Consider using metallic or variegated thread for quilting lines to give your pumpkin segments an elegant or whimsical twist. This works especially well for decorative pieces that aren’t used daily.
You can also experiment with different fabrics like corduroy, flannel, or linen to create texture contrast. Each fabric choice brings a different feel to the final product.
Lastly, if you’re planning to gift these or sell them at craft fairs, consider packaging them in sets tied with a ribbon and a custom tag. Handmade seasonal items like these are always popular around fall and Thanksgiving.
FAQ – How to Sew Quilted Pumpkin Coasters – Pattern
Q1: What kind of fabric is best for quilted pumpkin coasters?
A: The best choice is 100% cotton fabric. It’s easy to sew, absorbs moisture well, and holds up nicely through washing and use.
Q2: Can I sew these coasters by hand if I don’t have a sewing machine?
A: Yes! While a sewing machine speeds up the process, you can definitely sew these by hand using a backstitch and a bit of patience.
Q3: Do I need to pre-wash my fabric before sewing?
A: It’s highly recommended to pre-wash and iron your fabric to prevent shrinkage and ensure a clean, smooth surface for quilting.
Q4: What size should each coaster be?
A: A typical size is about 4.5 to 5.5 inches in diameter, but you can adjust the pattern depending on your needs or preferences.
Q5: Can I use synthetic batting instead of cotton?
A: While synthetic batting is an option, cotton batting is preferred because it’s more heat-resistant and provides a better texture for quilting.
Q6: How do I wash quilted coasters?
A: Wash them gently in cold water, either by hand or in a mesh laundry bag on a delicate cycle. Air dry and press with an iron to keep them looking crisp.
Conclusion
In this guide, we explored how to sew quilted pumpkin coasters – pattern from start to finish. From choosing materials, cutting and assembling fabric, to quilting and adding finishing touches, this simple but delightful sewing project brings autumn charm to your home in a handmade way.
Whether you’re crafting for yourself or preparing thoughtful seasonal gifts, quilted pumpkin coasters are a fun and beginner-friendly project. They’re customizable, functional, and make perfect additions to any fall table setting.
If you found this tutorial helpful, please leave a sincere opinion in the comments and share any suggestions you have. Your feedback helps improve future patterns and guides. Happy sewing!