If you’re someone who loves blending technology with creativity, then crafting your own iPad case sewing – pattern might just be the perfect project for you. A handmade iPad case not only adds a personal touch to your device but also provides functional protection tailored exactly to your needs and style. Whether you’re a seasoned sewer or just getting started, this project is beginner-friendly, budget-conscious, and rewarding from start to finish.
With an ever-growing number of iPad models on the market, finding the right case in stores can be challenging. Creating a custom iPad case sewing – pattern ensures a snug fit, lets you choose your favorite fabrics, and even gives you the flexibility to add pockets or closures. From simple slipcases to padded sleeves with zippers, the possibilities are endless.
In this article, we’ll walk you through the essentials of sewing an iPad case from scratch. You’ll learn how to select materials, measure your device, cut and sew fabric, and personalize your design. Plus, we’ve included helpful tips and a detailed FAQ to make sure your project goes smoothly and the results exceed your expectations.
1. Choosing the Right Materials for Your Ipad Case Sewing – Pattern
The first step in any successful iPad case sewing – pattern project is selecting the right materials. The goal is to balance style with functionality, ensuring that your finished case looks great and offers adequate protection for your device.
Start with a sturdy outer fabric. Canvas, denim, duck cloth, or even quilted cotton are all excellent choices. These fabrics are durable enough to resist wear and tear while giving your case a professional look. If you’re going for something more elegant, consider faux leather or linen blends.
For the interior lining, go with a soft cotton, microfiber, or fleece to protect your iPad’s screen from scratches. Avoid anything with rough textures or loose fibers that could leave lint on your screen. Solid or coordinating colors usually work best for linings.
You’ll also need padding to keep your iPad safe from bumps or minor drops. Fusible fleece, foam interfacing, or quilt batting are great choices. These materials provide cushion without adding too much bulk.
Don’t forget to pick a reliable closure method. Popular options include zippers, Velcro, magnetic snaps, or even button flaps. Zippers offer the most secure closure but may require a bit more sewing experience.
Finally, make sure you have all the basic sewing tools ready: scissors or rotary cutter, fabric pins or clips, a measuring tape, and a sewing machine. A walking foot attachment can be helpful when sewing through multiple thick layers.
Once you’ve gathered everything, do a quick test with your chosen fabrics to see how they layer and stitch. This helps you avoid surprises and ensures a smooth sewing process later on.
2. Measuring and Cutting Fabric for a Perfect Fit
Before diving into sewing, accurate measurements are key to a successful iPad case sewing – pattern. A well-fitted case not only looks better but also protects your device more effectively.
First, measure your iPad’s height, width, and depth. Be sure to include any accessories like a pencil holder or keyboard case if you intend to use the sleeve with them attached. Add at least 1 inch to each side to account for seam allowances and padding.
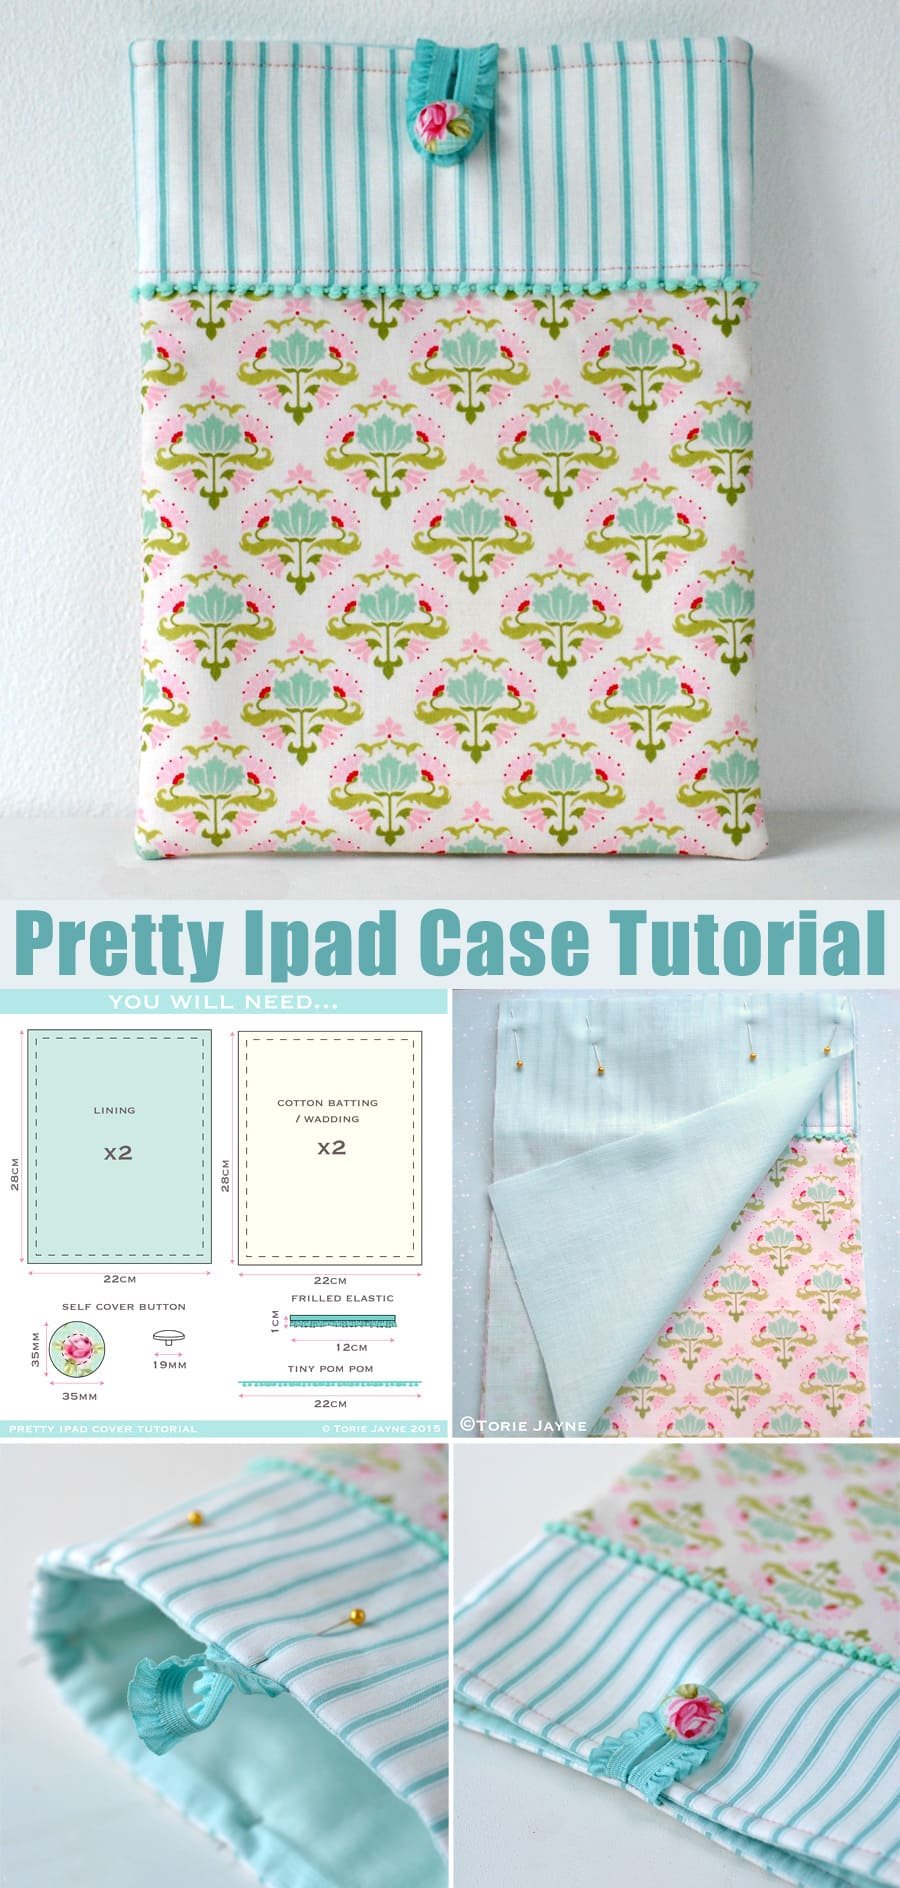
Once you have your final dimensions, draft a simple rectangular pattern on paper or cardstock. This template helps you cut each layer—outer fabric, padding, and lining—to the exact size needed. Label each piece to avoid confusion during assembly.
Remember that if you’re adding a flap or zipper, you’ll need additional fabric at the top. For a flap closure, extend the top edge by 3 to 4 inches. If you’re sewing in a zipper, make sure to include an extra seam allowance for easy attachment.
Use your rotary cutter and quilting ruler to cut all fabric layers with clean, straight edges. Accuracy at this stage will ensure the final sleeve looks neat and functions correctly.
If your design includes pockets or accessory compartments, cut those pieces now as well. You can add a front slip pocket for chargers or a pencil, or even an interior pocket for notes or documents.
Lay out all your cut pieces in the order they will be assembled. Double-check alignment, and make any last-minute adjustments before moving on to the sewing step.
3. Sewing the Ipad Case with Your Pattern
Now comes the fun part—bringing your iPad case sewing – pattern to life with stitching and assembly. If you’ve done all the prep work, the sewing process should be straightforward and enjoyable.
Start by sewing any optional pockets onto the outer or inner layers. Use a straight stitch and backstitch at the beginning and end for durability. Align pockets carefully so they look symmetrical and sit flat when the case is assembled.
Next, layer your pieces: place the outer fabric and lining right sides together, with the padding layer underneath. This sandwich method helps keep your case soft on the inside while hiding all seams neatly inside the finished product.
Pin or clip the layers together, and sew around the edges with a ¼-inch to ½-inch seam allowance, leaving the top open. If using a zipper, sew it into place now, making sure the teeth are centered and the zipper opens smoothly.
Trim excess seam allowance and clip the corners to reduce bulk. Then, turn the case right-side out and use a point turner or blunt tool to push out the corners for a crisp finish. Press the seams flat with a hot iron, using a pressing cloth if needed.
If your design includes a flap, sew it separately and attach it to the back side of the case before finishing the lining. For button or magnetic closures, sew them in place carefully so they align when closed.
Finally, topstitch around the outer edge for a clean, professional look. This also helps reinforce the case’s structure and keep all layers securely in place.
4. Personalizing and Using Your Ipad Case Sewing – Pattern
One of the best parts of using a iPad case sewing – pattern is the ability to personalize it to match your style or even create themed gifts for friends and family. This is where your creativity can really shine.
You can choose fabrics that reflect your hobbies or interests—florals, geometrics, gaming prints, or even minimalist neutrals. For a personal touch, consider embroidering initials, using iron-on patches, or adding decorative buttons.
Want to make your case even more functional? Add extra padding or a quilted outer layer for enhanced protection. Some crafters also add a handle or wrist strap for easy portability, especially useful for students or travelers.
You can also design your iPad case as part of a matching tech accessory set—include coordinating pouches for your charger, earbuds, or stylus. This adds value and style, especially if you plan to sell your cases online or at craft fairs.
For those looking to sell their handmade iPad cases, branding is important. Add a discreet label with your shop name or logo. Package your product nicely and use high-quality photos to highlight details.
Another fun option is to adapt the same iPad case sewing – pattern for different devices. With a few size adjustments, you can create cases for Kindle, other tablets, or even laptops. This makes the pattern a versatile addition to your sewing portfolio.
Don’t forget to share your finished work! Post photos on social media, in sewing forums, or upload your pattern modifications to crafting communities. Your work can inspire others and connect you with a wider creative audience.
Frequently Asked Questions (FAQ)
Q1: What is the best fabric for an iPad case?
A: Sturdy fabrics like canvas, denim, or quilted cotton are ideal. For the interior, soft materials such as fleece or microfiber work well to protect the iPad screen from scratches.
Q2: How much fabric do I need for an iPad case?
A: You’ll generally need about a fat quarter (18” x 22”) for each layer—outer fabric, lining, and interfacing. Add more if you’re including pockets or extra features.
Q3: Is the iPad case sewing pattern suitable for beginners?
A: Yes! It’s a great beginner project. You’ll practice measuring, cutting, and sewing straight seams, and you can customize it as your skills grow.
Q4: How can I make my iPad case more protective?
A: Add fusible fleece or foam interfacing for padding. Quilting the outer layer and using a zipper closure also improves durability and shock resistance.
Q5: Can I wash my handmade iPad case?
A: Most fabric cases are machine washable if made with pre-washed cotton and washable interfacing. However, cases with leather or magnetic components should be spot-cleaned.
Q6: Where can I find downloadable iPad case patterns?
A: Many sewing websites and craft blogs offer free or paid iPad case sewing – pattern templates. Etsy, Pinterest, and sewing forums are great places to explore.
Conclusion
Creating your own **iPad case sewing –
pattern** is more than just a craft—it’s a personalized project that combines function, style, and creativity. By choosing the right materials, planning your layout carefully, and sewing with attention to detail, you’ll end up with a case that’s as unique as you are.
This guide has walked you through every step, from fabric selection to customization ideas, giving you all the tools you need to succeed. Whether you’re sewing for yourself, as a gift, or for your online shop, a handmade iPad case is a thoughtful and useful creation.
If you enjoyed this article or have tried making your own iPad case, we’d love to hear from you. Leave a sincere comment below sharing your experiences, photos, or suggestions. Your feedback helps others in the community and inspires more makers to get started!