The Knotted Star Quilt Block – Pattern is a striking and symbolic quilt block that combines geometric precision with artistic flair. Its distinctive interlocking design gives the illusion of movement and dimension, making it a favorite among modern and traditional quilters alike. Whether you’re an experienced quilter or just starting your journey, this pattern offers an engaging and fulfilling project that adds depth and character to any quilt.
As quilting continues to evolve, timeless patterns like the Knotted Star Quilt Block – Pattern remain relevant due to their versatility and visual appeal. This specific design resembles a woven star, giving it both a classic and contemporary look. It can be used in a wide variety of quilt layouts, from full bedspreads to smaller wall hangings and table runners.
In this article, we’ll guide you through everything you need to know about the Knotted Star Quilt Block – Pattern—from understanding its history and design components to learning how to construct it yourself. We’ll also explore useful tips, creative adaptations, and address frequently asked questions to help you master this stunning quilt block.
1. Understanding the Knotted Star Quilt Block – Pattern
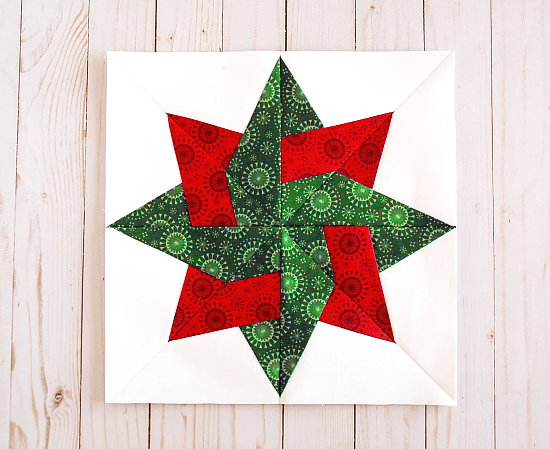
The Knotted Star Quilt Block – Pattern is known for its visually complex appearance, which resembles a star tied together with interlocking strips. This optical illusion is achieved through precise piecing and color placement, making the final result look intricate without being overly complicated to sew.
At its core, the pattern is based on traditional star block designs, but the addition of “knotted” overlays gives it a more intricate and artistic look. It typically involves working with half-square triangles (HSTs), flying geese units, and straight strips to create the illusion of knots or braids intersecting through the star points.
This quilt block often uses contrasting colors or values to create strong visual lines. For example, dark strips on a light background or vice versa can emphasize the knotted illusion. Color placement plays a significant role in the success of the design.
One of the most appealing features of the Knotted Star Quilt Block – Pattern is that it works beautifully with both solid fabrics and patterned prints. While solids emphasize the structure, prints can add texture and whimsy to the block, depending on the desired style.
This pattern is typically made in standard quilting sizes like 12×12 inches or 10×10 inches but can be easily scaled up or down depending on your project needs. This flexibility makes it suitable for everything from throw pillows to full-sized quilts.
Although it may look complex, many versions of the Knotted Star Quilt Block – Pattern are beginner-friendly, especially when paired with clear instructions or templates. It offers a great opportunity to build skills while creating something truly eye-catching.
2. Materials and Tools You’ll Need
To successfully create the Knotted Star Quilt Block – Pattern, gathering the right tools and materials is the first step. High-quality supplies will ensure clean lines, crisp seams, and a polished finish that showcases the beauty of the design.
Start with 100% cotton quilting fabric in at least three different shades: a background, a main color for the star points, and a contrast color for the knotted sections. Choosing high-contrast fabrics helps the knot effect stand out.
A rotary cutter and self-healing cutting mat are essential for precision cutting. Straight edges are vital for this pattern, as any misalignment can disrupt the knotted appearance.
A quilting ruler, preferably a 6.5” or 12.5” square, helps keep all pieces accurate and consistent in size. These rulers also make it easier to trim down blocks for perfect alignment during assembly.
You’ll also need a reliable sewing machine with a quarter-inch foot. This specialized foot ensures consistent seam allowances, which are key for maintaining the block’s structure and symmetry.
Good-quality thread, preferably in a neutral tone or one that blends with your fabric, helps keep the seams tight and secure without being visually distracting.
Finally, have an iron and ironing board nearby. Pressing seams (not just ironing) between each step is crucial when piecing the Knotted Star Quilt Block – Pattern to avoid bulky joins and ensure a flat, neat finish.
3. How to Piece the Knotted Star Quilt Block
Now that you have your tools and fabrics ready, let’s walk through how to piece together the Knotted Star Quilt Block – Pattern step-by-step. Precision and planning go a long way in achieving a clean, cohesive design.
Begin by cutting all your fabric pieces as per the pattern’s measurements. Label each section (e.g., background squares, star tips, knot strips) to avoid confusion during assembly.
The center of the block is often composed of half-square triangles (HSTs), which can be made by placing two fabric squares right sides together, drawing a diagonal line, sewing 1/4” on each side, and cutting along the line to form two HSTs.
Next, create the strips that form the “knots.” These are usually rectangles or narrow fabric strips that cross through the block and overlap the star points. The key is careful placement and alignment to give the illusion of an over-under weave.
Assemble each section separately before joining them together. Lay out the pieces before sewing to visualize how the star and knot components come together. This layout preview helps prevent errors in direction or placement.
Join the pieces in rows, carefully matching seams at the intersection points. Use pins or clips to secure them in place before sewing to maintain precision.
Once the full block is assembled, press the final seams and square up the block if needed. At this stage, you’ll see the beautiful effect of the Knotted Star Quilt Block – Pattern come to life, with its woven, layered appearance.
4. Creative Ways to Use the Knotted Star Block
The beauty of the Knotted Star Quilt Block – Pattern lies in its versatility. It’s not just limited to traditional quilts—there are numerous creative ways to use this pattern in your sewing projects.
One popular idea is incorporating the block into throw pillows or cushion covers. A single knotted star in the center of a pillow makes a bold, stylish statement in any room.
You can also make a table runner using three or more knotted star blocks stitched together in a row. This creates a modern and elegant centerpiece for any dining or coffee table.
Mini quilts or wall hangings are another great way to showcase this design. Add borders and creative quilting to turn a single block into an eye-catching art piece.
Combine multiple blocks with alternating sashing and borders to create a full-sized quilt. Vary the colors of the star and knots to add visual interest and a playful, scrappy vibe.
If you enjoy mixing patterns, try alternating the Knotted Star Quilt Block – Pattern with simpler blocks like four-patch or solid squares to balance complexity and keep construction manageable.
Another idea is using the block in tote bags or fabric baskets. It’s a fun way to incorporate quilting into practical items while still showing off the detailed knot design.
FAQ – Frequently Asked Questions
Q1: Is the Knotted Star Quilt Block – Pattern difficult for beginners?
Not necessarily. While the block looks intricate, many simplified versions are beginner-friendly. Clear instructions and patience are key.
Q2: How do I get sharp points in the star block?
Use a 1/4” seam allowance, press seams carefully, and trim pieces accurately before assembly. Matching seams precisely helps with sharp points.
Q3: What is the best fabric choice for this pattern?
100% cotton quilting fabric works best. Choose at least three fabrics with good contrast to emphasize the knot effect.
Q4: Can I use scraps to make this quilt block?
Yes, as long as the scraps are large enough to cut precise shapes. Scrappy versions can look beautiful and dynamic.
Q5: How do I prevent the block from becoming bulky at the seams?
Press seams open or to one side, and avoid layering too many thick seams at intersections. Trim excess fabric if necessary.
Q6: What size should my finished quilt block be?
It depends on the pattern. Common sizes are 10” or 12” finished, but you can adjust to suit your overall project.
Conclusion
The Knotted Star Quilt Block – Pattern is a beautiful blend of tradition and innovation. With its woven design and bold lines, it adds a stunning visual effect to any quilting project. From understanding the structure of the block to mastering piecing techniques and exploring creative applications, this article has provided you with everything you need to confidently try this pattern.
We hope this guide inspired you to explore the Knotted Star Quilt Block – Pattern in your next project. If you’ve already tried this pattern or plan to, please share your honest opinion and leave your suggestions. Your feedback helps us improve and helps other quilters along their creative journey!