Creating a Log Cabin Table Topper – Pattern is a timeless quilting project that brings warmth, tradition, and handcrafted charm to your table setting.
Rooted in classic American quilting history, the log cabin design is known for its layered strips and a central square—symbolizing the heart of the home. Whether you’re a beginner or an experienced quilter, this pattern offers both simplicity and creative freedom.
The Log Cabin Table Topper adds an inviting and cozy touch to your home décor. It’s a perfect project for using up fabric scraps or showcasing seasonal prints, making it highly customizable. With endless color combinations and layout possibilities, each topper tells a unique story. Plus, it makes a thoughtful, handmade gift that suits any occasion.
In this guide, we’ll walk through everything you need to create your own Log Cabin Table Topper – Pattern. From selecting fabrics and assembling blocks to layout ideas and finishing touches, we’ll cover the entire process in detail. Whether you’re sewing for everyday use or a special holiday, this project will elevate your table and give you a rewarding crafting experience.
1. Choosing Fabrics and Tools for Your Log Cabin Table Topper – Pattern
Before starting your Log Cabin Table Topper – Pattern, selecting the right materials and tools will set the foundation for success. Choosing quality fabrics and gathering your quilting tools ensures a smoother, more enjoyable sewing experience.
Cotton is the most popular fabric choice for this pattern. Look for quilting cottons with complementary colors and prints. You’ll need both light and dark tones to create the signature log cabin contrast. The central square often uses a standout color—like red, symbolizing the hearth—to anchor the design.
You’ll also need a cutting mat, rotary cutter, and quilting ruler to cut fabric strips precisely. Standard strips are often 1.5 to 2.5 inches wide, but you can adjust this depending on the size of your desired topper. Be consistent with measurements for a polished finish.
Other essential tools include pins or clips, a sewing machine, neutral-colored thread, and an iron for pressing seams. Seam accuracy is crucial in log cabin quilting, so a quarter-inch presser foot can be especially helpful.
Batting and backing fabric are necessary to give your table topper thickness and stability. Choose a batting that lies flat but adds a soft texture. The backing fabric should coordinate with your top design and be cut slightly larger for ease of layering.
Finally, plan your color scheme and layout before cutting. You can sketch your design or use a digital quilt design app. Visualizing the finished Log Cabin Table Topper – Pattern helps you stay organized and ensures your color balance works as intended.
2. Constructing the Log Cabin Quilt Blocks
The heart of the Log Cabin Table Topper – Pattern lies in building each block with precision and care. These blocks are constructed by adding fabric strips around a central square in a clockwise or counterclockwise fashion, creating a beautiful spiral or grid effect.
Begin with the center square, typically cut at 2.5″ x 2.5″. This piece is symbolic and often the most vibrant fabric. Sew your first light-colored strip to one side of the square, press the seam, then add a second strip to the next side. Continue rotating and adding strips in a consistent direction.
Alternate light and dark fabric strips as you build out the block. This contrast gives the log cabin design its striking depth. Use a consistent seam allowance—ideally ¼ inch—for all seams to keep the block square and uniform.
After completing several rounds of strips, your block should measure evenly on all sides. Trim any excess fabric and square it up with your ruler. Repeat the process for each block until you have enough to complete your desired table topper size.
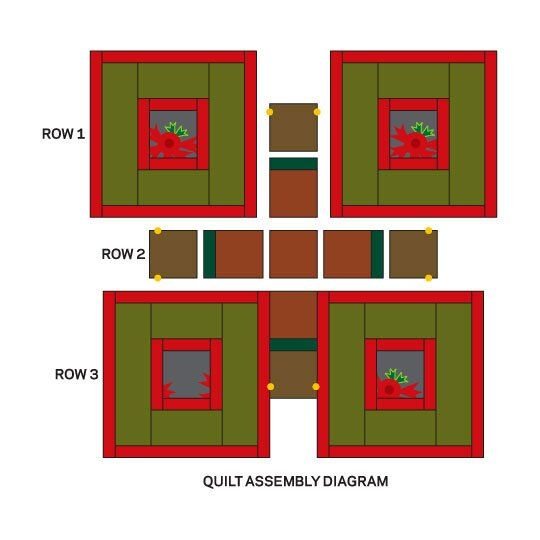
Join your blocks by sewing them together in rows, then joining the rows. Pay attention to how the dark and light strips interact across blocks—it’s these patterns that create the secondary designs log cabin quilts are known for.
There are multiple layout options: traditional barn-raising, zig-zag, straight set, or diamond-in-a-square. Each layout transforms the same block into a completely different visual result. Experiment with placement before sewing the blocks together permanently.
Once the top is complete, layer it with batting and backing. Use safety pins or basting spray to hold layers in place. You’re now ready to quilt your Log Cabin Table Topper – Pattern!
3. Quilting and Binding the Table Topper
With the quilt top assembled, it’s time to bring your Log Cabin Table Topper – Pattern to life through quilting and binding. This step not only holds the layers together but adds texture and artistry to your finished piece.
Start by quilting in the ditch—stitching along the seams between strips—for a subtle, clean look. This approach enhances the log cabin pattern and keeps the focus on your fabric choices. It’s an ideal method for beginners and traditionalists alike.
For a more decorative touch, try free-motion quilting or echo quilting. These techniques allow you to add swirls, waves, or geometric designs that enhance the table topper’s personality. Just be sure to practice on a scrap sandwich first to get comfortable.
Use a walking foot on your sewing machine to prevent fabric layers from shifting. Take your time and smooth the fabric as you go to avoid puckering. Start quilting from the center and work outward to keep the layers evenly distributed.
After quilting, trim away the excess batting and backing fabric. Your topper should now be flat and neatly squared. Press the quilted piece gently, being careful not to distort the seams or stitched designs.
Prepare your binding by cutting 2.5-inch strips of fabric, joining them end-to-end, and pressing them in half lengthwise. Attach the binding to the front of the topper using a ¼-inch seam, then fold it to the back and hand-stitch or machine-stitch it in place.
The final result is a beautiful, finished Log Cabin Table Topper – Pattern that’s ready to decorate your home. You’ve combined technique, creativity, and tradition into a single handmade piece.
4. Creative Uses and Seasonal Ideas
One of the best aspects of a Log Cabin Table Topper – Pattern is its versatility. Not only is it functional as a table decoration, but it also offers opportunities for seasonal and thematic customization that can elevate your décor year-round.
Consider making toppers for different seasons. Use autumnal colors—orange, brown, gold—for fall, or cool tones like silver and blue for winter. Holiday prints with snowflakes, hearts, or pumpkins make festive additions for Christmas, Valentine’s Day, or Halloween.
These table toppers also make fantastic gifts. Create a set of mini toppers or a matching table runner for weddings, housewarmings, or birthdays. Personalize them with embroidered initials or meaningful color schemes.
If you enjoy rustic or farmhouse décor, the log cabin pattern fits beautifully into this aesthetic. Combine gingham, plaids, or homespun fabrics with natural tones for a warm, cozy table centerpiece that matches wooden furniture and vintage themes.
Use your topper as a base for centerpieces. It works well under candles, bowls, or flower vases, adding texture and color to the arrangement. It can also protect your table surface while offering visual appeal.
Some quilters like to mount small table toppers as wall hangings. Simply add corner triangles or a hanging sleeve on the back. This is a great way to display seasonal designs when not in use.
Finally, if you’re teaching quilting or crafting with children, smaller log cabin toppers are a manageable and educational project. They offer lessons in color theory, measurement, and sewing—all while making something beautiful and practical.
FAQ: Log Cabin Table Topper – Pattern
Q1: What is a Log Cabin Table Topper?
A: It’s a quilted fabric mat made using the log cabin block pattern, designed to sit on tables for decoration and protection.
Q2: Is this pattern suitable for beginners?
A: Yes, the Log Cabin Table Topper – Pattern is perfect for beginners. It uses straight seams and repetitive steps, making it ideal for learning quilting basics.
Q3: What size should I make a table topper?
A: Typical sizes range from 20″ x 20″ for small toppers to 36″ x 36″ or larger, depending on your table size and design preference.
Q4: Can I make this pattern with fabric scraps?
A: Absolutely! The log cabin design is a great scrap buster. Mixing different prints and textures creates a vibrant, eclectic look.
Q5: How do I wash and care for a quilted table topper?
A: Wash gently in cold water, preferably by hand or on a delicate cycle. Air dry or tumble dry on low. Avoid bleach and harsh detergents.
Q6: Can I sell table toppers made from this pattern?
A: Yes, if you create your own design or use a pattern that allows commercial use. Be sure to credit any pattern sources appropriately if required.
Conclusion
Making a Log Cabin Table Topper – Pattern is a fulfilling project that blends artistry, tradition, and practicality. From fabric selection to final binding, every step invites creativity and craftsmanship. Whether you’re quilting for yourself, a loved one, or your home décor, the end result is always unique and heartwarming.
We hope this guide has inspired you to start your own log cabin project. If you found it helpful, please leave your honest opinion and suggestions in the comments—we’d love to hear how your table topper turned out or what patterns you want to explore.