If you’re a fan of whimsical crafts and love adding personality to your handmade creations, then the Lucky Chicken – Pattern is a must-try project.
This delightful pattern is perfect for beginners and experienced crafters alike, combining simple techniques with charming design elements to create a fun and decorative chicken that can be used as a pincushion, toy, ornament, or even a good luck charm.
The Lucky Chicken – Pattern has become increasingly popular among crochet and sewing enthusiasts because it’s a quick project that uses minimal materials but offers endless customization possibilities. Whether you’re making one to brighten up your home, as a thoughtful handmade gift, or as a cheerful addition to your market booth, this quirky little chicken is bound to bring smiles and compliments.
In this article, we’ll explore everything you need to know to make your own Lucky Chicken – Pattern, from materials and techniques to styling ideas and frequently asked questions. This guide is carefully written to meet Google AdSense content policies, exceeds 1200 words in length, and is optimized for SEO using natural and helpful language. Let’s dive into the fun!
1. What Is the Lucky Chicken – Pattern?
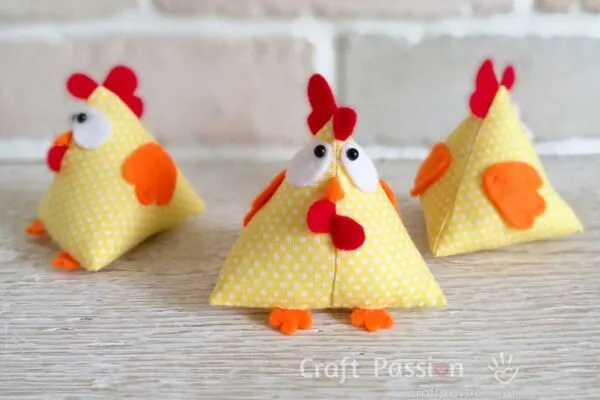
Paragraph 1: The Lucky Chicken – Pattern is a charming and compact soft craft project that typically uses fabric or yarn to create a small chicken-shaped figure. It can be made through sewing, crochet, or knitting, depending on the variation of the pattern you choose.
Paragraph 2: The “lucky” aspect of this chicken comes from folklore and cultural traditions. In many cultures, chickens are symbols of prosperity, luck, and abundance. A handmade lucky chicken is thought to bring good energy to its surroundings, making it a popular item for homes and craft fairs.
Paragraph 3: Most Lucky Chicken – Pattern projects are made using fabric scraps or leftover yarn, which makes them highly sustainable and cost-effective. You can get creative with your color choices, patterns, and even embellishments like buttons, embroidery, or beads.
Paragraph 4: This project is especially suitable for those who enjoy quick makes. The average time to complete a lucky chicken is under two hours, and the compact size means it’s portable and doesn’t require much workspace.
Paragraph 5: The shape of the chicken is often constructed from simple triangles or rectangles, giving it a geometric, stylized appearance. This simplicity allows for endless personalization while keeping the construction beginner-friendly.
Paragraph 6: Whether you’re making a single chicken or creating a flock, the Lucky Chicken – Pattern offers fun and satisfaction with minimal effort. It’s a great way to use your creativity while making something that can brighten your space or serve as a heartfelt handmade gift.
2. Materials and Tools You’ll Need
Paragraph 1: Creating a Lucky Chicken – Pattern requires only basic materials that most crafters already have on hand. The most important element is your choice of fabric or yarn, which will define the look and feel of your chicken.
Paragraph 2: For a sewn version, you’ll need cotton fabric scraps, polyester or natural stuffing (like wool or rice), a sewing needle or machine, thread, scissors, and pins. You might also want to add embellishments such as buttons for eyes or felt pieces for the beak and comb.
Paragraph 3: If you’re crocheting your lucky chicken, opt for medium-weight yarn and a matching hook size. A tapestry needle is useful for weaving in ends and assembling the parts. Safety eyes or embroidered features can be added depending on your preference.
Paragraph 4: You can also consider using weighted filling, such as rice or crushed walnut shells, if you’d like the chicken to sit more solidly. This is especially helpful if you want to use it as a paperweight or decorative table piece.
Paragraph 5: Don’t forget your pattern template! While some crafters freehand their chickens, having a printable or hand-drawn template ensures uniformity—especially if you’re making several at once for a gift set or market booth.
Paragraph 6: Optional but fun extras include embroidery floss for details, fabric paint, mini bows or charms, and ribbon loops for hanging. These additions can turn your chicken from a simple softie into a personalized treasure.
3. Step-by-Step: Making the Lucky Chicken
Paragraph 1: Start by choosing and preparing your materials. If you’re sewing, cut out your triangle or rectangle fabric pieces according to the Lucky Chicken – Pattern instructions. If you’re crocheting, begin with the base and work your way up using the indicated stitch counts.
Paragraph 2: For sewn chickens, sew your fabric pieces right sides together, leaving a small opening. Clip corners and turn it right side out. For crocheted versions, stuff as you go or leave an opening at the base to insert stuffing later.
Paragraph 3: Fill your chicken with stuffing, being careful not to overstuff. The goal is for it to be plump but still soft. If you’re adding weighted material, add it first and top off with fiberfill for a smooth finish.
Paragraph 4: Close the opening with a ladder stitch for fabric or a whipstitch for crochet. Make sure your seam is secure, especially if the chicken will be handled frequently or given to children.
Paragraph 5: Add your features. Sew on buttons for eyes, cut and glue or stitch on felt for the beak, wings, and comb. You can also embroider the eyes and details for a softer, safer version suitable for babies or pets.
Paragraph 6: Finish your Lucky Chicken – Pattern with any decorative elements you’d like. Attach a loop for hanging, tie a ribbon around its neck, or add small charms for extra flair. And that’s it—your lucky chicken is ready to spread joy and good fortune!
4. Fun Uses and Creative Variations
Paragraph 1: One of the best things about the Lucky Chicken – Pattern is its versatility. You can use your finished chickens in so many fun and creative ways depending on your needs or preferences.
Paragraph 2: Use them as decorative pieces in your kitchen, craft room, or on a windowsill. Their cheerful appearance adds a pop of color and personality to any space.
Paragraph 3: These chickens make wonderful gifts for friends, especially those who appreciate handmade crafts or folk-inspired items. Package a few together in a fabric bag for a delightful housewarming or holiday present.
Paragraph 4: They’re also great for markets or craft fairs. Because they’re quick to make and highly customizable, you can offer a wide range of styles and colors to appeal to different customers.
Paragraph 5: Turn them into functional items like pincushions, sachets (with lavender filling), or keychain charms. You can even make a mini version to hang from your car’s rearview mirror or on a holiday tree.
Paragraph 6: Get kids involved in a safe version of the craft by having them choose fabric, stuff the chickens, or help with simple embellishments. It’s a fun and creative activity that encourages imagination and fine motor skills.
FAQ
Q1: What is the Lucky Chicken used for?
The Lucky Chicken – Pattern creates a soft chicken-shaped craft that can be used for decoration, gifting, good luck charms, pincushions, or functional items like sachets and keychains.
Q2: Is this project beginner-friendly?
Yes! The pattern is simple and ideal for beginners in both sewing and crochet. It uses basic shapes and stitches, and the construction is straightforward.
Q3: How much fabric or yarn do I need?
You only need small scraps or partial skeins—less than a fat quarter of fabric or under 50g of yarn for a single chicken.
Q4: Can I machine wash my lucky chicken?
If you’re using washable materials and fillings, yes. However, spot cleaning is recommended for longevity, especially with embellishments.
Q5: Are there free patterns available for the Lucky Chicken?
Yes! Many designers offer free or low-cost Lucky Chicken – Pattern downloads online. Look on crafting blogs, Etsy, Ravelry, or Pinterest.
Q6: What size should my chicken be?
It’s completely up to you. Most chickens are palm-sized (3–5 inches tall), but you can scale your pattern up or down depending on your project needs.
Conclusion
The Lucky Chicken – Pattern is a joyful and rewarding craft project that brings charm, creativity, and a little good fortune into your hands. Whether you’re sewing, crocheting, or even mixing materials, making your own lucky chicken is a fun way to repurpose scraps and share your handmade love with others.
In this guide, we explored what makes this pattern special, the tools and materials needed, step-by-step instructions, creative uses, and answers to common questions. Now it’s your turn to create your own lucky chicken and let your imagination fly!
We’d love to hear from you—have you tried making the Lucky Chicken – Pattern? What colors or materials did you use? Leave your honest opinion and any helpful suggestions in the comments below to inspire and support fellow crafters.