The Patchwork Lucky Star Block – Pattern is a timeless quilt design that radiates beauty, balance, and charm. Known for its stunning geometric symmetry, this block is often used to represent hope, dreams, and a sense of guidance—just like a star shining in the night sky. Perfect for quilters of all skill levels, this pattern brings a magical touch to any quilt, making it both elegant and meaningful.
What makes the Patchwork Lucky Star Block – Pattern so special is its combination of precision and creativity. Each pointed starburst comes together through careful cutting and stitching, creating a captivating focal point. Whether you’re designing a full quilt or a single block, the Lucky Star adds depth, texture, and a sense of harmony to your project.
This block has become a favorite among quilters who love traditional patterns with a modern twist. Its versatility allows for endless variations—through color, layout, and scale—making it suitable for everything from wall hangings to bedspreads. With the right techniques and fabric choices, the Patchwork Lucky Star Block – Pattern can turn an ordinary quilt into an extraordinary masterpiece.
1. The History and Meaning Behind the Patchwork Lucky Star Block – Pattern
The Patchwork Lucky Star Block – Pattern carries a deep sense of symbolism and artistry. Throughout history, stars have represented light, luck, and navigation—guiding people both literally and metaphorically. Incorporating this celestial symbol into quilting brings that same sense of guidance and hope into fabric form.
The Lucky Star block first appeared in traditional American quilting during the 19th century, a period when symbolism played a major role in handmade crafts. Each quilt told a story, and stars often represented ambition, faith, and optimism. The Patchwork Lucky Star Block – Pattern continues that legacy today, reminding us that even in difficult times, creativity and craftsmanship can light the way.
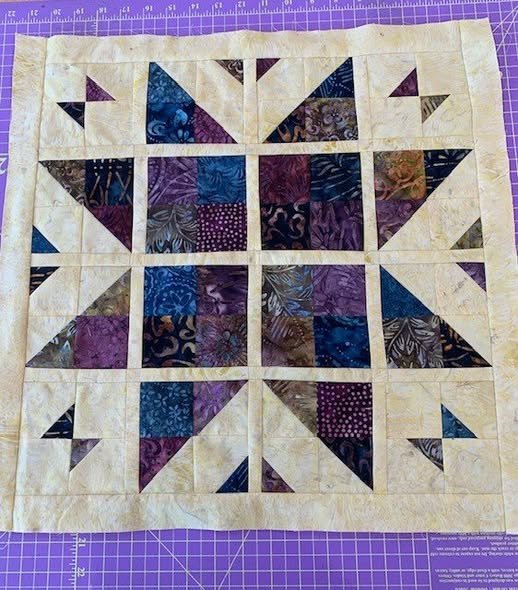
This design typically features eight points radiating from a central square, forming a balanced and symmetrical shape. The precision of its angles makes it a true test of skill and patience, but also one of the most rewarding patterns to master. The geometric beauty of the Lucky Star creates a sense of movement and energy within the quilt, drawing the eye naturally toward the center.
Modern quilters love this pattern not only for its historical roots but also for its adaptability. It can be reimagined in endless ways—through color gradients, patterned fabrics, or even modern minimalist interpretations. The star motif works beautifully in both vintage and contemporary quilts, blending tradition with personal expression.
Moreover, many quilters believe that creating a Patchwork Lucky Star Block – Pattern brings good fortune. Whether it’s made as a gift or for personal use, this block symbolizes positivity, success, and connection. It’s not just a piece of fabric—it’s a wish, a dream, and a work of art combined into one.
Ultimately, the meaning behind this pattern lies in its dual nature: it’s both a technical challenge and a creative opportunity. Each finished star serves as a reminder that, with patience and precision, beauty always shines through.
2. Materials and Preparation
Before beginning your Patchwork Lucky Star Block – Pattern, preparation is key to ensuring a smooth and enjoyable quilting experience. The accuracy of your cutting, stitching, and pressing will determine how clean and professional your final block looks.
Start by selecting your fabrics. The star design shines best when you use a mix of contrasting colors or patterns. A bright or bold fabric for the star itself will make it stand out against a lighter or more neutral background. You can also experiment with ombré or gradient fabrics to create a glowing, dimensional effect.
For a classic version, choose three to four different fabrics: one for the star points, one for the background, and one accent color for the center square. This contrast enhances the definition of the Patchwork Lucky Star Block – Pattern, giving it a crisp, eye-catching appearance.
Next, gather your essential tools. You’ll need a rotary cutter, self-healing cutting mat, quilting ruler, sewing machine, iron, and thread that complements your color scheme. For best results, use a ¼-inch seam guide on your sewing machine to maintain consistent seam allowances throughout your project.
Before cutting, always prewash and press your fabrics. This step helps prevent shrinkage and ensures smooth, even edges. Once your fabrics are ready, use your rotary cutter and ruler to cut precise squares and triangles according to your pattern measurements. Accurate cutting is crucial for maintaining the symmetry of your star.
Finally, arrange your fabric pieces on a flat surface to preview how your colors and shapes will come together. This visual planning step allows you to adjust placement and achieve a balanced design before you start stitching. With careful preparation, you’ll be ready to create a flawless Patchwork Lucky Star Block – Pattern that glows with craftsmanship and charm.
3. Step-by-Step Sewing Process
Sewing the Patchwork Lucky Star Block – Pattern requires patience, precision, and a love for detail. Though it may appear complex, breaking it into smaller steps makes the process manageable and enjoyable.
Start with your half-square triangles (HSTs), which form the star’s points. To make these, pair a light fabric square with a darker one. Draw a diagonal line across the lighter square, sew a quarter inch on both sides of the line, and then cut along the line. Press the seams open, and you’ll have two perfect HST units. Repeat this until you have enough for all eight star points.
Next, assemble the center square. This can be a single fabric piece or a smaller four-patch design for extra detail. The center square serves as the heart of your Patchwork Lucky Star Block – Pattern, so choose a fabric that contrasts beautifully with the star points.
Lay out all your pieces to form the full block. You should have a 3×3 grid: the center square in the middle, four star-point units around it, and background squares in the corners. Double-check your layout before sewing to ensure the star points face the correct direction.
Begin sewing each row together, using a ¼-inch seam allowance. Press the seams after each row, alternating the pressing direction to help the rows nest together neatly. Once all rows are complete, sew them together to form the finished block.
After assembling, press the entire block carefully, focusing on keeping it flat and square. Trimming your block to the correct size ensures that it aligns perfectly when joined with other blocks in a larger quilt.
To add texture and detail, consider quilting along the star’s edges or within the background spaces. Echo quilting, in which you sew parallel lines following the star’s shape, enhances its definition and makes the Patchwork Lucky Star Block – Pattern truly shine.
4. Creative Variations and Design Ideas
One of the best things about the Patchwork Lucky Star Block – Pattern is its flexibility. It can be adapted to fit almost any theme, color palette, or style. With a few creative adjustments, you can make this design completely your own.
Try experimenting with scale. Larger blocks create bold, dramatic focal points in bed quilts, while smaller versions are perfect for table runners, pillows, or wall hangings. The modular nature of this pattern makes it easy to mix and match different sizes within the same quilt for a dynamic effect.
Color is another powerful way to personalize your design. Traditional Lucky Stars often feature bold contrasts, such as navy and white or red and gold. For a modern twist, try using soft neutrals, pastel gradients, or even monochromatic schemes for a minimalist aesthetic.
You can also create a scrappy version using leftover fabric pieces. Mixing prints and textures gives your Patchwork Lucky Star Block – Pattern a cozy, handmade feel full of character and history. This is an excellent way to repurpose fabric scraps and add storytelling to your quilt.
For added dimension, try fussy cutting—a technique where you cut fabric so that specific motifs or patterns appear within the star points. This can create a playful or themed design, especially when using florals, geometric prints, or seasonal fabrics.
Finally, think about how you want to display your finished block. A single Lucky Star framed in embroidery hoops makes a charming wall decoration. Multiple blocks joined together can form an entire quilt top that radiates warmth, craftsmanship, and creativity. The possibilities are endless when working with the Patchwork Lucky Star Block – Pattern.
FAQ – Patchwork Lucky Star Block – Pattern
1. What is the Patchwork Lucky Star Block – Pattern?
It’s a traditional quilt block design featuring an eight-pointed star, symbolizing luck, hope, and creativity.
2. Is this pattern suitable for beginners?
Yes. With patience and accurate cutting, even beginners can successfully complete this block while improving their piecing skills.
3. What fabrics work best for this pattern?
High-quality cotton fabrics are ideal. Use contrasting colors to make the star stand out against the background.
4. Can I hand sew the Lucky Star Block?
Absolutely. While machine sewing offers speed, hand stitching gives a beautiful, traditional finish and extra control over your seams.
5. How large should the finished block be?
Common sizes range from 12×12 inches to 18×18 inches, but you can adjust measurements depending on your project.
6. How can I personalize my Lucky Star Block?
Experiment with color, scale, and layout. Try scrappy versions, gradient fabrics, or additional embellishments like embroidery or decorative quilting.
Conclusion
The Patchwork Lucky Star Block – Pattern is a true classic in the quilting world—rich in history, symbolism, and versatility. Its precise geometry and glowing design make it both a technical challenge and a creative delight. Every point, seam, and color choice contributes to a final piece that feels both timeless and personal.
Whether you’re crafting a gift, creating a statement quilt, or simply exploring new patterns, the Lucky Star invites you to celebrate patience, artistry, and connection. It reminds us that even small pieces, when joined thoughtfully, can shine brightly together.
If you enjoyed this article or decide to try this pattern yourself, please share your honest opinion and suggestions below. Your feedback helps inspire other quilters to discover the magic and meaning behind this beloved design.