Make a Bird Pin Cushion – Pattern is one of the most delightful and rewarding sewing projects you can undertake, combining functionality with an undeniable aesthetic charm. For any sewing enthusiast, having a dedicated place to keep pins safe is essential, but why settle for a plain, store-bought cushion when you can create something that reflects your personal style? In this guide, we will explore the nuances of creating a handmade sewing accessory that is as practical as it is adorable, ensuring your workspace remains organized and inspired.
Whether you are a seasoned quilter or a complete beginner, learning how to Make a Bird Pin Cushion – Pattern provides a fantastic opportunity to practice small-scale stitching and detail work. These tiny avian companions serve as perfect gifts for friends who sew, or even as decorative accents for your home office. By following a structured approach, you can transform scraps of your favorite fabrics into a professional-looking tool that will sit faithfully by your sewing machine for years to come.
The process of finding or creating a reliable Make a Bird Pin Cushion – Pattern involves understanding the balance between shape and stability. A well-designed pattern ensures the bird stands upright and has enough surface area to hold a large number of pins without losing its form. Throughout this article, we will delve into the materials required, the step-by-step assembly process, and the finishing touches that make your project truly unique. Let’s dive into the world of creative sewing and bring your fabric bird to life.
1. Selecting the Right Fabric for Your Make a Bird Pin Cushion – Pattern
When you decide to Make a Bird Pin Cushion – Pattern, the first step is choosing high-quality cotton fabric that can withstand repeated pin pricks. Look for tightly woven materials like quilting cotton, which holds its shape well and doesn’t fray excessively during the turning process. Using vibrant prints or subtle pastels can completely change the personality of your bird, so feel free to experiment with different color palettes.
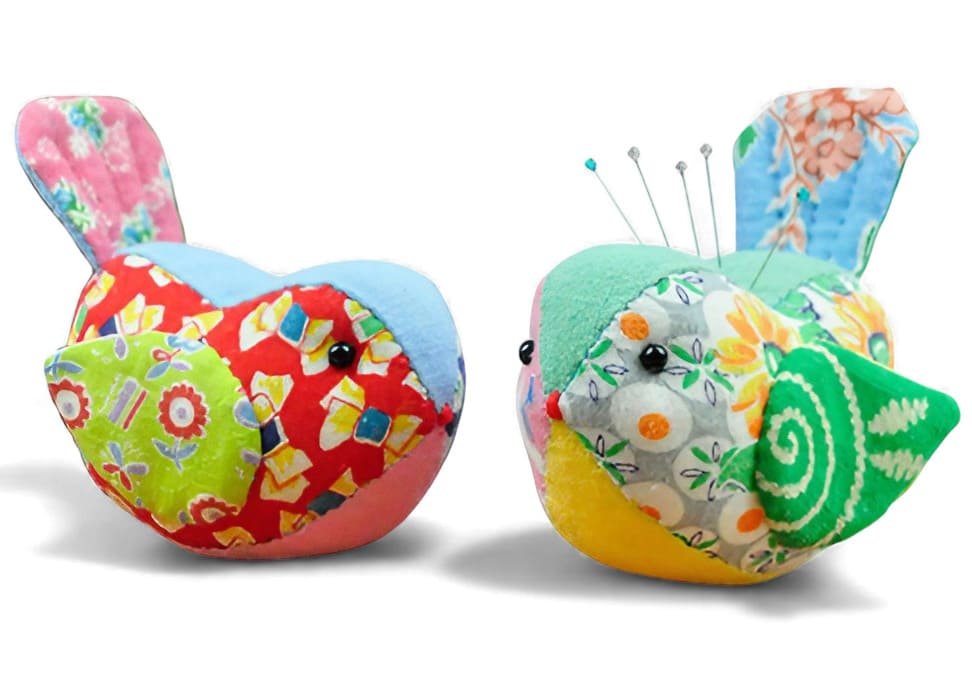
The Make a Bird Pin Cushion – Pattern works best when you use contrasting fabrics for the wings and the body. This creates a visual depth that makes the bird look more lifelike and professional. Many crafters prefer using felt for the beak and tail sections because it provides a sturdy texture that doesn’t require hemming. Choosing the right weight of fabric ensures that the needle glides in easily while staying securely in place.
Before you begin cutting, it is crucial to wash and iron your fabric to prevent any future shrinkage. Since the Make a Bird Pin Cushion – Pattern involves precise curves, a crisp piece of fabric will be much easier to trace and cut accurately. You might also consider using a stabilizer or interfacing if your chosen fabric is particularly thin or slippery, giving the bird more structure.
The choice of stuffing is equally important when you Make a Bird Pin Cushion – Pattern. While polyester fiberfill is common, some sewers prefer crushed walnut shells or emery sand. These heavier fillings provide weight, ensuring the bird stays stationary on your table, and the abrasive nature of emery helps sharpen your pins every time you stick them in.
Sustainability is a great factor to consider when working on this project. You can Make a Bird Pin Cushion – Pattern using leftover scraps from larger projects, making it an eco-friendly way to reduce waste. Combining different textures, such as a corduroy belly and a silk wing, can add a unique tactile experience to your finished sewing tool.
Finally, remember that the visual appeal of your Make a Bird Pin Cushion – Pattern depends on your color coordination. Warm tones like reds and yellows can make the bird look like a robin or a canary, while blues and greys can mimic a blue jay or a sparrow. The fabric is the “soul” of your bird, so take your time selecting pieces that bring you joy every time you look at them.
2. Essential Tools and Preparation for the Make a Bird Pin Cushion – Pattern
To successfully Make a Bird Pin Cushion – Pattern, you will need a few basic sewing tools that are likely already in your kit. A pair of sharp fabric scissors is non-negotiable for cutting out the small, intricate pieces of the pattern. You will also need a fine-point marking pen or tailor’s chalk to transfer the pattern lines onto the wrong side of your fabric accurately.
Precision is key when you Make a Bird Pin Cushion – Pattern, so using a high-quality thread is highly recommended. A standard all-purpose polyester thread works well for most fabrics, providing the strength needed to hold the stuffing tight. If you plan on hand-stitching the final closure, a matching thread color will help hide the stitches for a seamless look.
The actual Make a Bird Pin Cushion – Pattern usually consists of a few main pieces: the body (cut in two mirrored halves), the belly gusset, the wings, and the beak. Having these pieces printed or drawn on sturdy cardstock makes it much easier to trace them multiple times if you plan on making a whole flock of birds. Always leave a small seam allowance as indicated in your specific pattern instructions.
Pins and clips are your best friends during the assembly of your Make a Bird Pin Cushion – Pattern. Because the bird has many curved edges, pinning frequently will prevent the fabric from shifting while you sew. For very tight curves, you might find that sewing slowly and lifting the presser foot occasionally helps maintain the perfect shape of the bird’s head and breast.
An iron is a tool that many beginners overlook, but it is vital when you Make a Bird Pin Cushion – Pattern. Pressing your seams open or to one side as you go will result in a much crisper finished product. It helps the bird look “plump” rather than “lumpy” once the stuffing is added, and it makes the final hand-stitching much easier to manage.
Lastly, consider the small details like safety eyes or embroidery floss for the facial features. When you Make a Bird Pin Cushion – Pattern, you have the choice of sewing on small beads for eyes or simply stitching a French knot. If the cushion is for a household with small children, embroidery is the safest option to avoid any choking hazards.
3. Step-by-Step Assembly of Your Make a Bird Pin Cushion – Pattern
The assembly phase of the Make a Bird Pin Cushion – Pattern begins with sewing the body pieces together. Start by placing the two main body sections right sides together and stitching along the top back curve. It is important to leave the bottom area open where the belly gusset will be attached, as this provides the base for the bird to sit on.
Next, you will attach the belly gusset, which is often the trickiest part of the Make a Bird Pin Cushion – Pattern. Align the center of the gusset with the front “chest” seam of the bird and pin carefully toward the tail. This piece gives the bird its three-dimensional roundness, allowing it to hold plenty of pins and stand upright without tipping over.
Once the main body is stitched, you must clip the curves before turning the fabric right side out. In any Make a Bird Pin Cushion – Pattern, clipping small notches into the seam allowance allows the fabric to stretch and lay flat once turned. Be careful not to cut through your stitches, but get close enough to release the tension of the fabric.
Turning the bird right side out is a satisfying moment in the Make a Bird Pin Cushion – Pattern process. Use a turning tool or a dull chopstick to gently push out the beak and tail areas. Once turned, give the bird a good press with your iron to define the shape before you begin the stuffing process, which brings the character to life.
Now it is time to stuff your Make a Bird Pin Cushion – Pattern. Start with small clumps of filling, pushing them into the furthest corners like the head and tail first. Pack the filling firmly; a soft bird will sag over time, but a firmly stuffed bird will hold its shape and keep your pins more secure. This is where the bird truly takes its form.
The final step in the assembly is to close the opening using a ladder stitch (or hidden stitch). As you finish your Make a Bird Pin Cushion – Pattern, this hand-sewn closure should be virtually invisible. After the body is sealed, you can top-stitch the wings onto the sides and add your chosen eye details to complete the look.
4. Customizing and Optimizing Your Make a Bird Pin Cushion – Pattern
Customization is what makes the Make a Bird Pin Cushion – Pattern so much fun for the modern crafter. You can add a small loop of ribbon to the back if you want to hang it, or even add a weighted base using a large washer or a small bag of poly-pellets. This ensures that even when the bird is full of heavy pins, it remains stable on your sewing table.
For those who want to take their Make a Bird Pin Cushion – Pattern to the next level, consider adding decorative embroidery to the wings. Simple running stitches or feather-like patterns can add a sophisticated touch of “folk art” to the project. You can also use different textures like velvet or lace overlays to give the bird a vintage or Victorian aesthetic.
The Make a Bird Pin Cushion – Pattern can also be adapted into different sizes. By scaling the pattern up on a photocopier, you could create a small plush toy or a doorstop. Scaling it down allows you to create “finger” pin cushions or even decorative charms for your sewing bag. The versatility of the bird shape is one of its greatest strengths.
If you are making the Make a Bird Pin Cushion – Pattern as a gift, consider the recipient’s favorite colors or the decor of their sewing room. You can even personalize the bird by embroidering their initials onto the wing or the belly. This transforms a simple utility item into a cherished keepsake that shows real thought and effort.
Another great tip for your Make a Bird Pin Cushion – Pattern is to include a small “scent” pouch inside. A few dried lavender buds mixed with the stuffing can provide a calming aroma while you work. This tiny addition turns a functional tool into a sensory experience, making your sewing time even more relaxing and enjoyable.
Finally, don’t be afraid to experiment with the tail design. Some variations of the Make a Bird Pin Cushion – Pattern feature long, elegant felt tails, while others have short, stubby fabric tails. Each change modifies the bird’s silhouette and “personality.” The more you experiment, the more you will refine your technique and create a design that is uniquely yours.
FAQ – Frequently Asked Questions
1. What is the best filling for a bird pin cushion?
While polyester fiberfill is great for shape, a mixture of fiberfill and crushed walnut shells is often best. The shells provide weight so the bird doesn’t tip over and help keep your pins clean and sharp.
2. Can I make this bird pin cushion without a sewing machine?
Yes! The Make a Bird Pin Cushion – Pattern is small enough that it can be easily sewn by hand using a tight backstitch. It may take longer, but it allows for great control over the small curves.
3. How long does it take to complete the pattern?
For an intermediate sewer, it usually takes about 1 to 2 hours from cutting the fabric to the final decorative touches. Beginners might want to set aside an afternoon to ensure they don’t rush the curved seams.
4. What size should the bird be?
Most bird pin cushions are about 4 to 5 inches long. This size is large enough to be functional for holding many pins but small enough to remain a cute, unobtrusive accessory on your workspace.
5. Is this project suitable for children?
Absolutely! It is a wonderful project for teaching children basic sewing skills, especially if you use felt, which is easier to handle than slippery cotton fabrics.
6. Do I need to use a specific seam allowance?
Most patterns use a 1/4 inch (6mm) seam allowance. Because the project is small, sticking strictly to the allowance is important to ensure the pieces fit together correctly.
Conclusion
In this article, we have explored everything you need to Make a Bird Pin Cushion – Pattern, from selecting the perfect cotton fabrics to the final hand-stitched details. We discussed the importance of using the right tools, the intricacies of sewing the belly gusset, and how to customize your bird to make it a unique piece of art. Creating your own sewing accessories not only saves money but also adds a layer of personal joy to every project you start. This bird is more than just a place to stick your needles; it is a companion in your creative journey.
We hope this guide inspires you to pick up your needle and thread and start crafting your own avian friend. Whether you make one for yourself or a whole flock for your friends, the process is sure to be a delight. Please leave your sincere opinion and any suggestions you might have in the comments below—we would love to hear about your experience with the Make a Bird Pin Cushion – Pattern!