If you’re looking for a cozy and creative project to welcome the autumn season, one of the most charming ideas is to make fall acorn coasters – pattern based. These handmade fabric coasters not only add a warm, seasonal touch to your home but also make thoughtful gifts for friends, family, or even as items to sell at fall craft fairs. Acorns symbolize strength and new beginnings—what better inspiration for a beautiful fall DIY project?
Creating your own set of fall acorn coasters is simpler than it may seem, even if you’re just getting started with sewing or quilting. With just a few materials, a printable acorn coaster pattern, and a bit of time, you can make coasters that are both decorative and functional. Each coaster can be customized with different fabrics, textures, and embellishments to match your home’s autumn aesthetic.
This guide will walk you through everything you need to know to make fall acorn coasters – pattern, from gathering the right materials to cutting, sewing, and finishing your project with flair. These coasters are a perfect weekend project, especially when the weather starts to cool and you want to spend more time indoors crafting something useful and festive.
1. Materials Needed to Make Fall Acorn Coasters
To begin your crafting journey, it’s essential to gather the right supplies. When preparing to make fall acorn coasters – pattern, quality materials will ensure your coasters look great and stand the test of time.
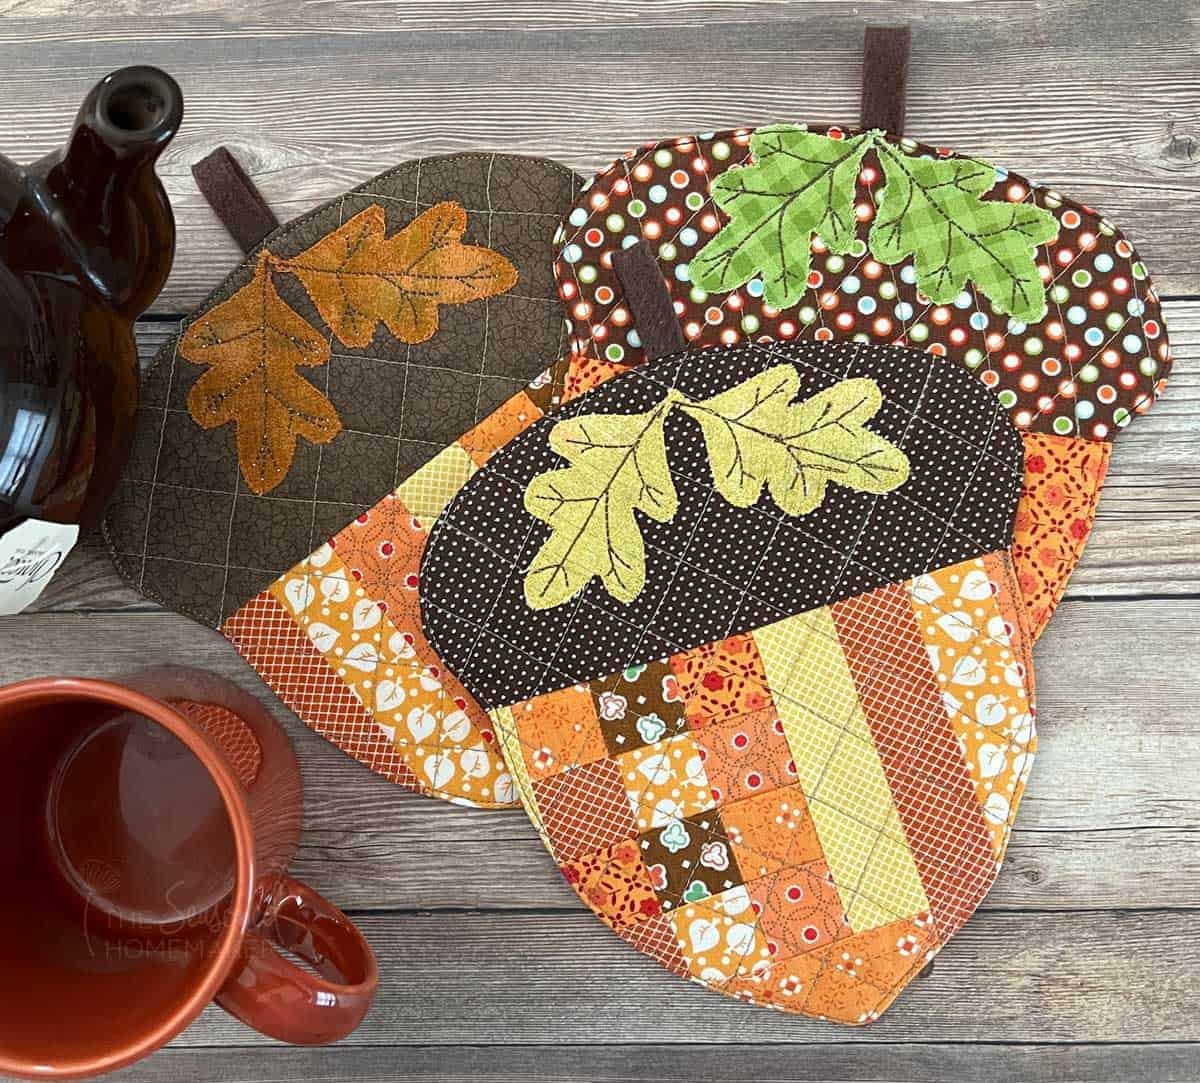
Start with 100% cotton fabric, which is the ideal material for quilting and coaster making. Choose at least two fabric designs per coaster: one for the acorn base and another for the acorn cap. Fall colors like browns, tans, oranges, and deep reds work beautifully for this theme.
Next, you’ll need batting for the center of the coaster. Low-loft cotton batting is recommended because it adds a bit of cushion and absorbency without being too bulky. This gives your coasters a quilted, finished look and makes them more durable.
Don’t forget fusible interfacing if you want to add extra firmness. This will help your coaster maintain its shape after washing and usage.
Other essential tools include thread in a coordinating color, fabric scissors or a rotary cutter, quilting pins or clips, a sewing machine, and optionally a fabric marking pen to trace your pattern accurately.
Download or draw a printable acorn coaster pattern template. You can find free ones online or create a custom one with simple curved shapes. The acorn cap and base are usually made separately and sewn together to form the full acorn.
Make sure your sewing machine is set up with a new needle, and press all your fabric with an iron before cutting to avoid uneven edges. Being precise from the beginning makes the sewing process smoother and helps your coasters turn out looking clean and professional.
2. Cutting and Assembling the Fabric Layers
Once your materials are ready, the next step in the process to make fall acorn coasters – pattern is cutting and layering your fabric. Taking your time here will result in a much neater final product.
Begin by printing and cutting out your acorn coaster pattern. Trace the base shape and the cap shape onto the back side of your selected fabrics using a fabric pen or chalk. You’ll need one base piece, one cap piece, one backing piece, and one piece of batting for each coaster.
Carefully cut each piece of fabric and batting along the lines, making sure all edges are smooth. Try not to tug or stretch the fabric as you cut to avoid any warping.
Layer your pieces in the correct order. Place the backing fabric face down, then add the batting, and finally place your acorn base fabric face up. Align them carefully and pin the layers together so they don’t shift during sewing.
Next, attach the acorn cap to the top of the base piece using a straight stitch across the bottom edge of the cap. This gives the acorn a classic two-toned look and helps hold the top fabric in place before quilting.
If you want to add decorative topstitching or embroidery to the cap, now is a great time. You can use contrasting thread to mimic the texture of an acorn’s cap, or even sew on a small felt stem for added character.
Once all parts are assembled and pinned, your coaster is now ready for quilting and sewing. Double-check your layers are aligned and your stitch lines are marked (if needed) before heading to the sewing machine.
3. Quilting and Stitching the Acorn Coasters
Quilting is where your acorn coaster really starts to take shape. This is the step where you add structure and texture to your creation and ensure all layers are secured together.
Begin by stitching through all layers, outlining the acorn shape and reinforcing the seam between the base and cap. This not only defines the acorn but also secures the batting in place and prevents it from shifting over time.
If you’re using quilting lines to add detail, sew curved or wavy lines across the base of the acorn. These lines can mimic the natural texture of acorn shells and add a lovely handcrafted look.
After quilting the surface, sew around the outer edge of the acorn, but be sure to leave a small opening (about 2 inches) for turning the coaster right side out. Use a short stitch length and backstitch at the beginning and end.
Trim any excess fabric around the seams, especially at the curves. Be careful not to cut through your stitching. Clip curved areas to help the coaster lay flat once turned.
Turn your acorn coaster right side out through the opening. Use a blunt tool like a chopstick to push out the edges and curves, making sure the shape is smooth and well-defined.
Press the coaster flat with an iron, folding the fabric at the opening inward. Then, topstitch around the entire outer edge of the coaster. This will close the opening and give the coaster a clean, professional finish.
4. Decorating and Customizing Your Coasters
Now that you’ve assembled your basic coasters, you can take creativity a step further. When you make fall acorn coasters – pattern, adding personal touches makes your project even more special.
Start by experimenting with fabric combinations. Use different textures for the cap and body—like burlap or felt for the cap and patterned cotton for the base. This adds dimension and a rustic, cozy look to the coaster.
You can also personalize your coasters by adding initials or monograms with embroidery. This makes each coaster unique and perfect for gifting during Thanksgiving or autumn birthdays.
Try stitching leaf appliqués onto the corner of each acorn or using fabric paint to draw little vines or fall details. These small accents go a long way in enhancing the seasonal vibe.
For a rustic farmhouse look, add a loop of twine or ribbon at the top so your coasters can be hung as wall or kitchen decor when not in use. They double as charming fall ornaments!
If you’re giving your coasters as a gift, consider creating a matching set with coordinating colors. Tie them with a ribbon and add a handmade tag with care instructions.
Lastly, keep track of your favorite patterns and templates so you can reuse them next season or tweak them for other holidays like Halloween or Thanksgiving. Once you’ve made your first set, the possibilities are endless.
FAQ – Make Fall Acorn Coasters – Pattern
Q1: What type of fabric works best for fall acorn coasters?
A: 100% cotton is ideal for the base. For the cap, you can also use textured fabrics like felt or linen to create a contrast.
Q2: Do I need a sewing machine to make these?
A: While a sewing machine speeds up the process, you can hand-sew these coasters using a backstitch and a little patience.
Q3: Where can I find an acorn coaster pattern?
A: There are many free acorn templates available online, or you can draw your own with basic shapes—just make sure it’s symmetrical and fits your desired coaster size.
Q4: Can I wash these coasters in a washing machine?
A: Yes, wash them gently in cold water. Air drying is best to maintain their shape, especially if you’ve added embellishments.
Q5: What size should an acorn coaster be?
A: A typical coaster size is about 4.5 to 5 inches tall. You can adjust the size based on your personal preference.
Q6: How many layers should each coaster have?
A: Ideally, each coaster should have three layers: front fabric, batting in the middle, and backing fabric.
Conclusion
In this complete guide, you learned how to make fall acorn coasters – pattern with step-by-step instructions. From choosing the right fabrics and cutting layers to sewing and customizing your acorn shapes, each part of the process offers room for creativity and personalization.
These seasonal coasters are not only functional but also bring a handmade touch to your fall decor. Whether you’re making them for yourself, for gifts, or even for sale, they’re a rewarding project that combines simplicity with charm.
We’d love to hear from you! Leave a sincere opinion in the comments and feel free to share your finished projects or suggestions for future tutorials
. Happy crafting and happy fall!