The Martha Washington’s Star Block – Pattern is a timeless piece of American quilting history that continues to inspire modern makers with its elegant geometry and rich heritage. Originally named after the first First Lady of the United States, this specific quilt block design represents the intersection of traditional craftsmanship and domestic artistry. For many enthusiasts, mastering the Martha Washington’s Star Block – Pattern is a rite of passage, as it balances the complexity of star points with the simplicity of basic patchwork construction.
In the world of textile arts, this pattern is celebrated for its versatility, allowing quilters to experiment with fussy cutting, bold color palettes, and varied fabric textures. Whether you are looking to create a historical reproduction or a contemporary wall hanging, the Martha Washington’s Star Block – Pattern provides a sturdy foundation for any project. Understanding the quilt geometry behind this star is essential for achieving those crisp, sharp points that make the design truly pop against a neutral background.
As we dive into the specifics of this quilting tutorial, it is important to remember that precision is your best friend when working with the Martha Washington’s Star Block – Pattern. Using high-quality cotton quilting fabric and maintaining a consistent quarter-inch seam allowance will ensure that your blocks lay flat and align perfectly. Throughout this guide, we will explore the cutting instructions, assembly steps, and design variations that will help you bring this iconic star pattern to life in your own sewing room.
1 The Anatomy and Geometry of the Martha Washington’s Star Block – Pattern
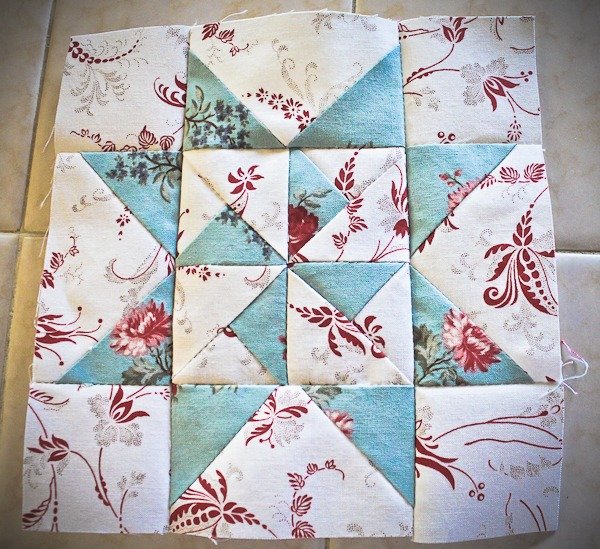
The Martha Washington’s Star Block – Pattern is fundamentally an eight-pointed star housed within a square grid, often referred to as a sawtooth star variation. To master this design, you must understand the relationship between the center square and the surrounding flying geese units. These units are the building blocks of the star’s “rays,” giving the pattern its characteristic celestial appearance.
When selecting your quilting supplies, consider how color value impacts the visibility of the Martha Washington’s Star Block – Pattern. High contrast between the star points and the background fabric makes the geometric shape more defined and striking. If the colors are too similar, the intricate seam lines may get lost, mudding the overall visual effect of the finished quilt block.
Precision in fabric cutting is the most critical stage of the Martha Washington’s Star Block – Pattern. Because the design relies on multiple triangular intersections, even a sixteenth of an inch error can lead to blunt points or “wonky” edges. Using a rotary cutter and an acrylic quilting ruler is highly recommended to maintain the mathematical integrity of the block layout.
The “Star” itself is composed of four flying geese components that border a central focal point. In the Martha Washington’s Star Block – Pattern, the center is usually a solid square, but it can be swapped for a four-patch or a square-in-a-square for added complexity. This modular nature is why the pattern remains a favorite among intermediate quilters who enjoy a bit of customization.
In terms of quilt block sizing, this pattern is incredibly scalable, though it is most commonly drafted as a 12-inch finished block. This size allows for easy math when calculating fabric yardage and fits perfectly into standard quilt layouts. Larger blocks can showcase large-scale floral prints, while smaller versions test your miniature quilting skills.
Finally, the Martha Washington’s Star Block – Pattern serves as a bridge between the past and the present. It evokes the Colonial era of sewing while fitting seamlessly into modern farmhouse decor. By understanding the “anatomy” of the lines and angles, you gain the creative freedom to manipulate the pattern’s aesthetic to suit any style.
2 Essential Materials and Cutting Guides for Your Star Project
Before you begin sewing the Martha Washington’s Star Block – Pattern, you need to gather the right sewing notions. A sharp microtex needle is preferred for piecing, as it glides through quilt shop quality cotton without pulling the threads. You will also need all-purpose polyester or cotton thread in a neutral color like cream or grey to ensure the seams don’t shadow through.
The cutting instructions for a standard Martha Washington’s Star Block – Pattern typically require three different fabrics: the star point fabric, the center square fabric, and the background fabric. For a 12-inch block, you will generally cut one 6.5-inch square for the center and various 3.5-inch squares for the corners. The flying geese units require their own specific rectangular and square cuts.
To ensure your Martha Washington’s Star Block – Pattern is successful, always starch your fabric before cutting. Starching adds stiffness to the cotton, which prevents the bias edges of the triangles from stretching during the sewing process. This step is a “pro-tip” for keeping your star points perfectly sharp and preventing the block from becoming distorted.
Organization is key when handling the many pieces of the Martha Washington’s Star Block – Pattern. Use clover clips or labeled bins to keep your “A,” “B,” and “C” cuts separate. If you are making a full-sized quilt, you will be dealing with hundreds of small pieces, so a systematic approach to your sewing room workflow will save you hours of frustration.
Don’t forget the importance of a reliable iron and a wool pressing mat. In the Martha Washington’s Star Block – Pattern, how you press your seams is just as important as how you sew them. Most quilters recommend pressing seams to the dark side or “nesting” them to reduce bulk where the star points meet, ensuring a professional finish.
Lastly, double-check your ruler measurements against the pattern requirements. The Martha Washington’s Star Block – Pattern is unforgiving of “guesstimates.” If your initial squares are off by just a tiny bit, the final block will not measure a true 12.5 inches (unfinished), making it difficult to join with other blocks in your quilt top.
3 Step-by-Step Assembly of the Martha Washington’s Star Block – Pattern
The first phase of assembling the Martha Washington’s Star Block – Pattern involves creating the flying geese units. You will sew two small squares onto a larger rectangle using the stitch-and-flip method. This creates the “V” shape that forms the points of the star. Ensure you trim the excess seam allowance to a quarter inch to keep the block light.
Once your four flying geese are ready, the Martha Washington’s Star Block – Pattern begins to take shape in a nine-patch grid. Lay out your pieces on a design wall or a flat table: the center square in the middle, the four geese units on the sides, and four background squares in the corners. This visual check prevents you from sewing a piece upside down.
Sew the pieces together in horizontal rows first. Row one consists of a corner square, a geese unit, and another corner square. Row two features a geese unit, the center square, and another geese unit. Row three mirrors row one. This row-by-row construction is the standard way to assemble the Martha Washington’s Star Block – Pattern efficiently.
The “moment of truth” in the Martha Washington’s Star Block – Pattern occurs when you join the rows together. You must align the intersections of the star points carefully. Using fine glass-head pins to hold the “V” of the star points will help you avoid “chopping off” the tips of your star when the presser foot passes over them.
As you finish sewing the rows, the Martha Washington’s Star Block – Pattern should be pressed one final time. Press the top and bottom rows toward the outside and the middle row toward the center. This nesting technique allows the seams to lock together like a puzzle, creating perfectly flat joins and a very neat quilt back.
After the block is assembled, perform a squaring up check. Your Martha Washington’s Star Block – Pattern should ideally measure 12.5 inches square. If it is slightly larger, you can trim the edges; if it is smaller, check your seam allowance—you might be sewing slightly wider than a scant quarter-inch, which is a common hurdle for beginners.
4 Design Variations and Creative Styling for Modern Quilts
While the traditional Martha Washington’s Star Block – Pattern is iconic, don’t be afraid to experiment with modern quilting trends. You can use negative space by making the background a bold, solid color like navy or charcoal, which makes the star appear to glow. This “minimalist” approach breathes new life into the vintage pattern.
Another popular variation is the Scrappy Martha Washington Star. Instead of using just two or three fabrics, use a different fabric for every single star point. This uses up your fabric scraps and creates a vibrant, eclectic look. The Martha Washington’s Star Block – Pattern is particularly well-suited for this because its structure is strong enough to handle many colors.
You can also play with the scale of the pattern. By shrinking the Martha Washington’s Star Block – Pattern down to a 4-inch size, you can create intricate pincushions or quilted coasters. Conversely, blowing the pattern up to a 24-inch “mega block” allows you to create a striking baby quilt using only four blocks in total.
Consider the quilting motifs you will use once the top is finished. For a Martha Washington’s Star Block – Pattern, “stitch-in-the-ditch” helps emphasize the geometry, while free-motion quilting like feathers or swirls provides a beautiful contrast to the sharp straight lines of the star. The quilt texture will define the final “mood” of the piece.
For those who enjoy English Paper Piecing (EPP), the Martha Washington’s Star Block – Pattern can be adapted for hand-sewing. While more time-consuming, this method offers unparalleled precision for the star points. It’s a great “portable project” for quilters who like to sew while traveling or watching television.
Ultimately, the Martha Washington’s Star Block – Pattern is a canvas for your creativity. Whether you choose batik fabrics, reproduciton prints, or modern linens, the star remains a symbol of light and guidance. By mastering this one block, you unlock a thousand different quilt design possibilities that can be passed down through generations.
FAQ: Frequently Asked Questions about the Martha Washington’s Star Block – Pattern
1. Is the Martha Washington’s Star Block – Pattern beginner-friendly?
It is considered an intermediate-level pattern. While it uses basic shapes, the need for precise star points and matching seams can be challenging for an absolute beginner. However, with a slow pace and careful pinning, it is a great “stretch project.”
2. What is the difference between this and a Sawtooth Star?
The Martha Washington’s Star Block – Pattern is essentially a variation of the Sawtooth Star. The primary difference often lies in the historical naming and the specific proportions of the center square relative to the points, but the construction methods are nearly identical.
3. How much fabric do I need for one block?
For a 12-inch block, you generally need less than a fat quarter of each color. It is a very “economical” pattern, which is why it was so popular in historical times when fabric was a precious resource.
4. How do I stop my star points from getting cut off?
The secret is the scant quarter-inch seam. When you sew your rows together, ensure your needle passes exactly through the “X” created by the seams of your flying geese. If you sew too deep into the “X,” the point disappears.
5. Can I use this pattern for a “Quilt as You Go” project?
Yes! The Martha Washington’s Star Block – Pattern works beautifully with the QAYG method. Since it is a square block, you can quilt each star individually and join them later with sashing, which is great for those with small domestic sewing machines.
Conclusion
In this article, we have explored the intricate world of the Martha Washington’s Star Block – Pattern, covering everything from its geometric anatomy to the technical details of flying geese construction.
We discussed the importance of fabric selection, the necessity of accurate cutting, and how to troubleshoot common issues like blunt star points. This pattern is more than just a design; it is a piece of quilting history that allows you to connect with the artisans of the past while expressing your modern style.