When it comes to creating stunning quilt designs, one of the most popular patterns that quilters love to incorporate is the Mini Posies Quilt Block – Pattern.
This intricate and charming block adds a delightful touch of whimsy to any quilt, making it an ideal choice for both beginners and experienced quilters alike.
Whether you’re creating a small wall hanging, a cozy throw, or a large bed quilt, the Mini Posies Quilt Block – Pattern can bring color, beauty, and creativity to your project.
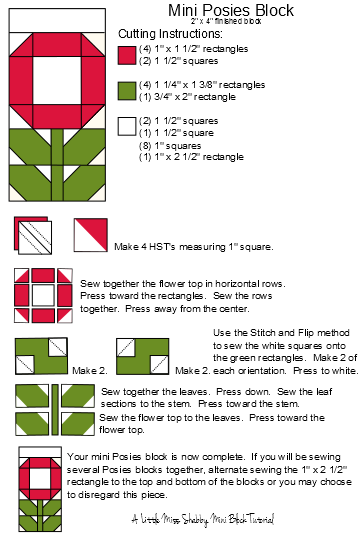
The design of this quilt block often features small, flower-like shapes arranged in a neat, symmetrical fashion. Each block is typically made up of smaller fabric pieces sewn together to create a flower motif, which can be arranged in different ways depending on your preference. The block pattern can be used to showcase a variety of fabrics, allowing quilters to play with colors, textures, and even patterns. One of the best things about the Mini Posies Quilt Block – Pattern is how versatile it is, making it suitable for various quilt themes, from floral and springtime designs to more modern and minimalist creations.
In this article, we’ll explore the beauty and versatility of the Mini Posies Quilt Block – Pattern and guide you through the process of creating this charming block. Along the way, we’ll dive into the materials and tools needed, the steps for constructing the blocks, and some creative ideas to incorporate the pattern into different quilt projects. Let’s get started with understanding why this pattern is so beloved by quilters worldwide.
1. Understanding the Mini Posies Quilt Block – Pattern
The Mini Posies Quilt Block – Pattern is a unique design that captures the essence of delicate flowers in a quilt format. The main feature of this block is its small, posy-like shapes that resemble blooming flowers. The pattern can be made up of different shapes, such as squares, triangles, and diamonds, which come together to create the flower motifs. Each block is designed to be small, making it ideal for creating intricate quilt patterns that showcase beautiful fabrics.
When you’re creating a Mini Posies Quilt Block – Pattern, it’s important to focus on precision and attention to detail. Quilting is all about piecing together fabrics in a way that enhances the overall design, and the Mini Posies Quilt Block – Pattern is no exception. You can use a variety of fabric colors to create contrast, and play around with different textures to give the flowers dimension.
In addition to the aesthetic appeal, the Mini Posies Quilt Block – Pattern also provides an opportunity to practice your quilting skills. Whether you’re mastering piecing techniques, learning how to match seams, or experimenting with fabric placement, this pattern offers endless learning opportunities for quilters of all levels.
Finally, once you’ve created several Mini Posies Quilt Blocks, you can begin to arrange them into a larger quilt design. Depending on your chosen layout, these blocks can form a grid-like pattern or be arranged in a more organic, flowing design. The versatility of this pattern makes it a great addition to any quilting repertoire.
2. Materials and Tools Needed for Creating the Mini Posies Quilt Block
Before you start piecing together the Mini Posies Quilt Block – Pattern, it’s essential to gather the necessary materials and tools. Having the right supplies will ensure that you can work efficiently and achieve the desired results. Here’s what you’ll need:
- Fabric: Select a range of fabrics for the flowers and background. Choose fabrics that contrast well with each other to make the flower shapes stand out. Cotton fabric is a popular choice due to its ease of handling and vibrant colors.
- Rotary Cutter and Cutting Mat: A rotary cutter is an essential tool for cutting fabric into precise shapes. A cutting mat helps protect your work surface and allows you to cut accurately.
- Quilting Ruler: A quilting ruler will ensure that your fabric pieces are cut to the correct size and help you make straight cuts.
- Thread: Choose a strong quilting thread that complements your fabric colors. It’s important to select thread that will hold the fabric pieces together securely.
- Needles: Use quilting needles or sharp needles that are appropriate for the type of fabric you are using.
- Iron and Ironing Board: Pressing your fabric pieces as you go is key to achieving neat seams. An iron and ironing board will help you press each block flat and ensure that your quilt pieces align properly.
These basic tools are all you need to get started, but as you become more experienced, you may find that additional tools like a walking foot or a quilting hoop can improve your quilting technique.
3. Step-by-Step Guide to Creating the Mini Posies Quilt Block – Pattern
Now that you’ve gathered your materials, it’s time to start creating the Mini Posies Quilt Block – Pattern. Below, we’ll break down the steps you need to follow to construct this lovely quilt block.
Step 1: Cutting the Fabric
Start by cutting your fabric into small pieces that will make up the individual components of your posy flower. You’ll need squares, triangles, or any other shapes specified in your pattern. Be sure to cut your fabric precisely using a rotary cutter and quilting ruler to ensure that your pieces fit together properly.
Step 2: Piecing the Flower Motif
Next, start piecing together the smaller fabric pieces to form the flower shapes. Depending on your pattern, you may need to sew together multiple small triangles to form a petal shape. Carefully align the pieces, pin them in place, and sew along the edges. Make sure to press the seams flat after each step to maintain a crisp, clean design.
Step 3: Assembling the Block
Once you’ve completed the flower motifs, it’s time to assemble the block. Place the flower shapes in the arrangement you desire and sew them together to form the full block. Make sure the edges of the flowers align properly, and take care to match seams where needed.
Step 4: Pressing the Seams
After piecing together the entire block, press the seams one final time to ensure the quilt block lays flat. Use a hot iron and apply steam if necessary to smooth out any wrinkles and give your block a polished finish.
Step 5: Final Measurements
Before moving on to the next block, check the measurements of your completed quilt block. It should match the dimensions specified in the pattern to ensure that all blocks will align properly when sewn together.
Step 6: Repeat and Assemble Your Quilt
Continue making the remaining Mini Posies Quilt Blocks and arrange them in your desired pattern. Once all the blocks are ready, sew them together to create the quilt top. Add batting and a quilt backing, then proceed with quilting and binding as desired.
4. Creative Ideas for Using the Mini Posies Quilt Block
The Mini Posies Quilt Block – Pattern is versatile enough to be used in a variety of quilting projects. Here are some creative ways you can incorporate this pattern into your quilts:
- Spring-Themed Quilts: The floral motifs of the Mini Posies Quilt Block make it an ideal choice for springtime quilts. Use pastel fabrics in shades of pink, lavender, yellow, and green to create a light, fresh look.
- Vintage-Inspired Quilts: Choose vintage fabrics, such as floral prints or soft, muted colors, to give your quilt a nostalgic, old-fashioned feel. The Mini Posies Quilt Block works beautifully with these fabrics.
- Baby Quilts: The small, whimsical nature of the Mini Posies Quilt Block makes it perfect for baby quilts. You can create a soft, colorful design using gender-neutral fabrics or pastel tones.
- Wall Hangings: If you’re looking to create a small quilted piece for display, the Mini Posies Quilt Block is ideal for a wall hanging. Combine several blocks in a grid pattern or arrange them in a more free-form style.
- Scrappy Quilts: The Mini Posies Quilt Block lends itself well to scrap quilting, allowing you to use up fabric remnants from previous projects. This is a great way to make a quilt that’s both beautiful and eco-friendly.
- Gift Quilts: Handmade quilts make thoughtful gifts, and the Mini Posies Quilt Block adds a personal touch. Create a quilt for a loved one for a birthday, wedding, or holiday gift.
FAQ About the Mini Posies Quilt Block – Pattern
1. How long does it take to make a Mini Posies Quilt Block?
The time it takes to create one Mini Posies Quilt Block can vary depending on your experience and the complexity of the pattern, but it typically takes a few hours to make a single block.
2. Can I use the Mini Posies Quilt Block for larger quilts?
Yes, you can easily use the Mini Posies Quilt Block in larger quilts. Simply make multiple blocks and arrange them to create a larger quilt.
3. What fabric is best for the Mini Posies Quilt Block?
Cotton fabric is the most commonly used fabric for quilting, and it works beautifully for the Mini Posies Quilt Block. It holds its shape well and is easy to work with.
4. Can I modify the Mini Posies Quilt Block pattern?
Yes! The Mini Posies Quilt Block can be modified by adjusting the size of the pieces or the layout of the flowers. Get creative and make the design your own.
5. What size should the blocks be?
The size of the block typically depends on the pattern you’re using. Most Mini Posies Quilt Blocks range from 4 inches to 6 inches, but you can adjust the size based on your preferences.
Conclusion
In this article, we’ve explored the charming Mini Posies Quilt Block – Pattern, a beautiful and versatile design perfect for a variety of quilting projects. We’ve covered the materials and tools you’ll need, the step-by-step process for creating the block, and some creative ideas for using it in your quilts. Whether you’re a beginner or an experienced quilter, this pattern offers endless possibilities for adding a delightful floral touch to your creations.
We’d love to hear your thoughts on the Mini Posies Quilt Block – Pattern! Please leave a sincere opinion and any suggestions for future topics in the comments below. Happy quilting!