The Needle case in the shape of a little bird – Tutorial is a delightful project that combines functional organization with the whimsical charm of nature-inspired textile art. Whether you are an experienced quilter or a beginner looking for a manageable weekend project, creating a specialized home for your sewing supplies is a rewarding endeavor. This guide is designed to provide you with comprehensive, step-by-step instructions to ensure your finished product is both beautiful and durable.
In the world of handmade crafts, finding a Needle case in the shape of a little bird – Tutorial that prioritizes both aesthetics and utility can be a challenge. Most sewists find themselves constantly searching for stray pins or losing track of expensive embroidery needles in large baskets. By crafting a specific, avian-themed case, you are not just making a decorative item; you are investing in a system that protects your tools from rust and keeps your workspace tidy and inspiring.
By following this Needle case in the shape of a little bird – Tutorial, you will learn how to work with small fabric remnants, apply basic applique techniques, and assemble a multi-layered accessory. We have optimized this guide to meet high-quality content standards, ensuring that every paragraph offers value and clarity. Prepare your fabric scraps, thread your machine, and let’s dive into the creative process of bringing this charming little bird to life.
1. Essential Materials for Your Needle Case Project
To begin this Needle case in the shape of a little bird – Tutorial, you will first need to gather high-quality cotton fabric scraps. Since this is a small project, it is the perfect opportunity to use your favorite leftover prints or upcycle vintage textiles. Choosing contrasting colors for the bird’s body and wings will make the design pop and give it a professional, artisanal look.
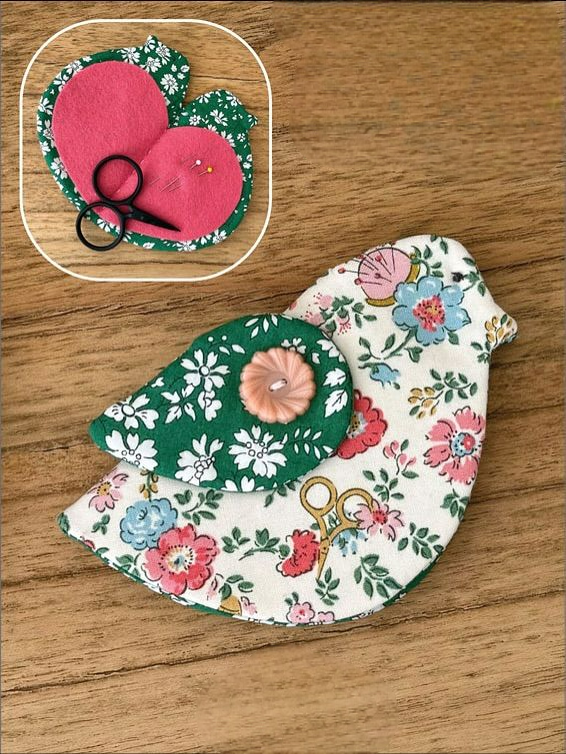
The internal pages of your bird case require wool felt or high-grade synthetic felt. Unlike woven fabrics, felt does not fray, making it the ideal medium for holding sharp sewing needles and pins securely. You should select a felt color that complements your exterior fabric while providing enough contrast so that your needles are easily visible when you are in the middle of a project.
Structure is vital for a long-lasting sewing accessory, so don’t forget to include a layer of lightweight fusible interfacing. Applying this to the back of your cotton fabric will prevent the bird shape from distorting during the sewing process. It adds a crispness to the finish that distinguishes a “homemade” look from a “handcrafted” professional quality item that could be sold or gifted.
For the decorative elements, you will need embroidery floss or heavy-duty topstitching thread. This will be used to create the bird’s eyes, beak details, and perhaps some decorative “feathers” on the wings. Using a satin stitch or a simple French knot for the eyes adds a touch of personality and character to your little bird, making each one you create truly unique.
A small magnetic snap or a decorative button is necessary to keep the case closed when it is tucked away in your sewing kit. If you prefer a more rustic look, a simple fabric loop and a wooden button work beautifully. Ensuring a secure closure is a key part of this Needle case in the shape of a little bird – Tutorial, as it prevents needles from slipping out during travel.
Finally, make sure you have a pair of sharp fabric shears, a fabric marking pen, and a reliable sewing machine. While much of this project can be done by hand using a blanket stitch, a machine helps reinforce the edges for better longevity. Having these tools ready at the start will ensure a smooth, enjoyable crafting experience from the first cut to the final stitch.
2. Preparing and Cutting the Bird Pattern Pieces
The first technical step in our Needle case in the shape of a little bird – Tutorial involves preparing the template. You can sketch a simple bird silhouette on cardstock, ensuring the body is wide enough to accommodate the width of a standard sewing needle. The pattern should consist of two main body pieces, two wing pieces, and at least two smaller felt rectangles for the interior “pages.”
Once your template is ready, place it on the wrong side of the fabric and trace the outline carefully using a disappearing ink pen. It is a best practice in textile arts to leave a small seam allowance, typically 1/4 inch, around the traced line. This ensures that the final bird shape remains true to your original design after the edges are turned and stitched.
Cutting the interfacing is the next priority to ensure the fabric has the right “hand” or thickness. Cut the interfacing slightly smaller than your fabric pieces to reduce bulk in the seams. Use a dry iron to fuse the interfacing to the back of your main body pieces, following the manufacturer’s instructions to avoid scorching your delicate fabrics.
For the interior felt pages, cut them into a rectangular or leaf shape that fits comfortably inside the bird’s body. You want these pages to be slightly smaller than the bird’s perimeter so they don’t peek out when the case is closed. Many crafters using this Needle case in the shape of a little bird – Tutorial like to use pinking shears on the felt edges to add a decorative, serrated finish.
Don’t forget the wings, which are the primary decorative feature of this handmade needle book. You can use a different fabric pattern for the wings to create a “patchwork” effect. If you want the wings to have a 3D effect, consider adding a very thin layer of batting or fleece between the wing layers before topstitching them onto the main bird body.
The final part of preparation is marking the placement for the eyes and the closure mechanism. Precision at this stage prevents the bird from looking lopsided. Use your marking pen to indicate exactly where the buttonhole or snap will go, ensuring that the bird’s “beak” aligns perfectly with the tail when the case is folded or snapped shut for storage.
3. Assembling the Body and Decorative Features
Now that the pieces are cut, the Needle case in the shape of a little bird – Tutorial moves into the assembly phase. Start by appliqueing the wings onto the right side of the front body piece. You can use a zigzag stitch on your machine or a decorative hand stitch like the running stitch to secure the wings, adding texture and visual interest to the bird’s plumage.
Next, it is time to add the facial features, which give your bird its soul. Using black or dark brown embroidery thread, sew the eyes onto the head area. If you are making this for a child or as a gift, ensure these elements are sewn very securely. Adding a small triangular piece of orange felt for the beak is a popular choice among those following this sewing tutorial.
Once the front is decorated, place the front and back body pieces right sides together. Pin them carefully, making sure the wings are tucked safely inside so they don’t get caught in the perimeter seam. Sew around the edges, leaving a two-inch gap at the bottom or the tail area. This opening is crucial as it allows you to turn the entire bird right-side out.
After sewing, clip the curves. This involves making small snips into the seam allowance (without cutting the stitches) around the head and tail. This technique is a fundamental sewing tip that allows the fabric to lay flat and smooth once turned. Turn the bird right-side out through the gap, using a chopstick or a turning tool to gently push out the edges.
Press the bird body flat with an iron, ensuring the raw edges of the opening are tucked neatly inside. You can now topstitch around the entire bird, which not only closes the turning gap but also gives the project a clean, high-end look. This topstitching reinforces the edges, making the needle case sturdy enough to survive years of use in your sewing basket.
The final assembly step involves attaching the interior felt pages. Align the felt pieces in the center of the bird’s interior and sew a straight line down the middle. This spine allows the “pages” to flip back and forth like a book. This specific construction is what makes the Needle case in the shape of a little bird – Tutorial so functional for organizing different types of needles.
4. Finishing Touches and Customization Ideas
To complete your Needle case in the shape of a little bird – Tutorial, you need to install the closure. If you chose a snap, use a setting tool to fix it to the beak and the corresponding spot on the tail or wing. A secure closure ensures that your pins and needles remain safely encased, preventing any accidental pricks when you reach into your bag for supplies.
Consider adding a small ribbon loop to the top of the bird’s head. This allows you to hang the needle case on a pegboard or attach it to a sewing machine handle. Personalizing your tools in this way makes your creative space feel more “you” and keeps your most-used needles within arm’s reach while you work on complex quilting projects.
If you are an enthusiast of shabby chic or vintage styles, you can embellish your bird with lace trim or small seed beads. Adding a bit of “bling” to the wings or using metallic thread for the topstitching can transform a simple scrap-busting project into a piece of textile art. The beauty of this tutorial is how easily it adapts to your personal style.
For those who enjoy scented crafts, you can tuck a tiny bit of dried lavender between the fabric layers before closing the turning gap. The subtle scent will be released every time you open the case to grab a needle. It’s a small, sensory detail that elevates the experience of using your handmade sewing tools and adds a professional touch to the final product.
Think about making a themed set! You could create a “mother bird” needle case and several smaller “baby bird” cases for different types of needles, such as tapestry needles, sharps, and betweens. Organizing your supplies by size or purpose using color-coded birds is a brilliant way to maintain an efficient and beautiful sewing room.
Finally, give your completed bird a final press with the iron and inspect all the stitches. This Needle case in the shape of a little bird – Tutorial is designed to produce a result you can be proud of. Whether it’s sitting on your desk or traveling with you to a crafting retreat, your new little bird is ready to protect your needles and brighten your creative journey.
Frequently Asked Questions (FAQ)
What is the best fabric for a needle case?
The best fabric for the exterior is 100% cotton because it is easy to sew and comes in endless patterns. For the interior “pages,” wool felt is highly recommended because it holds needles securely without dulling them over time.
Can I make this project without a sewing machine?
Yes, absolutely! This Needle case in the shape of a little bird – Tutorial can be completed entirely by hand using a blanket stitch or a backstitch. Hand-sewing often adds a charming, rustic character to the finished bird.
How many needles can this bird case hold?
Depending on how many felt pages you add, it can easily hold 20 to 50 needles. We recommend using different pages for different types of needles, such as embroidery needles on one page and standard sewing needles on another.
Is this tutorial suitable for children?
Yes, with adult supervision for the cutting and needle parts, this is an excellent beginner sewing project. It teaches basic shapes, turning fabric, and simple embroidery, making it a perfect introduction to the world of handcrafts.
How do I clean my handmade needle case?
If your needle case gets dusty, it is best to spot clean it with a damp cloth and mild soap. Avoid putting it in the washing machine, as the felt pages might shrink or lose their shape, especially if they are made of real wool.
Conclusion
In this article, we explored the complete process of creating a charming and functional Needle case in the shape of a little bird – Tutorial. We covered everything from selecting the right cotton fabrics and wool felt to the technical steps of assembly, including applique, turning the body, and installing a secure closure.
This project is a fantastic way to use up your fabric scraps while creating a specialized tool that brings order and joy to your sewing routine. By following these steps, you now have a unique, handcrafted accessory that reflects your creativity and passion for the textile arts.