The nimble quilt – pattern is quickly becoming a favorite among modern quilters for its simplicity, adaptability, and timeless aesthetic. Whether you’re new to quilting or a seasoned stitcher, this pattern offers a satisfying blend of structure and creative freedom. Its clean lines, modular layout, and straightforward assembly make it a go-to choice for personal projects, gifts, or even sellable handmade quilts.
What makes the nimble quilt – pattern so appealing is its flexibility. You can scale it up or down, play with fabric types and colors, or even introduce your own design twists without disrupting its essence. The pattern is ideal for using up fabric scraps, fat quarters, or curated bundles, allowing you to showcase various prints in a cohesive design. It’s also one of the most beginner-friendly options in the quilting world.
In this article, we’ll walk through the fundamentals of the nimble quilt – pattern, from materials and construction techniques to creative variations and finishing tips. You’ll also find answers to frequently asked questions and learn how to tailor this design to match your personal style. Whether you’re quilting for relaxation, decoration, or gifting, this project is sure to inspire your next masterpiece.
1. What is the Nimble Quilt – Pattern?
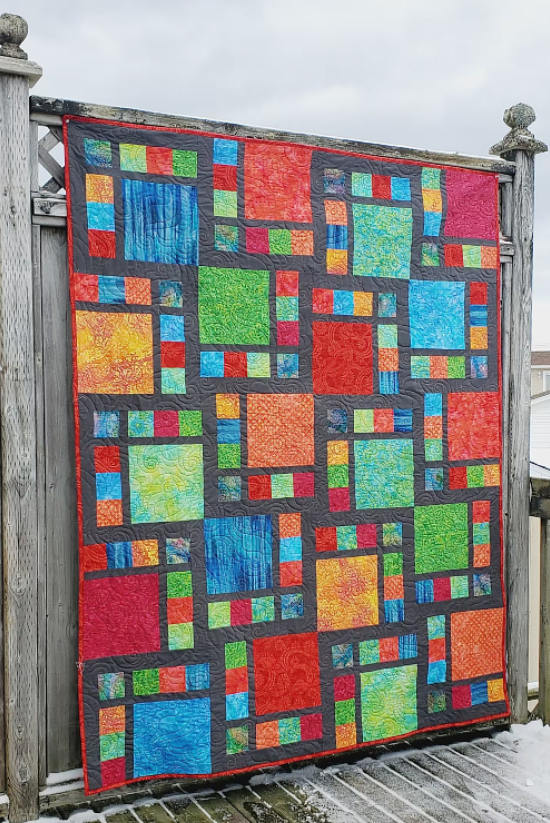
The nimble quilt – pattern is a versatile quilting layout known for its geometric blocks that create a balanced and clean aesthetic. Typically featuring simple squares, rectangles, or half-square triangles, this design is perfect for quilters who want a quick yet visually appealing result.
One of the primary advantages of this pattern is its speed. Compared to more complex patterns that require intricate piecing, the nimble quilt focuses on minimal fuss and maximum impact. The process of cutting, arranging, and sewing is efficient—perfect for weekend projects or last-minute gifts.
Despite its simplicity, the final result looks polished and professional. The structure of the nimble quilt – pattern is so well-organized that even modest fabric combinations look intentional and harmonious. This makes it ideal for those experimenting with color theory or learning how fabrics interact.
Another defining feature of this pattern is that it’s modular. That means you can scale it up by adding more blocks or shrink it down for smaller projects like baby quilts, wall hangings, or lap throws. The adaptability makes it a favorite among quilters of all ages and skill levels.
This pattern also supports various quilting techniques—from traditional piecing to modern quilting or even machine embroidery. It’s a blank canvas, which is why so many creators keep returning to it with new fabric collections or seasonal themes.
If you’re looking for a quilt pattern that balances ease and elegance, the nimble quilt – pattern checks all the boxes. It provides structure for beginners and room for innovation for advanced quilters, making it truly timeless.
2. Materials Needed for the Nimble Quilt
Creating a nimble quilt – pattern starts with selecting the right materials. You’ll need a selection of fabrics—usually cotton quilting fabric works best—along with basic quilting tools like rotary cutters, rulers, and a sewing machine.
Start by choosing a fabric palette. You can go monochromatic, use contrasting colors for a bold look, or work with a curated fabric bundle. The nimble quilt works beautifully with fat quarters or fabric scraps, especially when arranged with intention.
The backing fabric should complement the front but doesn’t need to match exactly. Since the design is already strong visually, a neutral or subtly printed backing helps highlight the front without clashing.
For batting, use a medium-weight cotton or cotton-blend batting. This gives the quilt structure and warmth without being too bulky. Lightweight batting is good for summer quilts, while heavier batting is great for cozy winter blankets.
You’ll also need basic notions: quality thread, sewing pins, fabric scissors or rotary cutter, a self-healing mat, and a quilting ruler. A walking foot or quarter-inch foot for your sewing machine can make stitching easier and more accurate.
Before starting, it’s essential to wash and press your fabrics. This prevents shrinkage later and helps the pieces lie flat during assembly. A smooth start leads to a better finish, especially when precision matters as much as it does in the nimble quilt – pattern.
3. How to Sew the Nimble Quilt – Pattern
Start by cutting your fabrics according to the block dimensions in your nimble quilt – pattern. Most versions involve repeating blocks that are easy to size and stack. Lay your cut pieces out on a clean surface to visualize the final layout.
Once you’ve arranged the blocks, begin sewing them row by row. Use a 1/4-inch seam allowance for consistency. Press each seam after sewing—pressing toward the darker fabric helps prevent shadows from showing through the quilt top.
After completing each row, stitch the rows together to complete the quilt top. At this point, it’s important to check for alignment. A quick trim may be necessary if your blocks have shifted slightly. This step ensures a clean, even look when the quilt is finished.
Next, layer the quilt sandwich: backing (right side down), batting in the middle, and quilt top (right side up). Use safety pins or basting spray to hold the layers in place. Make sure everything is smooth and wrinkle-free.
You can quilt the layers together using simple straight-line quilting, free-motion quilting, or decorative stitching. Straight lines work beautifully with this pattern, enhancing its geometric simplicity without overwhelming the design.
Finish by squaring up the quilt and attaching the binding. Binding can be done by hand or machine, depending on your preference. Your nimble quilt – pattern project is now ready to use, gift, or showcase as a handmade work of art.
4. Creative Ideas and Variations
The beauty of the nimble quilt – pattern lies in its ability to be customized. Try incorporating themed fabrics—florals for spring, plaids for winter, or novelty prints for kids. This small tweak turns a basic design into something personal.
Another idea is to alternate solid and patterned fabrics. This gives your quilt a rhythm and flow, making it visually interesting without requiring complex techniques. Solids also provide negative space, which is great for detailed quilting.
Use asymmetry to your advantage. Shift a row, change the block size, or rotate certain pieces to add movement and modern flair. This adds interest while keeping within the framework of the nimble quilt – pattern.
Add embroidery or applique to certain blocks. A small stitched motif in the center of a square can turn a simple quilt into a story. These touches are ideal for memory quilts or custom gifts.
Think beyond bed quilts. Use the same pattern to create coordinating pillow covers, placemats, or tote bags. Matching accessories made from the same design elevate your home décor and make beautiful handmade gift sets.
Lastly, experiment with fabric textures. Try mixing linen with cotton, or adding a velvet patch for softness. Just ensure that all fabrics are pre-washed and compatible so the quilt stays durable and washable.
FAQ – Frequently Asked Questions
Q1: Is the nimble quilt – pattern good for beginners?
Yes! This pattern is very beginner-friendly thanks to its simple shapes and modular layout. It’s a great starting point for those new to quilting.
Q2: How big is a typical nimble quilt?
The size varies based on how many blocks you use. A baby quilt might be 36″x48″, while a queen-size quilt can reach 90″x108″. The pattern scales easily.
Q3: Can I use pre-cut fabric bundles like charm packs or jelly rolls?
Absolutely. The nimble quilt – pattern is ideal for using pre-cuts. Just adjust block dimensions to match the size of your fabric pieces.
Q4: What quilting technique works best with this pattern?
Straight-line quilting complements the geometric style perfectly. However, feel free to explore free-motion quilting if you’re feeling adventurous.
Q5: How long does it take to complete a nimble quilt?
For a throw-size quilt, it usually takes 1–2 weekends, depending on your speed and the complexity of your quilting. It’s one of the faster patterns out there.
Q6: Can I sell quilts made from this pattern?
Yes, as long as you follow copyright guidelines if using a commercial pattern. Many creators use the nimble quilt – pattern as a base for custom quilt commissions.
Conclusion
The nimble quilt – pattern proves that simplicity and beauty can go hand in hand. With its clean lines, flexible layout, and beginner-friendly structure, it opens the door to creativity for quilters at all levels. Whether you’re making a cozy throw, a vibrant wall hanging, or a heartfelt gift, this pattern offers endless possibilities.
We explored what defines this pattern, what materials you’ll need, how to construct it, and ways to customize it to suit your personal taste. It’s more than just a project—it’s an opportunity to create something lasting and meaningful with your own hands.
If this guide helped or inspired you to start your own nimble quilt – pattern project, we’d love to hear from you. Please leave a sincere opinion or any suggestions below. Your feedback helps us continue creating helpful and inspiring content for makers like you. Happy quilting! 🧵