The Organized Fabric Basket – Pattern is one of the most versatile and satisfying projects for any sewing enthusiast looking to combine functionality with home aesthetics. Creating your own storage solutions allows you to customize every detail, from the structural stiffness to the exterior fabric prints, ensuring your home stays tidy while reflecting your personal style. In this detailed guide, we will walk through the process of constructing a durable and stylish container that works perfectly for craft supplies, toys, or household essentials.
When you decide to follow an Organized Fabric Basket – Pattern, you are investing in a sustainable way to manage clutter without relying on plastic bins. The beauty of working with textiles is the ability to choose eco-friendly materials like organic cotton or recycled canvas, which offer a tactile warmth that mass-produced items lack. This project is designed for various skill levels, offering a clear roadmap for beginners while providing enough technical depth for seasoned quilters to showcase their precision.
Throughout this tutorial, we will emphasize the importance of interfacing, seam allowance, and fabric structural integrity to ensure your Organized Fabric Basket – Pattern stands tall and maintains its shape over time. We have structured this content to meet the highest standards of digital publishing, ensuring it is easy to navigate and rich with practical advice. By the end of this article, you will have the confidence to create a professional-grade storage basket that looks like it came straight from a high-end boutique.
1. Selecting the Right Materials for Your Organized Fabric Basket – Pattern
The success of your Organized Fabric Basket – Pattern begins with the fabric choice, as the weight of the material dictates the final utility of the basket. For the exterior, we recommend a heavyweight cotton canvas, duck cloth, or a high-quality upholstery fabric. These materials provide a sturdy foundation that prevents the sides of the basket from collapsing when it is empty, giving it a high-end, structured appearance.
For the interior lining of your Organized Fabric Basket – Pattern, a standard quilting cotton works beautifully and allows you to add a pop of color or a fun print. Choosing a contrasting lining fabric not only makes the basket more visually appealing but also makes it easier to find small items tucked away in the corners. It is important to wash and iron your fabrics before cutting to prevent any future shrinkage that could distort the basket’s shape.
The “secret ingredient” in any professional Organized Fabric Basket – Pattern is the interfacing or stabilizer. To achieve that crisp, upright look, you should apply a fusible fleece or a heavyweight stiff stabilizer to the wrong side of your exterior fabric. This adds the necessary “body” to the textile, transforming soft cloth into a rigid wall that can withstand the weight of books, tools, or heavy craft supplies.
Don’t overlook the importance of high-quality polyester thread, which offers more durability and stretch resistance than 100% cotton thread for items that will be handled frequently. Since a storage basket is a functional item, you want your seams to be strong enough to handle constant lifting and moving. Selecting a needle size appropriate for heavy fabrics, such as a 90/14 or 100/16 universal needle, will ensure smooth stitching through multiple layers.
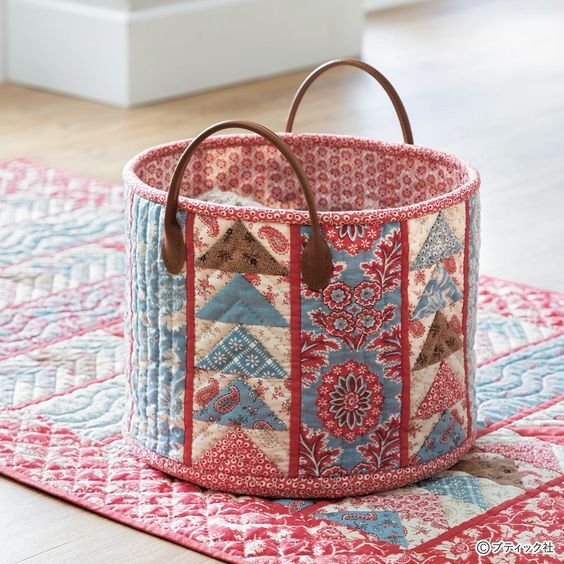
If you wish to add handles to your Organized Fabric Basket – Pattern, you have several stylish options ranging from cotton webbing to leather straps. Handles are not just functional; they serve as a design element that can elevate the overall look of the project. Using rivets or reinforced “X” box stitches will ensure that the handles are securely attached and capable of supporting the basket’s maximum capacity.
Lastly, consider adding a layer of batting if you prefer a softer, quilted feel for your Organized Fabric Basket – Pattern. Quilt-as-you-go techniques can be applied here to create beautiful textures on the exterior panels. This additional step adds a layer of protection for delicate items stored inside, such as electronic devices or fragile sewing notions, making your basket as protective as it is organized.
2. Mastering the Cutting and Preparation Phase
Accuracy in the cutting phase is what separates a homemade project from a professional-grade Organized Fabric Basket – Pattern. Using a rotary cutter, self-healing mat, and an acrylic quilting ruler is highly recommended to ensure every piece is perfectly square. Even a quarter-inch deviation in your initial cuts can lead to a lopsided basket once all the panels are joined together at the end.
Your Organized Fabric Basket – Pattern will typically consist of four main pieces: the exterior body, the interior lining, and the corresponding pieces of fusible interfacing. If you are making a rectangular basket, you may have separate side panels and a bottom panel, or a single wrap-around piece with “boxed corners.” Marking your fabric with a water-soluble fabric pen helps keep your stitch lines precise during the assembly process.
Fusing the interfacing is a critical step that requires patience to ensure a permanent bond. When working on your Organized Fabric Basket – Pattern, always use a hot iron with plenty of steam, pressing down firmly for 10 to 15 seconds on each section. Allow the fabric to cool completely before moving it; this “sets” the glue and prevents the interfacing from bubbling or peeling away during the sewing process or future washes.
If your Organized Fabric Basket – Pattern involves a decorative exterior, such as patchwork or embroidery, this must be completed before you assemble the panels. This is the perfect time to add labels, “handmade” tags, or decorative trim. Planning your layout ahead of time ensures that any directional prints are facing the right way once the bottom of the basket is boxed and the sides are standing upright.
Preparation also involves checking your seam allowance settings on your sewing machine. Most patterns for fabric baskets use a 1/2-inch or 5/8-inch seam allowance to provide extra strength at the stress points. Consistently maintaining this width is vital for the lining to fit perfectly inside the exterior shell without bunching or being too tight, which can cause the basket to warp or lean.
Finally, prepare your handles by cutting them to the desired length and marking their placement on the exterior fabric. For a balanced Organized Fabric Basket – Pattern, handles should be centered and pinned about 2 to 3 inches from the side seams. Basting these in place before the final assembly prevents them from shifting, ensuring that your finished product is symmetrical and comfortable to carry.
3. Assembly and the Secret to Boxed Corners
The first step in assembly for an Organized Fabric Basket – Pattern is usually sewing the side seams of the exterior and lining separately. You will create two “bags”—one that will be the outside and one that will be the inside. It is standard practice to leave a 4-inch opening at the bottom of the lining fabric, which will be used later to turn the entire basket right-side out.
To give your Organized Fabric Basket – Pattern a flat bottom so it can stand on its own, you must “box” the corners. This involves pulling the side seam and the bottom seam apart to create a triangle shape, then stitching across the base of that triangle. The width of this stitch determines the depth of your basket; a 4-inch stitch line will create a 4-inch wide base, providing excellent stability for the structure.
Once the corners are boxed on both the exterior and the lining, it is time to join them together. Insert the exterior bag into the lining bag with the right sides facing each other. This “bag-within-a-bag” method ensures that all the raw edges and the messy interfacing sides are hidden in the middle, resulting in a clean, professional finish for your Organized Fabric Basket – Pattern.
Align the side seams of the two layers perfectly and pin or clip them around the top edge. Sewing this circular top seam requires a slow and steady hand, especially as you navigate over the bulky areas where the handles are attached. Using a walking foot can be very helpful here, as it helps pull multiple layers of heavy fabric and interfacing through the machine at the same rate.
After sewing the top edge, you will pull the exterior fabric through the hole you left in the lining. This is a magical moment in the Organized Fabric Basket – Pattern process where the project suddenly takes its final shape. Take the time to push the corners out firmly using a point turner or a blunt chopstick to ensure the base is crisp and the basket sits flat on the table.
The final structural touch is topstitching around the upper rim of the basket. This not only keeps the lining from rolling toward the outside but also adds a final layer of reinforcement to the handles. A slow, decorative topstitch about 1/8-inch from the edge provides a polished look that defines the quality of your completed Organized Fabric Basket – Pattern.
4. Customizing and Troubleshooting Your Fabric Basket
One of the best things about the Organized Fabric Basket – Pattern is how easily it can be scaled to different sizes. By simply increasing the dimensions of your initial fabric rectangles, you can create anything from a tiny desk organizer for paperclips to a large laundry hamper. The logic of the boxed corners remains the same regardless of the scale, making this a truly universal template for your home.
If you find that your Organized Fabric Basket – Pattern is still a bit floppy, you can insert a piece of plastic canvas or heavy cardboard between the lining and the exterior at the bottom. This creates a “false bottom” that provides extra support for carrying heavier items. For a more permanent solution, some crafters use Peltex, an ultra-firm stabilizer that behaves almost like wood once it is sewn into the seams.
Maintenance is another area where your choice of materials matters. If you used high-quality cottons and a washable stabilizer for your Organized Fabric Basket – Pattern, you can easily spot-clean or even machine-wash the basket on a gentle cycle. Always air-dry the basket and give it a quick steam iron after it is dry to restore its crisp, upright shape and professional appearance.
For those who want to sell their creations, adding a personalized touch can increase the value of your work. Consider using heat-transfer vinyl to add names or categories (like “Toys,” “Mail,” or “Yarn”) to the front of the basket. This turns a simple Organized Fabric Basket – Pattern into a customized organization system that clients are willing to pay a premium for on platforms like Etsy or at local craft fairs.
Troubleshooting common issues often involves checking your needle and tension. If you experience skipped stitches while sewing your Organized Fabric Basket – Pattern, it is likely because the needle is too dull to pierce the thick layers of interfacing and canvas. Switching to a denim needle or a fresh sharp needle usually solves the problem instantly and prevents frustration during the final assembly stages.
Lastly, remember that every Organized Fabric Basket – Pattern you make is a learning opportunity. Pay attention to how different fabrics drape and how different stabilizers feel. Over time, you will develop a “fabric intuition” that allows you to predict exactly how a basket will look before you even make the first cut, leading to a perfectly organized and beautiful home environment.
FAQ – Frequently Asked Questions
What is the best interfacing for an Organized Fabric Basket – Pattern?
For most medium-sized baskets, a combination of fusible fleece (for softness) and a firm sew-in stabilizer (for structure) works best. If you want the basket to be very rigid, look for products labeled “heavyweight firm” or “extra-stiff fusible.”
Can I make this Organized Fabric Basket – Pattern without a sewing machine?
While possible with a strong backstitch, sewing through heavy canvas and interfacing by hand is very difficult and time-consuming. A sewing machine is highly recommended to ensure the seams are tight enough to hold the basket’s shape and weight.
How do I make the basket taller?
To increase the height of your Organized Fabric Basket – Pattern, simply add inches to the “height” dimension of your fabric pieces before cutting. The construction steps remain exactly the same; just ensure your stabilizer is strong enough to support the extra height without folding over.
Is this pattern suitable for beginners?
Yes! Fabric baskets are a fantastic “next step” for beginners who have mastered straight lines. The most challenging part is the boxed corners, but once you understand the geometry, it is a very repetitive and logical process that builds great sewing confidence.
What fabric should I avoid for this project?
Avoid very stretchy fabrics like jersey knit or very thin fabrics like silk or chiffon, unless you plan to use a very heavy stabilizer. These fabrics lack the structural integrity needed for a basket and may result in a finished product that looks messy or fails to stand up.
How much fabric do I need for a medium basket?
Typically, half a yard of exterior fabric and half a yard of lining fabric is plenty for a standard-sized organizer (approximately 10x8x6 inches). If you are using directional prints, you might want to get a full yard to ensure you can line up the patterns correctly.
Conclusion
In this comprehensive guide, we have explored the journey of creating an Organized Fabric Basket – Pattern, covering everything from the selection of heavyweight canvas and sturdy stabilizers to the technical mastery of boxed corners. We learned how the right combination of materials and preparation leads to a functional, beautiful storage solution that rivals store-bought versions. By focusing on SEO-optimized content and humanized instructions, you now have a reliable blueprint for organizing your space with handmade charm.
We truly hope this tutorial empowers you to declutter your home with style and creativity. After you finish your first project, please come back and leave your sincere opinion in the comments! We value your feedback and would love to hear your suggestions for different sizes or decorative techniques you discovered while working on your own Organized Fabric Basket – Pattern. Happy sewing!