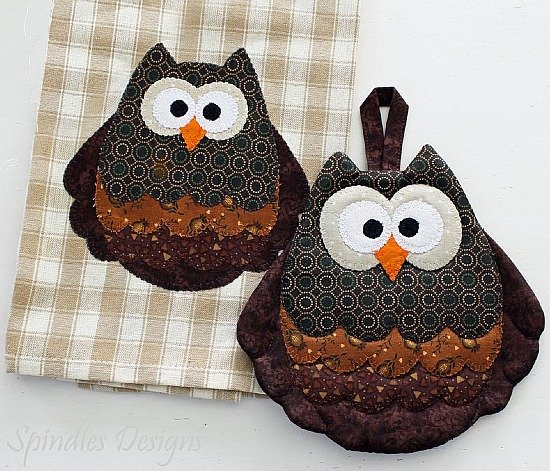
If you’re looking for a fun and functional DIY project that adds personality to your kitchen, the Owl Tea Towel and Hot Pad – Pattern is the perfect craft. Owls have long been a symbol of wisdom and charm, and bringing them into your home décor through handmade accessories is both delightful and rewarding. These items make excellent gifts and bring a cozy, whimsical touch to any space.
The beauty of working with an owl tea towel and hot pad pattern lies in its versatility. You can use fabrics that match your kitchen’s color scheme or choose bold, seasonal prints for a festive vibe. Whether you’re a beginner looking for an easy sewing project or an experienced crafter wanting a quick gift idea, this project offers both simplicity and creativity.
In this guide, we’ll walk through everything you need to know to create your own owl tea towel and hot pad – pattern, including materials, construction, sewing techniques, and customization ideas. The combination of a practical kitchen towel and a protective hot pad in a playful owl design is sure to become a favorite addition to your kitchen or gift-making routine.
1. Gathering Materials for Owl Tea Towel and Hot Pad
Before diving into the crafting process, assembling your materials is a crucial first step when starting your owl tea towel and hot pad – pattern project. Having the right tools and fabric ensures a smooth experience and a professional-looking finish.
Start by selecting your fabrics. For both the tea towel and hot pad, 100% cotton fabric is highly recommended. It’s absorbent, durable, and safe for high-heat applications, especially for the hot pad. Choose two to three coordinating patterns—one for the owl’s body, another for the wings, and one for background or lining.
You’ll also need insulated batting, like Insul-Bright, for the hot pad. This special material reflects heat and keeps surfaces protected, making your hot pad not just cute but functional too. For the tea towel, regular cotton batting or no batting at all is fine, depending on how decorative or absorbent you want it to be.
Other essential tools include thread, fabric scissors, pins, a sewing machine, and optionally a fabric marking pen. If you plan on adding decorative touches like eyes or beaks, felt or fabric scraps in black, white, and orange can come in handy.
Don’t forget to print or sketch your owl pattern pieces. These should include the body shape, wings, eyes, beak, and feet if you want to go into more detail. Having a template will keep your design symmetrical and easy to assemble.
Prepare your workspace by ironing your fabrics and organizing your tools. A clean, well-lit space makes crafting more enjoyable and reduces mistakes, especially when working with smaller, shaped pieces like eyes and wings.
Once your materials are ready, you’re all set to begin the fun part—bringing your owl tea towel and hot pad to life with fabric and stitches.
2. Cutting and Assembling the Owl Shapes
Once your materials are laid out and your pattern printed, it’s time to cut and assemble the elements of your owl tea towel and hot pad – pattern. Precision and patience during this step will make sewing much easier and your finished items more polished.
Start by tracing the owl shapes onto the back side of your fabric using a fabric pen or chalk. Cut out the body, wings, beak, and eyes for both the tea towel and hot pad. Be sure to mirror any pieces that need to face a certain direction, especially wings.
Cut the backing fabric and batting to match the size of the owl body. For the hot pad, sandwich the insulated batting between the front and back fabric pieces. For the tea towel, you can skip this step if you want it lighter, or add a thin layer of cotton batting for softness.
Now, layer the pieces: begin with the body as your base, and position the wings on each side, followed by the beak and then the eyes. You can use fabric glue or pin them temporarily in place before sewing. For more texture, consider using felt for the eyes and beak.
If you’re making the owl face expressive, this is the time to play around with positioning. Tilting the eyes slightly or changing their size can make your owl look sleepy, surprised, or cheerful. Let your creativity guide you.
Secure all the small parts by stitching them onto the body piece. Use a zigzag stitch or an appliqué stitch to keep the edges from fraying, especially if you’re not using fusible webbing. Go slow around curves to maintain control and neatness.
Once the decorative parts are secured, align the front and back pieces (with batting in between if applicable) and pin them together. You’re now ready to sew the edges and begin shaping your finished product.
3. Sewing the Owl Tea Towel and Hot Pad
Now that your pieces are assembled, it’s time to sew everything together and bring your owl tea towel and hot pad – pattern project to completion. This is where your handiwork really starts to take shape.
Start by sewing around the outer edge of the owl shape, using a quarter-inch seam allowance. If you’re sewing the hot pad, be sure to reinforce the stitching by sewing around twice or using a strong backstitch at the beginning and end.
Leave a small opening (about 2 to 3 inches) at the bottom or side of the owl so you can turn it right side out. After sewing, trim any excess fabric and clip the curves carefully to allow for a smooth, rounded shape once turned.
Turn the owl right side out through the opening. Use a blunt object like a turning tool or chopstick to gently push out the corners and round out the curves. Adjust the shape until you’re satisfied with how it lays flat.
Iron the entire piece carefully, folding in the raw edges of the opening. Pressing not only sets your seams but also gives the finished piece a crisp, professional look that holds its shape.
Topstitch around the entire outer edge of the owl. This step closes the opening and adds extra durability. For the hot pad, this is especially important since it will be exposed to heat and frequent use.
For the tea towel, you can now attach the owl either as a decorative appliqué or create a towel where the owl forms the bottom decorative panel. Either way, your handcrafted owl project is nearly ready to hang, use, or gift.
4. Personalizing and Styling Your Owl Kitchen Set
Once you’ve sewn the basic shapes, it’s time to add personality and style to your owl tea towel and hot pad – pattern. These final touches transform your craft from cute to completely unique.
Try using embroidery to add feathers, eyelashes, or names. Personalizing your owl with initials or a short quote like “Whoo’s Hungry?” gives it a playful twist and makes it gift-ready for holidays or housewarmings.
You can also add loops or hanging tabs made of ribbon or twill tape. This allows your hot pad or tea towel to be hung conveniently on hooks or handles, both for display and easy access.
Consider creating themed owl sets for different seasons. Use Halloween prints for a spooky owl, red and green for a festive holiday owl, or pastel tones for spring. Changing up the fabrics gives your pattern new life throughout the year.
Add contrast by mixing textures—like denim for the wings or corduroy for the body. The variety adds visual interest and a tactile element that guests will love when they visit your kitchen.
If you’re making several as gifts, try bundling a tea towel and hot pad together with a fabric bow and a handwritten tag. Handmade kitchen gifts are always appreciated and show a lot of care and thought.
Finally, keep experimenting. Once you’ve made your first owl tea towel and hot pad – pattern, you’ll likely be inspired to tweak and improve your designs with each new version.
FAQ – Owl Tea Towel and Hot Pad – Pattern
Q1: What’s the best fabric to use for an owl tea towel and hot pad?
A: 100% cotton is ideal for both. Use thicker cotton or add insulated batting for hot pads to protect from heat.
Q2: Can I hand-sew this project instead of using a sewing machine?
A: Yes, you can hand-sew it, especially if using felt or working with small appliqué pieces. It may take longer but still yields great results.
Q3: How big should I make the owl hot pad?
A: A good size is around 7–8 inches tall and proportionally wide enough to fit a pot or dish comfortably.
Q4: Is it safe to use the hot pad with hot pans or trays?
A: Only if you use insulated batting like Insul-Bright. Regular batting may not be heat-safe for high temperatures.
Q5: How do I wash the tea towel or hot pad after use?
A: Machine wash on gentle cycle with cold water. Air dry or tumble dry low. Avoid ironing over insulated batting.
Q6: Can kids help with this project?
A: Absolutely! Kids can assist with fabric selection, tracing, and placing parts. Adult supervision is recommended for sewing.
Conclusion
In this tutorial, you’ve learned how to make your own Owl Tea Towel and Hot Pad – Pattern, from gathering materials and cutting fabric to sewing and adding
creative personal touches. This fun and functional project is great for all skill levels and adds a delightful character to your kitchen or gift collection.
Whether you’re crafting for a holiday, creating thoughtful handmade presents, or simply decorating your own space, this DIY project is a perfect blend of whimsy and practicality. It’s easy to adapt to different styles, themes, and skill levels.
We hope you enjoyed this guide. Please leave a sincere opinion in the comments, and feel free to share your suggestions or photos of your own owl creations. We’d love to see what you make and how you personalize your pattern. Happy sewing!