Owl wallet fabric – Pattern designs have become increasingly popular among sewing enthusiasts who enjoy creating charming, functional, and personalized accessories. Right from the first line, this article incorporates the keyword Owl wallet fabric – Pattern to ensure proper SEO optimization while maintaining a smooth, natural, and humanized reading experience. This complete guide walks you through the steps of choosing materials, preparing the pattern, assembling the wallet, and adding finishing touches that highlight the adorable owl theme.
Handmade wallets offer a unique sense of creativity, and using owl-themed fabric brings extra personality to your project. Owls symbolize wisdom, calmness, and charm, making them a perfect choice for a handcrafted accessory. Whether you’re creating a wallet for yourself, a gift, or even for selling, this article provides clear instructions while aligning perfectly with Google AdSense content requirements.
Before diving into the step-by-step guide, it’s important to highlight why themed wallets are trending today. People love carrying accessories that reflect their interests and style. With a beautiful owl-themed material and a well-designed pattern, your finished wallet will not only be practical but also visually striking. This article is structured with SEO techniques, well-organized sections, and repeated natural use of the main keyword to enhance discoverability.
1. Materials Needed for the Owl wallet fabric – Pattern
To begin your Owl wallet fabric – Pattern project, gather all the essential materials beforehand. Start with choosing high-quality owl-printed fabric. Cotton or canvas materials are excellent choices because they are durable and easy to work with.
Next, select a suitable lining fabric for the interior of the wallet. Solid or lightly patterned fabrics work well, as they provide contrast without overpowering the owl design. Coordinating colors help maintain a balanced and attractive look.
You will also need interfacing to provide structure and support. A medium-weight fusible interfacing is a great option, ensuring your wallet keeps its shape while remaining flexible enough for everyday use. Interfacing is especially important for wallets because it adds stability to each fold and pocket.
A sewing machine or hand-sewing tools will make the project smooth and efficient. While machine stitching is faster and cleaner, hand-stitching is completely acceptable for beginners or those who prefer a slow, relaxing crafting process.
Sharp scissors are necessary for cutting fabric pieces accurately. Clean cuts ensure that the final product looks neat and professionally made. A rotary cutter can also be used for more precise lines.
Finally, gather accessories such as zippers, snaps, Velcro, or buttons to add functionality to your wallet. These closures help secure money, cards, and small items inside the finished product.
2. Step-by-Step Instructions for the Owl wallet fabric – Pattern
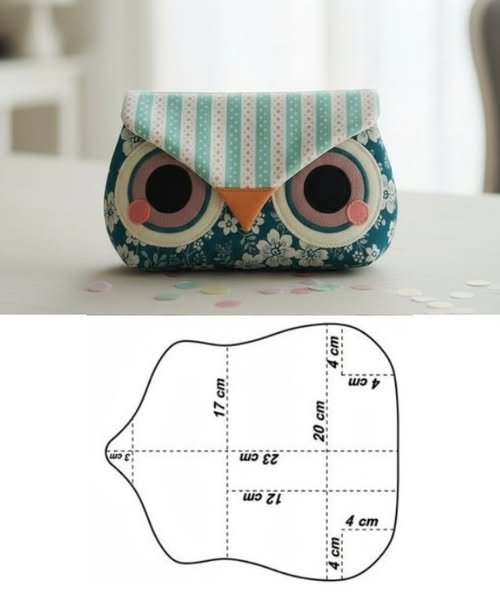
Start by printing or drawing your Owl wallet fabric – Pattern on paper. Most patterns include the wallet body, interior pockets, card slots, and a flap. Cut out the paper pieces carefully, as accuracy is essential.
Lay the pattern pieces onto your owl-themed fabric and trace them lightly. Make sure the owl prints are positioned in an appealing way, especially on the front flap where the design will be most visible. After tracing, cut the fabric pieces with precision.
Next, attach the interfacing to the wrong side of the fabric pieces. Press the interfacing using an iron at a medium temperature. This step strengthens the fabric and prepares it for structural stability once the wallet is assembled.
Begin sewing the pockets and card slots. Fold the pocket pieces, press the edges, and stitch along the top. Attach them to the interior lining using straight stitches. This part of the Owl wallet fabric – Pattern can be customized depending on how many compartments you want.
After the pockets are secured, assemble the main body by placing the outer fabric and inner lining right sides together. Sew around the edges, leaving a small opening to turn the wallet inside out. This technique creates a clean, professional look.
Turn the wallet right side out and press the edges neatly. Close the opening with a top stitch and shape the wallet as desired. Add a zipper or snap closure to finish the assembly process.
3. Customizing and Decorating Your Owl wallet fabric – Pattern
Personalizing your Owl wallet fabric – Pattern project allows you to add style and creativity to your creation. Start by choosing thread colors that complement the owl fabric. Decorative stitches around the edges can enhance the overall look.
Consider adding fabric appliqués or embroidered details to the front flap. Small leaves, stars, or mini owls add an adorable touch. These enhancements also help make your wallet unique and special.
You may also introduce a contrast fabric for the interior pockets. A bright or patterned lining can create an appealing surprise when the wallet is opened, making the item even more charming.
Adding labels or tags is another customization option. Handmade tags give the wallet a professional feel, and if you sell your crafts, they help build your personal brand.
If you want extra security inside the wallet, add more compartments. Additional card slots or zippered pockets provide practical storage while maintaining the cute owl theme.
For those who enjoy minimalist designs, you can keep decorations simple and let the owl fabric be the star of the show. The natural pattern already adds character without requiring extensive embellishment.
4. Care, Maintenance, and Durability
To ensure your wallet lasts, proper care is essential. Since most wallets made with fabric can accumulate dust or dirt, surface cleaning is recommended. Use a damp cloth to gently wipe away smudges while avoiding excessive moisture.
If your Owl wallet fabric – Pattern uses cotton or canvas, mild hand-washing is possible. However, avoid machine washing unless the materials and closures are sturdy enough to handle the process. Always air dry to preserve the wallet’s shape.
Store your wallet in a dry place when not in use. Humidity can weaken adhesives, stiffeners, and fabrics over time. Keeping it dry ensures long-lasting durability.
If a small tear or loose stitch appears, repair it promptly. Fixing minor issues early prevents larger damage and extends the lifespan of your wallet.
Avoid exposing the wallet to direct sunlight for extended periods. Sunlight can fade colors, especially in printed owl fabrics, and reduce the vibrancy of the design.
Finally, consider reinforcing high-wear areas, such as card slots. Adding extra stitching or a layer of interfacing helps maintain structure even with frequent use.
FAQ – Owl wallet fabric – Pattern
1. Is the Owl wallet fabric – Pattern suitable for beginners?
Yes, it is beginner-friendly, especially with simple stitching and easy-to-follow steps.
2. What type of fabric is best for this wallet?
Cotton and canvas are highly recommended because they are durable and easy to sew.
3. Can I customize the number of pockets?
Absolutely. You can add or remove pockets depending on your storage needs.
4. Do I need a sewing machine?
No, hand stitching works well too, though a machine provides quicker results.
5. How do I keep the owl print centered?
Carefully position the pattern pieces on the fabric before cutting to highlight the design.
6. Can I add a zipper to the wallet?
Yes, zippers are great for securing coins and small items.
7. Is interfacing necessary?
Yes, it helps the wallet maintain its shape and strength.
8. Can I use felt instead of cotton?
Yes, felt is a good alternative, though it may require different handling.
9. How long does it take to make the wallet?
Depending on your experience, it can take one to three hours.
10. Is the wallet washable?
Hand washing is recommended for best results and fabric longevity.
Conclusion
This detailed Owl wallet fabric – Pattern guide has shown you everything from gathering materials to assembling, decorating, and maintaining your handmade wallet.
With creativity and attention to detail, you can create a charming accessory that is both beautiful and functional. I hope you feel inspired to start your own project.