The Pad-type thread collector- Pattern is a game-changing addition to any sewing room, offering a clever and organized solution to the perpetual problem of stray threads and fabric scraps. If you have ever spent more time cleaning your workspace than actually sewing, you know how quickly those tiny snips of thread can migrate onto your carpet, clothes, and even the fur of your pets. By utilizing a Pad-type thread collector- Pattern, you create a weighted base that sits securely under your sewing machine, featuring a detachable or integrated bag that catches every bit of debris before it hits the floor. It is the ultimate fusion of utility and craft, ensuring that your creative process remains focused on the stitches rather than the mess.
Crafting your own Pad-type thread collector- Pattern allows for a level of customization that store-bought plastic bins simply cannot match. This DIY project involves a “pad” section that acts as a vibration dampener for your machine and a “collector” section designed to hang off the edge of your table. Because you are following a specific Pattern, you can adjust the dimensions to perfectly fit your specific sewing machine model or table height. The beauty of the Pad-type thread collector- Pattern lies in its simplicity; it is an accessible project for beginners that provides immediate value, making it a favorite among quilters and dressmakers alike who value a pristine environment.
In this detailed guide, we will explore everything you need to know about creating and using a Pad-type thread collector- Pattern to enhance your sewing efficiency. We will break down the two main components: the Pad-type thread collector, which is the finished textile accessory that keeps your workspace tidy, and the Pattern, which serves as the geometric blueprint and instruction set for the project. By the time you finish reading, you will understand why the Pad-type thread collector- Pattern has become a staple in the modern sewing community, combining ergonomics with sustainable waste management in a way that is both stylish and highly practical.
1. Selecting the Ideal Fabrics for your Pad-type thread collector- Pattern
When you begin your Pad-type thread collector- Pattern, the choice of fabric is more than just an aesthetic decision. Since the “pad” part of the collector will sit directly under your sewing machine, you should opt for a durable, non-slip fabric like heavyweight cotton canvas or a specialized grip fabric for the bottom layer. This ensures that as you sew at high speeds, your Pad-type thread collector doesn’t slide around or shift the position of your machine, providing a stable and safe working surface.
For the top layer of your Pad-type thread collector- Pattern, many crafters prefer to use a quilted cotton or a decorative linen. This is a great opportunity to use up large scraps from your stash or to choose a print that complements your sewing room’s decor. Because the Pad-type thread collector is constantly exposed to thread snips and lint, choosing a fabric with a smooth weave will make it easier to brush off debris later. Avoiding fuzzy fabrics like fleece for the outer shell is a wise move, as they tend to trap the very threads you are trying to collect.
The “collector” bag section of the Pad-type thread collector- Pattern needs a fabric that can hold its shape while hanging. A stiffened cotton or a fabric reinforced with medium-weight interfacing works best here. This allows the mouth of the bag to stay open, making it easy to toss in scraps without having to use your other hand to manually open the pouch. Following the Pattern instructions for adding interfacing is crucial to ensuring that your Pad-type thread collector remains functional and doesn’t just hang as a flat, useless flap of cloth.
Inside the pad section, many Pad-type thread collector- Pattern designs suggest a layer of batting or felt. This serves two purposes: it adds a bit of “cushion” to protect your table from the heat and vibration of the sewing machine motor, and it gives the project a professional, weighted feel. If you are working with a particularly loud machine, using a thicker wool felt within the Pad-type thread collector can significantly reduce the ambient noise in your sewing room, making your hobby much more peaceful.
Don’t forget the importance of washability when selecting materials for your Pad-type thread collector- Pattern. Sewing rooms can get dusty, and threads can sometimes carry oils or dyes. You want a Pad-type thread collector that can be tossed into the laundry machine every few weeks without losing its shape or shrinking. Pre-shrinking your fabrics before you cut them according to the Pattern is a vital step to ensure the finished product fits your machine perfectly for its entire lifespan.
Lastly, consider the weight used in the Pad-type thread collector- Pattern to keep the bag from tipping over the edge. Some designs use a weighted bar or plastic pellets sewn into a specific pocket. When selecting these “fillers,” ensure they are either removable or water-safe if you plan on washing the entire unit. A well-weighted Pad-type thread collector is the difference between a tool that stays in place and one that falls to the floor every time you move a piece of fabric through your machine.
2. Understanding the Technical Geometry of the Pattern
The Pattern for a thread collector is a masterpiece of functional design, usually consisting of two or three main rectangular pieces and a circular or boxed bottom for the bin. When you look at a Pad-type thread collector- Pattern, the largest piece is the “mat” that sits under the machine. It is essential to measure your machine’s footprint before you start cutting, as you want the mat to be slightly larger than the base of the machine to provide a protective border for your table.
One of the cleverest features of the Pad-type thread collector- Pattern is the “hanging bridge.” This is the section of fabric that connects the pad to the scrap bin. In a high-quality Pattern, this bridge is designed to be long enough to clear the edge of your sewing cabinet or table, but short enough that the bin doesn’t hit your knees while you are sitting down. Adjusting this length in the Pattern is the best way to customize the project to your specific ergonomic needs and furniture height.
The scrap bin portion of the Pad-type thread collector- Pattern often utilizes a “boxed corner” technique. This is a sewing method where you stitch across the corners of a bag to give it a flat bottom, allowing it to expand and hold a significant volume of thread and fabric waste. Understanding how to read the markings on your Pattern for these boxed corners is key to creating a Pad-type thread collector that looks sleek and remains open and accessible while you are in the “flow” of sewing.
Many modern versions of the Pad-type thread collector- Pattern now include a detachable bin feature using Velcro or snaps. This is a brilliant addition to the Pattern because it allows you to empty the thread scraps into the trash without having to move your entire sewing machine off the pad. If your chosen Pattern doesn’t include this, it is an easy modification to make, simply by adding a fastening strip where the bridge meets the collector bag on your Pad-type thread collector.
Seam allowances are particularly important in a Pad-type thread collector- Pattern because the project involves several layers of thick fabric. Most Patterns will call for a 1/2-inch seam allowance to provide enough “grip” for the stitches to hold the weight of the scrap bin. If you are using especially thick canvas or denim for your Pad-type thread collector, you may even want to topstitch your seams to ensure they don’t burst over time under the weight of the collected waste.
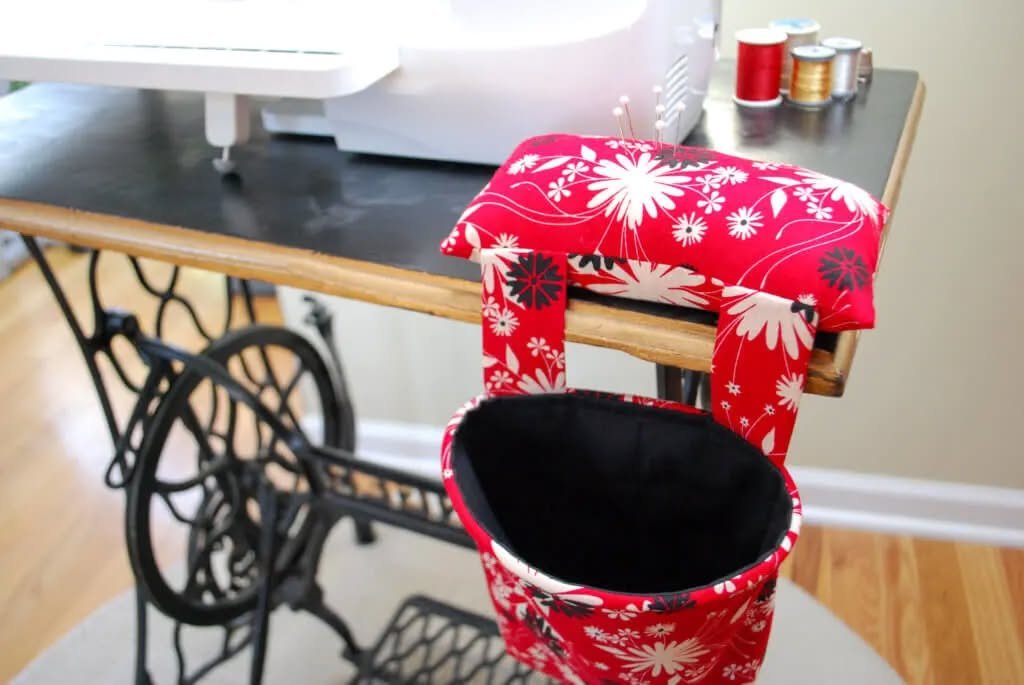
Finally, the Pattern usually includes instructions for a “pin cushion” attachment. Many sewists like to have their pins right next to the machine, so a Pad-type thread collector- Pattern often features a small stuffed section on the corner of the mat. This integration makes the Pad-type thread collector a multi-functional workstation, proving that a well-thought-out Pattern can replace multiple separate accessories and create a much more streamlined and efficient sewing experience.
3. Step-by-Step Construction of the Pad-type thread collector
The assembly of your Pad-type thread collector- Pattern begins with preparing the main mat. You will typically quilt the top fabric, the batting, and the bottom grip fabric together first. This “sandwich” creates the sturdy base that defines the Pad-type thread collector. Use a walking foot on your sewing machine if you have one, as this will help move the thick layers evenly through the machine and prevent the fabric from shifting away from the Pattern lines.
Next, you will move on to the bridge and bin sections of the Pad-type thread collector- Pattern. If you are adding interfacing, apply it to the wrong side of the bin fabric before you sew the sides together. Once the bin is shaped using the boxed corner method mentioned in the Pattern, you will have a sturdy container. For an extra professional touch on your Pad-type thread collector, you can add a piece of plastic boning or a flexible wire around the rim of the bin to keep it perfectly circular or square.
Attaching the bin to the bridge is the next critical phase in the Pad-type thread collector- Pattern. This seam will bear the most stress, so it is often recommended to use a triple stitch or a reinforced zigzag stitch. Because the Pad-type thread collector will be hanging, you want to ensure that even if the bin gets full of heavier fabric scraps, the connection point won’t fray or tear away from the main mat under the machine.
If your Pad-type thread collector- Pattern includes the optional pin cushion, you will sew this small pouch separately and then hand-stitch or machine-stitch it onto the corner of the mat. Fill it with ground walnut shells or polyester fiberfill. The walnut shells are a popular choice for a Pad-type thread collector because they provide extra weight and help keep your pins sharp, adding another layer of utility to your handmade Pattern project.
The final “finishing” step for your Pad-type thread collector- Pattern is usually the binding. Just like a quilt, you can finish the raw edges of the mat with bias tape. This gives the Pad-type thread collector a polished look and hides the raw edges of the batting and multiple fabric layers. Choose a contrasting color of bias tape to make your Pattern design stand out and give it that “designer” sewing room aesthetic that makes your workspace feel more inspiring.
Once the sewing is complete, give your Pad-type thread collector a final press with a hot iron. This helps set the stitches and ensures the mat lies perfectly flat under your machine. After following the Pad-type thread collector- Pattern from start to finish, you will have a durable, functional tool that is ready to be put to work immediately. Slide it under your machine, let the bin hang over the edge, and enjoy the satisfaction of a mess-free sewing session.
4. Maintenance and Advanced Customizations for your Collector
To keep your Pad-type thread collector- Pattern looking new, it is important to empty the bin regularly. While it is designed to hold a lot of waste, letting it get too heavy can put unnecessary strain on the bridge and the fabric of the Pad-type thread collector. A quick daily emptying into the main trash bin will ensure the longevity of your project and prevent the “bridge” from stretching out of shape over months of heavy use.
If you find that your machine still vibrates more than you’d like, you can modify the Pad-type thread collector- Pattern by adding a layer of shelf liner or neoprene inside the pad. This material is excellent for absorbing high-frequency vibrations from modern computerized machines. This slight adjustment to the original Pattern can make your sewing experience much more comfortable and prevent your machine from “walking” across the table during high-speed decorative stitching.
For those who do a lot of embroidery or applique, the Pad-type thread collector- Pattern can be customized with extra pockets. By sewing small mesh or clear vinyl pouches onto the side of the bridge, you can create a spot for your embroidery scissors, seam rippers, or tweezers. This transforms the Pad-type thread collector from a simple trash bin into a comprehensive organizer station, keeping your most-used tools within arm’s reach at all times.
Aesthetic updates can also be made to your Pad-type thread collector- Pattern as your style changes. Since these are relatively small projects, you can make seasonal versions—using bright florals for spring and cozy flannels for winter. Having multiple Pad-type thread collectors also means you always have one ready to use while the other is in the wash, ensuring you never have to sew without your favorite organizational tool.
If you are a professional sewist or sell your crafts, the Pad-type thread collector- Pattern makes an excellent gift or “add-on” item for customers. You can even embroider your business logo onto the front of the scrap bin. A personalized Pad-type thread collector is a thoughtful gift for any sewing enthusiast, and because it is made from a reliable Pattern, you can produce them quickly and consistently for craft fairs or as tokens of appreciation for your sewing circle.
Ultimately, the Pad-type thread collector- Pattern is about more than just cleaning; it’s about respecting your workspace and your craft. When your environment is orderly, your mind is free to focus on the intricate details of your sewing. By investing the time to create a high-quality Pad-type thread collector, you are investing in your own productivity and joy, ensuring that every project you start is a clean, organized, and professional experience.
Frequently Asked Questions (FAQ)
Does the Pad-type thread collector- Pattern work with all sewing machines?
Yes, the beauty of a Pad-type thread collector- Pattern is that it is essentially a universal design. However, since machines vary in size, it is always best to measure your specific machine’s base and adjust the mat size in the Pattern to ensure it provides full coverage and stability.
How do I stop the bin from hitting my legs while I sew?
If the bin is too low, you can shorten the “bridge” section of the Pad-type thread collector- Pattern. Before you do the final stitching, place the pad under your machine and hold the bin against the table to find the perfect height that clears your lap while still being easy to reach.
What can I use to weight the Pad-type thread collector?
Many crafters use a small bag of aquarium gravel, clean sand, or metal washers tucked into a hidden pocket at the back of the mat. This counterweight is what allows the Pad-type thread collector to support a full bin of scraps without shifting.
Is it better to use Velcro or snaps for the detachable bin?
Velcro is often preferred in a Pad-type thread collector- Pattern because it allows for slight adjustments in positioning and is very easy to rip off and reattach quickly. However, snaps are more durable over many wash cycles and don’t collect lint like Velcro does.
Can I make the collector bag larger?
Certainly! You can scale up the bin pieces of the Pad-type thread collector- Pattern if you tend to produce a lot of large fabric scraps. Just remember that a larger bag will require a heavier counterweight in the pad to keep everything balanced.
How often should I wash my thread collector?
It depends on your sewing frequency, but generally, washing your Pad-type thread collector once a month is sufficient to remove dust and lint. If you use it for a project with very “sheddy” fabrics like faux fur, you might want to wash it immediately after.
Conclusion
The Pad-type thread collector- Pattern is a must-have for anyone looking to professionalize their sewing space and eliminate the frustration of constant cleanup. Throughout this article, we have explored the importance of selecting high-friction base fabrics, the technical details of the Pattern geometry, and the step-by-step construction of the Pad-type thread collector.
We also discussed how to customize the project with pin cushions and organizer pockets to fit your unique workflow. By following a well-designed Pattern, you create a tool that not only keeps your floor clean but also reduces machine noise and protects your furniture.