A padded sleep mask – pattern is the perfect project for those looking to improve their sleep quality while embracing creativity. These soft, padded eye masks are not only functional but also a fun sewing project to add to your crafting collection. Whether you’re looking for a way to block out light for a restful night or want to create a personalized gift, a padded sleep mask – pattern can help you make the ideal mask suited to your needs.
Making your own padded sleep mask is simple and highly customizable. You can choose the fabric that suits your taste, whether it’s luxurious silk, cozy cotton, or a playful patterned fabric. The process is beginner-friendly, requiring only basic sewing skills. By following a clear, step-by-step tutorial, you can make a sleep mask that’s not only comfortable but also tailored to fit your face perfectly.
In this article, we will guide you through everything you need to know to create your own padded sleep mask – pattern, including the materials required, step-by-step instructions, and a few creative tips for customization. With this guide, you’ll have everything you need to start crafting your own personalized sleep mask in no time.
1. Materials You Will Need for Your Padded Sleep Mask
Before diving into your padded sleep mask – pattern, let’s gather the materials required. The beauty of making your own sleep mask is that you can choose your favorite fabrics and fillings, allowing for a fully customized product.
First, you’ll need two pieces of fabric for the front and back of the mask. Cotton fabric works well for this project, but you can also experiment with silk, satin, or even flannel if you prefer a softer feel against your skin. Choose fabric that is smooth and gentle on your face, especially if you plan to use the mask for sleeping.
In addition to fabric, you’ll need padding to give the mask its comfortable, cushioned texture. Cotton batting or polyester fiberfill are great choices for this. Make sure the padding is not too thick, as you want the mask to feel light and breathable, but still provide enough cushioning to block out light.
For securing the mask around your head, elastic is essential. You can find different widths of elastic, but a 1-inch wide elastic will typically work well for most people. Ensure it is soft and stretchy to avoid discomfort while sleeping.
You’ll also need scissors, pins, a needle and thread, and a sewing machine (if you prefer to use one). You may also want to have a fabric marker or chalk for marking where to cut and stitch.
Once you have all the materials gathered, you’re ready to start your project and create a padded sleep mask – pattern that’s both comfortable and stylish.
2. Step-by-Step Instructions for Sewing Your Padded Sleep Mask
Creating your padded sleep mask – pattern is simple and fun. Follow these step-by-step instructions to sew your mask from scratch.
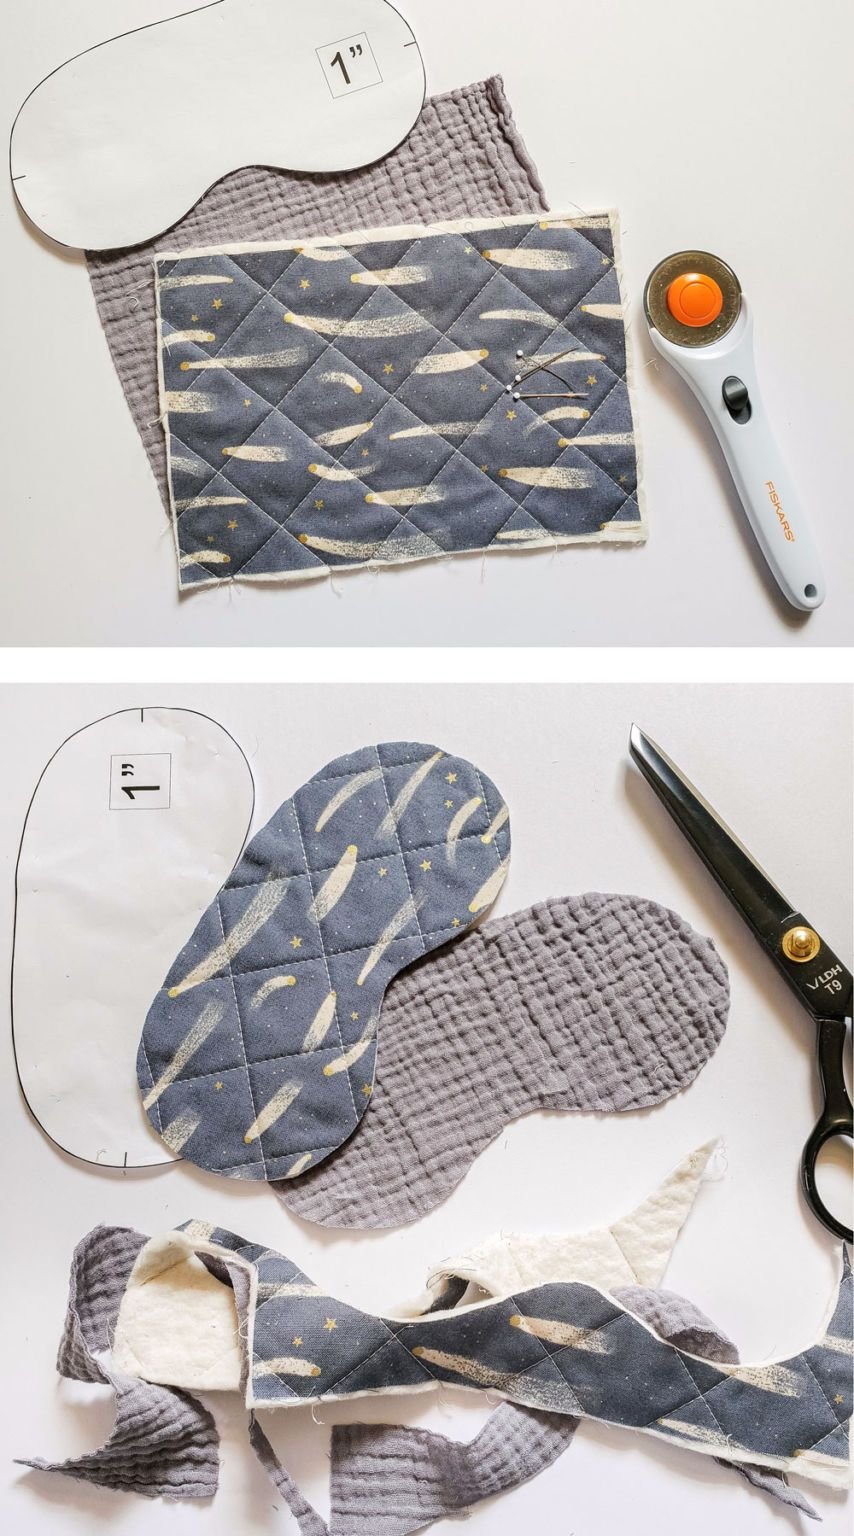
Step 1: Cut the fabric pieces
Start by cutting out two pieces of fabric for the mask shape. Use a sleep mask template or draw your own mask shape onto the fabric. The pieces should be roughly oval in shape and slightly larger than the width of your face, as you want the mask to cover your eyes and the area around them.
Step 2: Cut the padding
Next, cut a piece of cotton batting or polyester fiberfill to fit the shape of the mask. It should be the same size as the fabric pieces you cut, but a little thinner than the fabric to avoid making the mask too bulky. If using batting, make sure it’s not too thick to ensure comfort.
Step 3: Pin the layers together
Place one piece of fabric right-side down, then place the padding on top, followed by the second piece of fabric right-side up. Pin the layers together around the edges to keep them in place.
Step 4: Sew the mask together
Using a sewing machine, sew around the edges of the mask, leaving a small gap for turning it right-side out. Make sure to sew slowly and carefully to ensure the stitches are even. If you’re hand-sewing, use small, tight stitches to avoid any gaps.
Step 5: Turn the mask right-side out
Once sewn, carefully turn the mask inside out through the gap you left. Use a pencil or blunt object to gently push out the corners and edges of the mask to make sure it has a smooth, clean shape.
Step 6: Attach the elastic
Next, measure and cut a piece of elastic to fit around your head. Sew one end of the elastic to the sides of the mask, and then sew the other end to the opposite side. Make sure the elastic is comfortably snug but not too tight to avoid discomfort during sleep.
3. Customization Ideas for Your Padded Sleep Mask
Once you’ve completed your basic padded sleep mask – pattern, it’s time to add a personal touch. There are endless ways to customize your mask, whether you want it to be cute, luxurious, or unique.
Add embroidery or appliqué
Consider adding some decorative embroidery or appliqué to the front of your mask. This can be a fun way to add a monogram, a cute design, or even a pattern that matches your room decor. For a more personalized touch, try adding your initials or a simple design like stars or flowers.
Use different fabrics for different textures
Experiment with different fabrics for the front and back of your mask. You could use a soft flannel on one side for a cozy feel and a smooth satin on the other side for a luxurious touch. Mixing textures can make the mask feel even more special and tailored to your preferences.
Create a scented sleep mask
For an extra relaxing experience, add a scented element to your sleep mask. You can sew a small pouch of dried lavender or chamomile between the fabric layers for a soothing, aromatic sleep. The natural scent will help you relax and unwind before bed.
Make it adjustable
If you want your sleep mask to fit multiple people, consider adding an adjustable Velcro strap or using a stretchable ribbon instead of elastic. This way, the mask can fit comfortably for different head sizes.
Play with colors and patterns
Have fun mixing different colors and patterns to match your style. Choose fabrics that make you happy—whether it’s bold, vibrant hues or soft, muted pastels. You can even create a themed sleep mask for holidays like Christmas or Halloween.
4. Common Mistakes to Avoid When Making a Padded Sleep Mask
While making a padded sleep mask – pattern is relatively simple, there are a few common mistakes that you should be aware of to ensure your mask turns out perfectly.
1. Using too thick padding
If the padding is too thick, the mask may become uncomfortable to wear. Choose a medium-thin batting or fiberfill to achieve the right balance between softness and support.
2. Sewing too quickly
Sewing too quickly can result in uneven stitches or a poorly aligned mask. Take your time and sew slowly to ensure each stitch is even and secure.
3. Choosing fabric that’s too stiff
While it’s tempting to use a thick, sturdy fabric, it can make your sleep mask feel uncomfortable. Stick to soft, flexible fabrics that will feel pleasant against your skin.
4. Making the elastic too tight
If the elastic is too tight, it will cause discomfort around your head. Ensure the elastic is snug but not tight, giving you the right amount of hold without restricting circulation.
5. Forgetting to pre-wash fabrics
Always pre-wash your fabric before starting the project. Fabrics can shrink, and pre-washing ensures the mask will hold up well after future washes.
FAQ – Padded Sleep Mask – Pattern
1. Can I use any type of fabric for a padded sleep mask?
While any fabric can technically be used, softer materials like cotton, silk, or satin work best for a comfortable fit. Avoid stiff fabrics that could irritate your skin.
2. How can I make my sleep mask more comfortable?
Choose soft, breathable fabrics, and use lightweight padding. Ensure that the elastic is not too tight to prevent discomfort during sleep.
3. Can I make the padded sleep mask for someone else?
Yes! This is a great gift idea. You can customize the size by adjusting the elastic or adding a velcro strap for an adjustable fit.
4. What can I use instead of polyester fiberfill for padding?
You can use cotton batting, memory foam, or even rice if you want to make a heated sleep mask. Experiment with different fillers based on your preferences.
5. How do I clean my padded sleep mask?
Hand wash your sleep mask with mild detergent and air dry it. Machine washing may cause the fabric to shrink or the padding to lose its shape.
6. How long will it take to make the padded sleep mask?
This project should take about 1-2 hours, depending on your sewing skills and the amount of customization you add.
Conclusion
The padded sleep mask -pattern is a fantastic project that combines practicality with creativity. With just a few materials, you can create a soft, comfortable mask that helps you sleep better while adding a personalized touch to your nighttime routine. Whether you make it for yourself or as a thoughtful gift, this DIY project is sure to delight.
From cutting fabric to adding decorative elements, you’ve learned how to create a customized sleep mask that fits your style and needs. Don’t forget to experiment with different fabrics and techniques to make your mask truly one-of-a-kind!
If you found this article helpful, feel free to leave your honest opinions and suggestions in the comments below. Your feedback is valuable and encourages us to continue sharing fun and creative projects like this one. Sweet dreams and happy crafting!