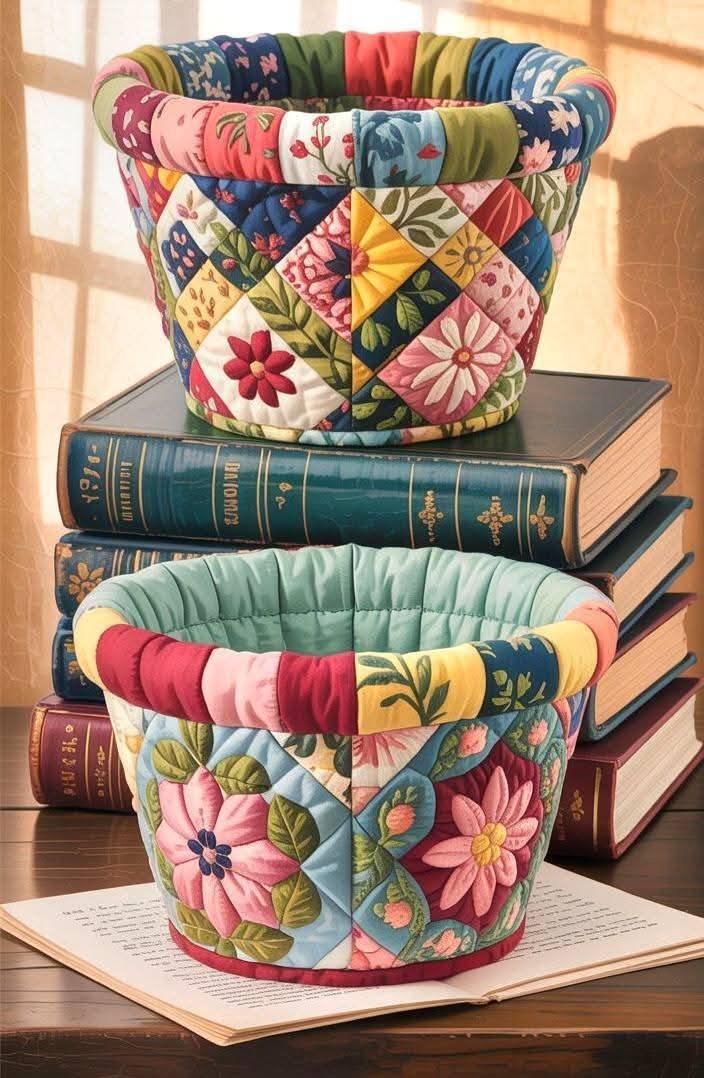
Exploring the world of a Patchwork Baskets – Pattern is one of the most rewarding journeys a fiber artist can undertake, combining the precision of quilting with the practical utility of home storage. These charming containers are not just functional; they serve as a canvas for your favorite fabric scraps, allowing you to blend colors, textures, and memories into a structural masterpiece. Whether you are looking to organize your sewing room or create a heartfelt, handmade gift, mastering the art of the quilted basket is a milestone in any crafter’s repertoire.
The beauty of following a Patchwork Baskets – Pattern lies in its incredible versatility and the professional finish it provides to otherwise simple fabric strips. By utilizing various piecing techniques—such as half-square triangles, flying geese, or simple squares—you can transform a pile of remnants into a sturdy, self-standing vessel. This process requires a balance of creative flair and technical accuracy, ensuring that every seam aligns perfectly to maintain the basket’s integrity and aesthetic appeal.
When you dive into a Patchwork Baskets – Pattern, you are engaging in a sustainable practice that celebrates the “reduce, reuse, and upcycle” philosophy. Using high-quality cotton, heavy-duty interfacing, and thoughtful quilting stitches, these baskets become durable heirlooms that stand the test of time. In this comprehensive guide, we will break down the essential components of creating these beautiful items, ensuring your finished project looks like it came straight from a high-end boutique.
1. Understanding the Essentials of a Patchwork Baskets – Pattern
A successful Patchwork Baskets – Pattern begins with the selection of the right materials, as the structure of a basket is far more demanding than a standard flat quilt. To ensure your basket doesn’t collapse, you must choose a firm stabilizer, such as fusible fleece or heavyweight foam batting, which provides the necessary “body” for the walls. Pairing these with 100% cotton fabrics ensures that your patchwork remains crisp and manageable during the assembly process.
When reading a Patchwork Baskets – Pattern, pay close attention to the seam allowance, which is typically a standard 1/4 inch. Because these baskets are 3D objects, even a slight deviation in seam width can cause the base and the sides to misalign during the final “boxing” stage. Precision in cutting and sewing is the secret ingredient to a professional-looking quilted container that sits flat on a surface and holds its shape.
The “pattern” serves as your roadmap, providing specific measurements for the exterior panels, the interior lining, and the bottom base. Most modern designs incorporate boxed corners, a clever sewing trick that creates depth and allows the basket to stand upright. Understanding how these geometric shapes interact is vital for anyone looking to master the Patchwork Baskets – Pattern and move on to more complex organizational projects.
The lining fabric is just as important as the exterior, as it hides all the raw seams and provides a clean finish to the inside of your work. Many crafters choose a coordinating solid or a subtle print for the lining to make the patchwork exterior truly pop. If you are using your basket for heavy items, consider a sturdier lining like canvas or duck cloth to add an extra layer of durability to the sewing project.
Finally, the finishing touches are what elevate a simple fabric box into a true Patchwork Baskets – Pattern success story. This includes adding sturdy handles, which can be made from leftover fabric strips, leather straps, or even cotton webbing. Ensuring these are securely attached with reinforced stitching or rivets will guarantee that your basket is as functional as it is beautiful for years to come.
2. Choosing and Prepping Your Fabric Scraps for Success
Before you start cutting into your favorite fabrics for a Patchwork Baskets – Pattern, it is crucial to curate a cohesive color palette. Since patchwork involves many different prints, choosing a “hero” fabric and pulling accent colors from it helps prevent the design from looking cluttered. Mixing small-scale florals with geometric prints or solids creates a visual balance that enhances the overall quilting design.
Pre-washing your fabrics is a debated topic, but for a Patchwork Baskets – Pattern, it is often recommended to prevent future shrinkage. If you plan to wash your basket later, you want to ensure the cotton fibers have already settled so the seams don’t pucker after the first cleaning. Using a bit of best press or fabric starch during the ironing phase will also make the fabric easier to handle and cut accurately.
Organizing your scraps by size and shape makes following the Patchwork Baskets – Pattern much more efficient and enjoyable. Many quilters find success using pre-cut squares like Charm Packs or Layer Cakes, which are already color-coordinated and cut to specific sizes. However, the true joy of patchwork often comes from digging through your “scrap bin” to find those hidden gems that add a unique personality to your handmade basket.
The “Pattern” aspect of your project dictates exactly how many pieces you need for the side walls and the bottom panel. Using a rotary cutter and a self-healing mat is the best way to ensure every piece is perfectly square. In a Patchwork Baskets – Pattern, even a 1/8-inch error can multiply across several seams, leading to a lopsided basket, so take your time during the cutting phase.
Interface your exterior pieces before you begin the patchwork assembly if you want a very rigid structure. Some patterns suggest applying fusible interfacing to the individual scraps, while others recommend piecing the fabric top first and then fusing it to a large sheet of stabilizer. Following the specific instructions in your Patchwork Baskets – Pattern regarding stabilization will save you from frustration during the sewing machine process.
Don’t forget the importance of the grainline when prepping your fabric for a Patchwork Baskets – Pattern. Fabric has more stretch on the “bias” (the diagonal), which can lead to distortion when you are sewing the long side seams of a basket. By aligning your cuts with the lengthwise grain, you ensure that the walls of your quilted basket remain stable and do not stretch out of shape over time.
3. Step-by-Step Construction and Sewing Techniques
The first step in the actual sewing of your Patchwork Baskets – Pattern is creating the quilted sandwich. This involves layering your pieced patchwork top, the stabilizer/fleece, and sometimes a “scrap” fabric on the bottom to hold it all together. Quilt-as-you-go is a popular method for baskets, as it allows you to decorate and stabilize the fabric in one efficient step using decorative stitching.
As you move through the Patchwork Baskets – Pattern, you will likely encounter the “Right Sides Together” (RST) rule frequently. When sewing the side panels to the base, it is essential to pin or clip generously, especially at the corners. Using wonder clips instead of traditional pins is often easier when working with the thick layers of interfacing and patchwork required for these structural items.
The “Pattern” will guide you on how to create the boxed corners, which is the magic moment when a flat piece of fabric becomes a three-dimensional container. You will fold the corners of the sewn bag in a way that creates a triangle, sew across the base, and trim the excess. This technique is a fundamental skill in bag making and is the backbone of most Patchwork Baskets – Pattern layouts.
Once the exterior shell is complete, you must repeat the process for the inner lining, usually omitting the heavy interfacing to reduce bulk. The Patchwork Baskets – Pattern will then instruct you to place the exterior and lining together, usually with the lining inside the exterior (right sides facing). Sewing around the top rim while leaving a small gap for “turning” is the standard way to finish the edge.
Topstitching the upper edge of your basket is not just for looks; it provides essential structural reinforcement. After turning the basket right side out through the gap and pressing the top edge flat, a row of stitching about 1/8 inch from the top creates a crisp, professional finish. This step also closes the opening used for turning, completing the main body of your Patchwork Baskets – Pattern project.
The final construction phase involves attaching the handles, which should be centered on opposite sides of the basket. Whether you choose fabric handles that match your patchwork or leather accents for a modern look, make sure to use a heavy-duty needle (like a 90/14 or 100/16) to pierce through the many layers. This ensures your Patchwork Baskets – Pattern results in a product that can actually carry weight without the handles snapping.
4. Creative Variations and Advanced Customization
Once you have mastered the basic Patchwork Baskets – Pattern, you can begin to experiment with different shapes and sizes. You can easily scale a pattern up to create a large laundry hamper or scale it down for tiny thread bins or jewelry holders. The principles of patchwork remain the same, but the weight of your interfacing should increase as the basket gets larger to prevent sagging.
Integrating different types of fiber arts into your Patchwork Baskets – Pattern can yield stunning results. For example, you could replace one of the patchwork panels with a piece of hand embroidery, a crochet applique, or even a felted wool section. These mixed-media approaches make your quilted storage units truly one-of-a-kind and showcase a wide range of your crafting skills.
Adding functional features like exterior pockets or a drawstring closure can enhance the utility of your Patchwork Baskets – Pattern. Exterior pockets are perfect for holding small tools like scissors and measuring tapes, making the basket an ideal sewing caddy. A drawstring top, made from a lightweight cotton, can turn your basket into a project bag that keeps your yarn and fabric safe while you are on the go.
The “Pattern” can also be adapted to include dividers on the inside, which is great for organizing specific items like tea bags, spice jars, or office supplies. Creating these dividers involves sewing smaller fabric rectangles with stiff interfacing and securing them to the lining seams. This level of customization is why the Patchwork Baskets – Pattern is a favorite among those who love home organization.
For those who love a vintage look, using repurposed denim or antique linens in your Patchwork Baskets – Pattern adds a layer of history and texture. Denim is exceptionally durable and provides great natural structure, reducing the amount of stabilizer needed. Mixing the ruggedness of old jeans with the delicacy of floral patchwork creates a beautiful contrast that fits perfectly in a farmhouse-style home.
Finally, consider the seasonal possibilities of the Patchwork Baskets – Pattern. You can create a set of baskets for every holiday—using spooky prints for Halloween treat bags, festive reds and greens for Christmas gift baskets, or bright pastels for Easter egg hunts. These projects are quick enough to complete in a weekend, making them the perfect way to decorate your home with handmade charm throughout the year.
FAQ – Frequently Asked Questions
What is the best stabilizer to use for a Patchwork Baskets – Pattern?
For a sturdy basket that holds its shape well, Peltex 71F or Annie’s Soft and Stable are the top choices. If you prefer a softer, more flexible basket, fusible fleece like Pellon 987F works beautifully.
Can I make these baskets using only a standard sewing machine?
Yes! A standard sewing machine is perfectly capable of sewing a Patchwork Baskets – Pattern. However, because the layers can get quite thick, using a walking foot and a denim needle is highly recommended to prevent skipped stitches and ensure even feeding.
How do I clean my patchwork basket if it gets dirty?
Most patchwork baskets can be spot-cleaned with a damp cloth and mild detergent. If you used high-quality cotton and a washable stabilizer, you may be able to machine wash on a gentle cycle and air dry, though it may require a good steam press afterward to regain its shape.
How long does it take to complete one Patchwork Baskets – Pattern?
For an intermediate sewist, a medium-sized basket usually takes between 3 to 5 hours. This includes the time for cutting, piecing the patchwork, quilting the panels, and final assembly.
What size fabric scraps are best for this project?
You can use almost any size! Many patterns are designed for 2.5-inch strips (Jelly Rolls) or 5-inch squares (Charm Squares). The Patchwork Baskets – Pattern is exceptionally “scrap-friendly,” meaning even your smallest 1.5-inch remnants can be used in the design.
Is this project suitable for a complete beginner?
If you have basic knowledge of how to operate a sewing machine and sew a straight line, you can definitely attempt a Patchwork Baskets – Pattern. It is a great way to learn about 3D construction and interfacing without the pressure of a full-sized quilt.
Conclusion
In this article, we have explored the intricate and rewarding process of creating a Patchwork Baskets – Pattern, from selecting the right heavy-duty stabilizers to mastering the boxed corner technique. We learned that the secret to a professional-grade quilted basket lies in the preparation—choosing a cohesive fabric palette, ensuring precise cuts, and using the correct sewing machine needles for thick layers.
Whether you are upcycling old materials or using fresh cotton prints, these baskets provide a stylish and functional solution for home organization.