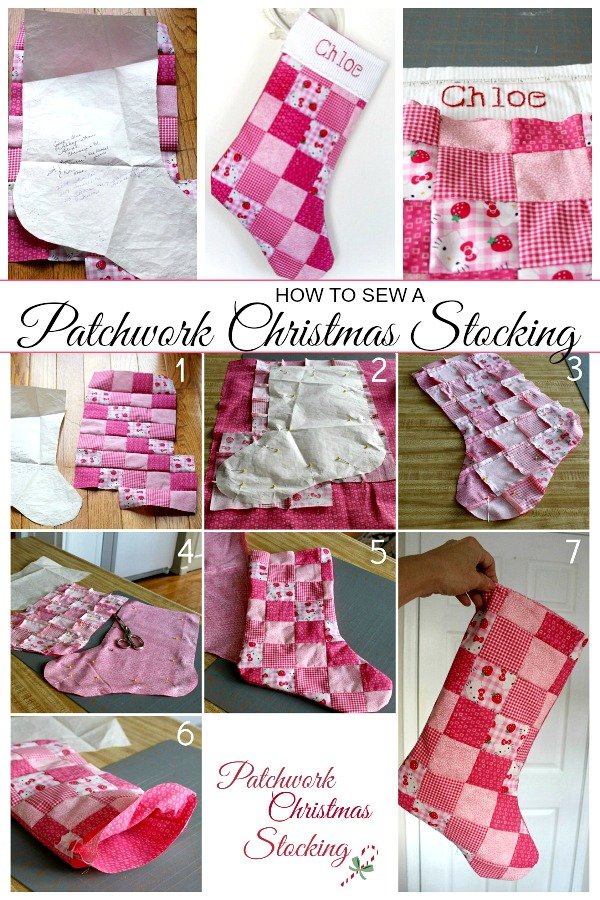
Bringing charm and warmth to your holiday décor, the Patchwork Christmas Stocking – Pattern is a delightful project for crafters who love the blend of color, tradition, and creativity.
This festive handmade stocking not only holds small gifts and treats but also captures the nostalgic beauty of patchwork quilting in a holiday-themed format.
Whether you’re a seasoned sewer or new to patchwork, this is a project that invites personalization and joy.
The great thing about the Patchwork Christmas Stocking – Pattern is that it allows you to use fabric scraps and remnants creatively. Instead of purchasing expensive seasonal stockings, you can craft something unique and filled with character — a piece that reflects your style or the personality of a loved one. Plus, making stockings from scratch is a sustainable way to celebrate Christmas, as it reduces waste and promotes handmade traditions.
In this article, we’ll guide you through the full process: selecting materials, assembling the patchwork, sewing and lining the stocking, and adding those finishing touches that make each one special. Whether you’re making one or a set for the whole family, this pattern will help you create beautiful heirloom pieces you’ll treasure for years.
1. Choosing Fabrics and Materials for Your Patchwork Stocking
The first step in crafting your Patchwork Christmas Stocking – Pattern is choosing the right materials. This pattern is highly flexible, and a big part of its charm lies in mixing and matching different fabrics to create a vibrant, festive patchwork design.
Cotton fabrics are the most popular choice for patchwork stockings. They’re easy to sew, available in countless prints, and hold their shape well. Look for holiday-themed prints like snowflakes, candy canes, plaids, stars, or simple red-and-green solids. Recycled fabrics from old clothes or linens can add a special, personal touch.
To begin, you’ll need about a half-yard of fabric for the back and lining of the stocking and a variety of fabric scraps for the front patchwork design. Batting or interfacing is also essential — it adds structure and softness, giving the stocking a quilted feel.
Make sure you have quality thread that matches or complements your fabric. A rotary cutter, cutting mat, and quilting ruler will help you cut precise shapes. If you’re new to patchwork, pre-cut fabric squares (charm packs) are a great option and make the process faster and easier.
You can sew the stocking entirely by machine or incorporate hand-stitching for decorative purposes. Both techniques are acceptable, and adding embroidery or appliqué can make your piece even more special.
Finally, consider extras like a hanging loop made of ribbon, bias tape for edging, or decorative buttons and bells to give your Patchwork Christmas Stocking – Pattern a festive, personalized finish.
2. Creating and Assembling the Patchwork Front
Once you’ve gathered your fabrics, it’s time to begin assembling the patchwork design — the heart of the Patchwork Christmas Stocking – Pattern. This step allows for maximum creativity and personal expression.
Start by choosing a patchwork layout. The most beginner-friendly options are square grids or strip blocks, where each piece is the same size. You can also try diagonal patterns, half-square triangles, or even crazy-quilt styles if you’re feeling adventurous.
Cut your fabric pieces evenly — typically 2.5” to 4” squares work best for stockings. Make sure all your pieces have a consistent seam allowance (usually ¼ inch). Lay them out on a flat surface or design board to plan your composition and make any adjustments before stitching.
Sew the pieces together row by row, then join the rows to form the full patchwork panel. Press the seams flat with an iron as you go to keep everything neat. You can quilt the patchwork by stitching through the layers in simple lines or decorative patterns.
After finishing your patchwork panel, place it on top of your batting and backing fabric, then quilt through all three layers. This gives your stocking a professional look and adds texture and strength.
Once the quilting is complete, trace your stocking template onto the patchwork panel and cut out the shape. Do the same for the back panel using your chosen fabric. Your stocking is now ready to be assembled.
Take your time during this step — it’s where your creativity shines. The beauty of the Patchwork Christmas Stocking – Pattern lies in these handmade imperfections and the uniqueness of each fabric combination.
3. Sewing, Lining, and Assembling the Stocking
Now that your panels are ready, it’s time to sew your Patchwork Christmas Stocking – Pattern into a functional piece. This part is where everything starts to come together into a beautiful holiday keepsake.
Start by placing the patchwork front and the back panel right sides together. Pin around the edges, leaving the top open. Sew around the stocking shape using a ¼ to ½ inch seam allowance, depending on how thick your fabric layers are.
Clip the curves around the heel and toe areas to help the stocking turn smoothly. Then, turn it right side out and press carefully. You’ll already see how your stocking is taking shape.
Next, prepare the lining. Use the same stocking template to cut out two pieces from your lining fabric. Sew these right sides together, again leaving the top open, but do not turn the lining right side out.
Insert the lining into the main stocking, wrong sides together. Adjust until the seams align and everything sits smoothly inside. Fold down the raw edges at the top and top-stitch or sew a binding around the opening to secure it all neatly.
Now it’s time to add the hanging loop. Fold a small strip of fabric or ribbon into a loop and sew it securely to the inner side of the stocking’s back seam. Make sure it’s strong enough to support the weight of filled treats and gifts.
At this point, you can add optional finishing touches — a fabric cuff, pom-poms, jingle bells, or a name tag. These small details add even more charm and personalization to your stocking.
4. Styling, Displaying, and Gifting Your Patchwork Stockings
The best part about completing a Patchwork Christmas Stocking – Pattern is putting it on display or gifting it to someone special. These handmade creations are more than decorations — they become part of cherished holiday traditions.
Hang your stocking by the fireplace, staircase, or on a bedroom door for a cozy, festive vibe. Group multiple stockings in complementary patchwork styles for a unified yet unique look.
If you’re giving the stocking as a gift, consider filling it with small handmade items, candies, or thoughtful notes. A patchwork stocking filled with care makes a beautiful and heartfelt present that goes far beyond store-bought alternatives.
These stockings also make wonderful family heirlooms. Add embroidered names or dates to the cuff to create a meaningful tradition. Each year, you can add a new stocking to your collection, or update old ones with new fabrics and embellishments.
You can even use your skills to create themed stockings — rustic, modern, vintage, or whimsical — depending on your holiday décor. The versatility of the Patchwork Christmas Stocking – Pattern means it can evolve with your style year after year.
For those with a crafting business, patchwork stockings are highly marketable during the holiday season. You can sell custom versions at craft fairs, online shops, or as part of Christmas gift bundles.
However you choose to use them, these patchwork stockings reflect the time, love, and creativity you’ve invested — and that’s what makes them truly special.
FAQ – Patchwork Christmas Stocking – Pattern
1. Is the Patchwork Christmas Stocking – Pattern suitable for beginners?
Yes! With basic sewing skills and a little patience, beginners can successfully complete this project. Starting with simple square patterns makes it even easier.
2. What size should I make the stocking?
A standard size is about 18 inches tall and 8 inches wide, but you can resize the pattern to suit your needs. Mini versions are great for decorations or gift card holders.
3. Can I make the stocking without a sewing machine?
Yes, although it will take more time. Hand sewing works well for small stockings or if you enjoy slow stitching. Just ensure your seams are tight and strong.
4. What’s the best way to personalize a patchwork stocking?
Adding a fabric cuff with an embroidered name, attaching initials, or using themed fabric patterns are great ways to personalize your stocking.
5. How do I wash the finished stocking?
Spot cleaning is recommended to preserve the shape and detail. If needed, hand wash gently in cold water and lay flat to dry.
6. Can I use fleece or flannel instead of cotton?
Yes, but keep in mind that thicker fabrics may be harder to sew and bulkier at the seams. Use lighter interfacing if working with heavy materials.
Conclusion
The Patchwork Christmas Stocking – Pattern is a festive, heartfelt project that brings together sewing, creativity, and tradition. From selecting joyful fabrics to crafting a one-of-a-kind piece for your home or a loved one, this pattern offers something truly meaningful.
By following this guide, you’ve learned how to choose your materials, create and quilt your patchwork, assemble the stocking, and style it for the holidays. The result? A timeless piece full of holiday cheer and personal charm.
We’d love to hear what you think! Please leave your honest feedback and suggestions in the comments. Have you tried this pattern? Did you add your
own twist? Your insights help other readers and inspire us to keep sharing meaningful, creative content.