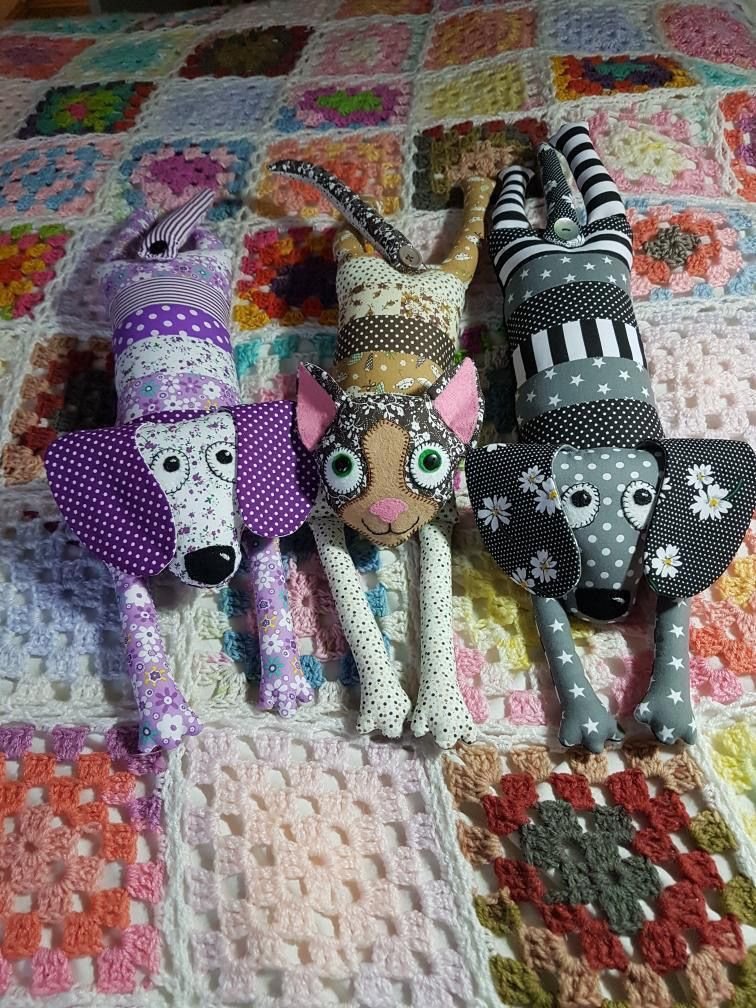
Creating a handmade patchwork dog – pattern is a fun and fulfilling sewing project that blends creativity, nostalgia, and function. Whether you’re making a soft toy for a child, a decorative piece for your home, or a unique handmade gift, a patchwork dog brings charm and personality to your sewing table. Using different fabric scraps gives each dog its own story, texture, and life.
One of the most enjoyable aspects of working on a patchwork dog – pattern is the freedom to experiment. You don’t need to stick with one color or type of fabric—mix florals, plaids, denim, or even old shirts to give your creation a warm, vintage feel. These little dogs are often designed with floppy ears, button noses, and stitched eyes, making them perfect for both play and display.
Whether you’re new to sewing or a seasoned maker, this guide will help you understand how to create a patchwork dog – pattern from start to finish. We’ll cover tools and materials, how to cut and sew the fabric pieces, tips for stuffing and shaping, and even creative ways to personalize your patchwork pup.
1. Gathering Materials and Planning Your Project
Before diving into the stitching process, it’s important to gather your supplies and prepare your workspace. Planning ahead makes your patchwork dog – pattern experience much smoother and more enjoyable.
Start by collecting fabric scraps in various colors and textures. Cotton works best for easy cutting and sewing, but you can also incorporate corduroy, denim, or linen for added texture. The beauty of patchwork lies in its variety, so don’t be afraid to mix prints and solids.
You’ll need a good pair of fabric scissors, thread, pins or clips, a sewing machine (or needle and thread if hand-sewing), and stuffing. Polyester fiberfill is a popular stuffing material for plush toys due to its softness and durability.
To follow a patchwork dog – pattern, you’ll either need a printed template or a digital download. These templates provide the shapes and sizes of the dog’s body parts—head, ears, legs, tail, and body. Always print your pattern pieces at 100% scale and check that everything aligns before cutting your fabric.
If your template doesn’t come with seam allowances included, remember to add about 1/4 inch around each piece. Labeling your pieces with fabric names or colors can also help keep track of your design as you lay everything out.
Pre-washing your fabric is a smart idea, especially if you’re using scraps from old clothing or different textile types. This helps to prevent shrinkage later and removes any dirt or residue. Iron your pieces to flatten them for accurate cutting.
Lastly, take time to visualize your finished dog. Do you want it to be playful and bright? Or soft and neutral? Sketching a color plan or arranging your fabric pieces in advance helps avoid last-minute design confusion.
2. Cutting and Piecing the Patchwork Dog
Now that your materials are ready, it’s time to begin cutting and assembling your patchwork dog – pattern. Precision and patience are key to a neat and lovable final result.
Start by cutting out each pattern piece and laying them on your chosen fabrics. Use pins or pattern weights to hold them in place as you cut. Be mindful of the fabric’s grainline, especially for curved parts like the head or ears, so the shape holds up after sewing and stuffing.
When you’ve cut all the fabric pieces, arrange them according to your chosen color layout. This step helps you visualize the final appearance of your patchwork dog – pattern and ensures a balanced, visually appealing design. You can swap sections around until you’re happy with the overall look.
Begin sewing your smaller sections together. It’s common to start with ears, legs, and tail since these can be pre-assembled and attached later. Use a 1/4″ seam allowance and press your seams open for a flatter finish. Backstitch at the beginning and end to secure each piece.
Next, sew the larger body parts. You’ll usually assemble the body in two halves—left and right—before joining them together. Remember to leave an opening (usually at the bottom or back) so you can turn the dog right-side out and stuff it later.
Once all parts are assembled and joined, check the seams for gaps and trim excess fabric if needed. Clip notches into curved seams, especially around the head and legs, to help them lie flat once turned inside out. Be careful not to snip through the stitching.
Turn your patchwork dog right-side out. Use a blunt tool like a knitting needle or chopstick to push out corners and curves. At this stage, you’ll start to see the full personality of your little pup take shape.
3. Stuffing and Shaping the Toy
The stuffing stage is where your patchwork dog – pattern really comes to life. Getting the right shape and firmness can make a big difference in how your dog looks and feels.
Start by gently filling the legs and tail. These areas are narrow and require small amounts of fiberfill pushed in gradually. Use your fingers or a stuffing tool to reach into the corners and shape them evenly.
Move on to stuffing the head and body. Fill the head firmly but not too tight—you want it to hold shape but still be soft and cuddly. As you stuff, occasionally pause to check the symmetry and make sure one side isn’t more lumpy than the other.
Once the body is filled, sew the opening closed using a ladder stitch or invisible stitch. Take your time here, as a neat closing seam helps the dog look polished and finished. If you’d like to make the toy more washable or durable, consider double-stitching this area.
You can shape the face by adding small tucks or stitching details. Embroider or sew on eyes, a nose, and a mouth using embroidery floss or felt pieces. Avoid buttons if the toy is for a small child, as they can pose a choking hazard.
Want your patchwork dog – pattern to stand or sit? You can insert small weights (like plastic pellets) into the base during stuffing to help it balance. Just make sure they are securely enclosed to avoid leaks.
Finally, fluff the dog, adjust stuffing where needed, and admire your finished creation. Each dog is unique, full of character, and a special representation of your creativity and effort.
4. Customization and Gift Ideas
One of the most enjoyable parts of creating a patchwork dog – pattern is how easy it is to customize. With a few small adjustments, you can tailor your pup to any occasion or recipient.
For a child’s birthday, use fun prints featuring animals, stars, or their favorite characters. You can even embroider the child’s name on the dog’s belly or back. Personalization makes the toy extra meaningful.
If you’re making a keepsake dog, consider using fabric from loved ones—baby clothes, shirts, or blankets. These memory dogs are deeply sentimental and can be a beautiful way to preserve memories through sewing.
Create a holiday-themed version with festive colors—red and green for Christmas, orange for Halloween, or pastel tones for Easter. Add bows, scarves, or mini accessories to make your patchwork dog – pattern fit the season.
For pet lovers, you can even model the patchwork dog after their real-life pup. Use similar fur colors or add a custom collar tag with the pet’s name stitched on. This makes a thoughtful and unique gift.
Selling your creations? The patchwork dog – pattern is a great product for craft fairs or online shops. With endless fabric combinations and personal touches, no two dogs are the same—and that’s a selling point.
Lastly, you can turn your patchwork dog into a décor piece by filling it with dried lavender or herbs instead of polyester stuffing. It becomes both cute and aromatic—a lovely addition to any room.
FAQ: Patchwork Dog – Pattern
Q1: Is the patchwork dog suitable for beginner sewists?
Yes! The patchwork dog – pattern is beginner-friendly, especially if you’re comfortable with basic sewing techniques like straight seams and simple hand-stitching.
Q2: What type of fabric works best for this project?
Cotton is ideal for easy sewing and cutting, but you can mix in other textures like corduroy, flannel, or linen for variety. Avoid fabrics that fray easily.
Q3: Can I stuff the dog with something other than fiberfill?
Yes, alternatives include fabric scraps, wool roving, or eco-friendly stuffing. You can also add lavender, dried herbs, or plastic pellets for scent or weight.
Q4: How do I make sure my dog stands up?
To make your patchwork dog – pattern stand, add weights like rice or plastic pellets to the base and ensure the legs are evenly stuffed and aligned.
Q5: Are there no-sew options for making a patchwork dog?
While sewing is best for durability, some no-sew kits use glue or iron-on bonding for decorative dogs, though they’re not suitable for young children or frequent use.
Q6: Can I wash the finished dog?
Yes, if all materials used are washable. Hand-washing is recommended to preserve the seams and embroidered details. Avoid machine drying unless it’s very secure.
Conclusion
The patchwork dog – pattern is more than just a sewing project—it’s a creative journey that brings joy, sentiment, and personality intoa tangible, huggable form. With just a few fabric scraps, some thread, and a little time, you can make something that delights children, decorates a home, or holds cherished memories.
This guide walked you through everything you need to know, from choosing materials and cutting fabric, to stuffing, stitching, and customizing your pup. Now it’s your turn to create a patchwork masterpiece!
We’d love to hear from you—leave your honest opinion below and feel free to share any ideas or suggestions. Your input helps this community grow and brings more creative patterns to life.