A Patchwork Elephant Quilt – Tutorial is the perfect way to combine artistic flair with functional cozy decor, offering a whimsical touch to any nursery or bedroom. Creating a quilt that features such a majestic and beloved animal allows quilters to play with a vast array of colors, textures, and patterns while mastering the precision of patchwork techniques. This project is not just about sewing fabric together; it is about storytelling through textiles, ensuring that every stitch contributes to a durable and beautiful heirloom piece.
Whether you are a seasoned quilter or a beginner looking for a rewarding challenge, following a Patchwork Elephant Quilt – Tutorial provides a structured path to success. The elephant motif is particularly popular because its large surface area allows for beautiful fussy cutting and the use of bold, vibrant scraps that might otherwise sit in your stash. By focusing on high-quality materials and thoughtful layout, you can create a professional-grade quilt that stands the test of time and frequent washing.
In the following guide, we will break down the essential steps to ensure your project is both enjoyable and technically sound. From selecting the right cotton fabrics to understanding the nuances of quilt batting and binding, every detail matters for a polished finish. Let’s dive into the creative process of making your very own Patchwork Elephant Quilt – Tutorial, ensuring your workspace is ready for a journey into the world of creative fiber arts and precision sewing.
1. Selecting Fabrics for Your Patchwork Elephant Quilt – Tutorial
When starting your Patchwork Elephant Quilt – Tutorial, the first step is choosing a cohesive color palette that brings the elephant to life. Many crafters opt for a “scrappy” look, using various shades of grey, blue, or even bright florals to define the elephant’s body. High-quality quilting cotton is the best choice here, as it provides the stability needed for intricate patchwork without excessive fraying during the assembly process.
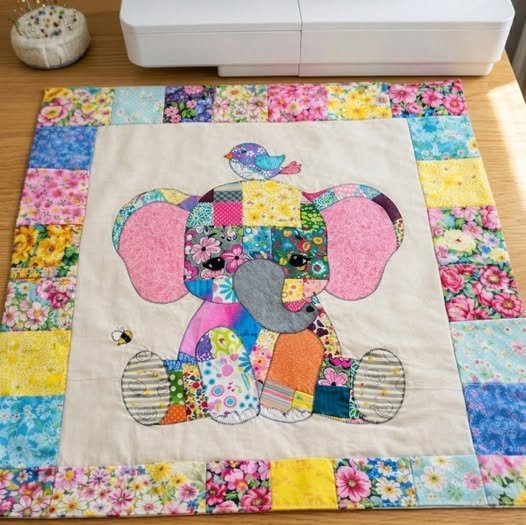
To make the elephant stand out, consider using a high-contrast background fabric, such as a crisp white or a soft cream. This ensures that the patchwork design remains the focal point of the quilt and doesn’t get lost in a busy background pattern. Using pre-washed fabrics is also a highly recommended SEO-friendly tip to prevent future shrinkage and color bleeding, keeping your quilt looking vibrant for years.
The ears of the elephant offer a fantastic opportunity to use accent fabrics like minky or flannel for a sensory experience, especially if the quilt is intended for a child. Mixing textures can add depth to the Patchwork Elephant Quilt – Tutorial, making the final product feel more customized and high-end. Remember to coordinate your thread color with the dominant shades in your fabric selection for seamless looking seams.
Don’t forget to look at the scale of the prints you are using; a mix of large-scale motifs and small ditsy prints creates visual interest. Using a rotary cutter and mat will ensure that your fabric pieces are cut with absolute precision, which is vital for the blocks to line up correctly. Precision cutting is the secret ingredient that separates a hobbyist project from a professional-looking quilt masterpiece.
Organization is key during the fabric selection phase of your Patchwork Elephant Quilt – Tutorial. Keeping your cut pieces in labeled bins or stacks helps prevent confusion once you start the sewing machine. Many quilters find that quilting clips are more effective than pins for holding multiple layers of fabric together, especially when working on the thicker sections of the elephant’s trunk or ears.
Finally, always purchase a little more fabric than the pattern suggests to account for any cutting errors. Having extra coordinating fabric also allows you to create a matching pillowcase or a “scrappy” binding that ties the whole aesthetic together. Planning your fabric layout on a design wall before sewing can help you visualize the final Patchwork Elephant Quilt – Tutorial and make adjustments to the color balance.
2. Cutting and Preparing the Elephant Motif Blocks
The heart of the Patchwork Elephant Quilt – Tutorial lies in the preparation of the individual blocks that form the animal’s silhouette. You will likely be working with squares and half-triangle squares (HSTs) to create the curved appearance of the elephant’s head and back. Accuracy in your 1/4-inch seam allowance is critical here, as even a small deviation can lead to blocks that do not fit together at the end.
Start by cutting your primary fabric into the specific dimensions required for the body, trunk, and legs as outlined in your quilting template. Using acrylic quilting rulers will help you maintain straight edges and perfect angles throughout the process. It is often helpful to starch your fabric before cutting to give it extra crispness, which makes handling small patchwork pieces much easier and more manageable.
For the elephant’s eye and tail details, you might choose to use applique techniques rather than traditional piecing. This allows for more organic shapes that are difficult to achieve with straight seams. Using a fusible web can simplify this process, allowing you to “glue” the pieces in place with an iron before securing them with a permanent blanket stitch or zig-zag stitch.
As you assemble the blocks for your Patchwork Elephant Quilt – Tutorial, press your seams carefully after every single addition. Most quilters prefer to press seams to the dark side to prevent the fabric allowances from showing through lighter sections of the quilt top. A hot iron and a bit of steam are your best friends for achieving the flat, professional finish required for high-quality SEO-optimized quilting projects.
If your pattern involves many small pieces, consider “chain piecing” to save time and thread. This technique involves feeding fabric pairs through the sewing machine one after another without cutting the thread in between. It is a hallmark of efficient patchwork quilting and helps you stay focused on the repetitive nature of building the elephant’s large fabric mosaic body.
Once all the individual blocks for the elephant are completed, lay them out on a flat surface to check the alignment. This is the moment where the Patchwork Elephant Quilt – Tutorial truly comes together, revealing the charming character of the animal. Ensure that the points of your triangles meet perfectly, as this attention to detail is what defines a well-crafted handmade quilt that people will admire.
3. Assembling the Quilt Top and Adding Borders
With the elephant motif completed, the next phase of the Patchwork Elephant Quilt – Tutorial involves surrounding the animal with background blocks or borders. This adds size to the quilt and provides a frame that enhances the central artwork. You can choose a simple border for a modern look or a more complex pieced border to continue the patchwork theme around the edges.
Measuring your quilt top through the center before adding borders is a vital step to avoid “wavy” edges. If you simply sew a long strip of fabric to the side without measuring, the quilt may not lay flat when finished. This quilting best practice ensures that your Patchwork Elephant Quilt – Tutorial remains square and professional, making the later process of long-arm or domestic quilting much smoother.
The choice of border fabric can significantly change the mood of the piece; a dark border creates a “window” effect, while a light border makes the quilt feel airy and large. Many modern quilters prefer to use a solid color for the first thin border (the “stop border”) and a bold print for the final outer edge. This layering adds a sense of depth and sophistication to the handmade elephant quilt.
During assembly, you should continue to use high-quality polyester or cotton thread that matches your project’s durability needs. If the quilt is intended for heavy use or frequent washing, a stronger thread is advisable. Ensuring that your sewing machine needle is fresh and appropriate for the fabric weight will prevent skipped stitches and maintain the integrity of your patchwork seams.
As the quilt top grows in size, manage the bulk by supporting the fabric on a large table next to your machine. This prevents the weight of the fabric from pulling on the needle, which can distort your quilt rows. Keeping the tension even is a key component of a successful Patchwork Elephant Quilt – Tutorial, ensuring the fabric doesn’t pucker or stretch out of shape.
Finalizing the quilt top is a major milestone in your Patchwork Elephant Quilt – Tutorial. Give the entire top a final, thorough pressing, checking for any loose threads or unraveled seams. A clean, flat quilt top is much easier to “sandwich” with the batting and backing, setting you up for a successful quilting and binding phase that will complete your creative journey.
4. Quilting and Finishing Your Patchwork Elephant Quilt
The final stage of the Patchwork Elephant Quilt – Tutorial is the “sandwiching” process, where you layer the quilt top, the quilt batting, and the backing fabric. For a soft, breathable feel, 100% cotton batting is a popular choice, while a cotton-poly blend offers more loft and less creasing. Secure these layers together using curved safety pins or a temporary spray adhesive to prevent shifting during the quilting process.
When it comes to the actual quilting—the stitching that holds the three layers together—you can choose between straight-line quilting or “free-motion” designs. For an elephant-themed project, stitching “in the ditch” (along the seams) helps define the animal’s shape, while swirl or cloud patterns in the background can simulate an outdoor environment. This adds a beautiful textural dimension to your Patchwork Elephant Quilt – Tutorial.
If you are quilting on a domestic machine, take your time and work from the center outwards to push any excess fabric toward the edges. This prevents bubbles or pleats from forming on the back of the quilt. Using a walking foot is highly recommended for this stage, as it feeds all layers of the “sandwich” through the machine at the same rate, ensuring a smooth quilting experience.
After the quilting is complete, it is time to “square up” the edges by trimming away the excess batting and backing. This creates clean, 90-degree corners that are ready for the quilt binding. The binding is a narrow strip of fabric that wraps around the raw edges, providing a durable and decorative finish. Choosing a striped or polka-dot binding can add a playful “pop” to your Patchwork Elephant Quilt – Tutorial.
Hand-sewing the binding to the back of the quilt provides a clean, “invisible” finish that is highly prized in the quilting community. However, machine-binding is a faster, more durable alternative for quilts that will see a lot of action in a child’s room. Whichever method you choose, ensure the corners are mitered perfectly for that professional, sharp appearance that characterizes a high-quality handmade gift.
Congratulations, you have completed your Patchwork Elephant Quilt – Tutorial! The final result is a beautiful, functional piece of art that showcases your skill and patience. Adding a quilt label to the back with your name, the date, and a message is a wonderful way to document your work for future generations, ensuring the story of your patchwork elephant lives on.
FAQ – Frequently Asked Questions
1. What is the best size for a Patchwork Elephant Quilt?
Most beginners start with a “crib” or “lap” size, roughly 40 x 50 inches. This size is manageable for domestic sewing machines while still being large enough to showcase the elephant motif clearly.
2. Can I use flannel instead of cotton for this quilt?
Yes, flannel is very cozy, but it tends to fray more and can stretch. If you use flannel, consider using a slightly larger seam allowance and plenty of starch to keep the patchwork pieces stable.
3. How do I wash my finished elephant quilt?
To preserve the life of your Patchwork Elephant Quilt – Tutorial, wash it on a cold, gentle cycle with a “color catcher” sheet. Tumble dry on low or air dry to prevent excessive shrinkage of the cotton fibers.
4. How many different fabrics do I need for the elephant?
For a “scrappy” look, you can use 10 to 15 different fabric scraps. If you prefer a more minimalist look, 3 to 4 coordinating fabrics will work perfectly to define the body, ears, and accents.
5. Is this project suitable for a complete beginner?
While it requires some knowledge of 1/4-inch seams, an elephant quilt is a great “intermediate-beginner” project. If you can sew a straight line and cut accurately, you can definitely succeed with this tutorial.
Conclusion
In this Patchwork Elephant Quilt – Tutorial, we have covered everything from the initial fabric selection to the final binding stitches.
You learned how to choose the right quilting cottons, prepare your patchwork blocks with precision, and assemble a quilt top that features a charming elephant motif. We also discussed the importance of quilt sandwiching and how different quilting designs can add texture and life to your finished project.