If you’re looking for a unique and creative way to add warmth and charm to your home, this Patchwork Lamp” Tutorial – Pattern is the perfect project.
Combining the beauty of handcrafted design with a practical purpose, patchwork lamps not only illuminate a space but also showcase personal style and artistry.
This guide will take you through everything you need to know to make your very own patchwork lamp, even if you’re a beginner.
In this comprehensive tutorial, we’ll walk through all the essential steps—from gathering materials to stitching and assembling your patchwork lamp. You’ll also find valuable tips on how to choose the best fabrics and patterns to suit your interior design. By the end of this article, you’ll have all the tools you need to create a one-of-a-kind piece that lights up any room.
Whether you’re crafting for yourself, creating a thoughtful handmade gift, or even looking to sell your creations, this Patchwork Lamp” Tutorial – Pattern will help you create a stunning and functional piece. Let’s get started on your journey to a more colorful and artistic home lighting solution.
1. Choosing the Right Materials for Your Patchwork Lamp
When starting your patchwork lamp project, selecting the right materials is key. Quality materials not only affect the overall appearance but also ensure your lamp remains safe and durable for daily use.
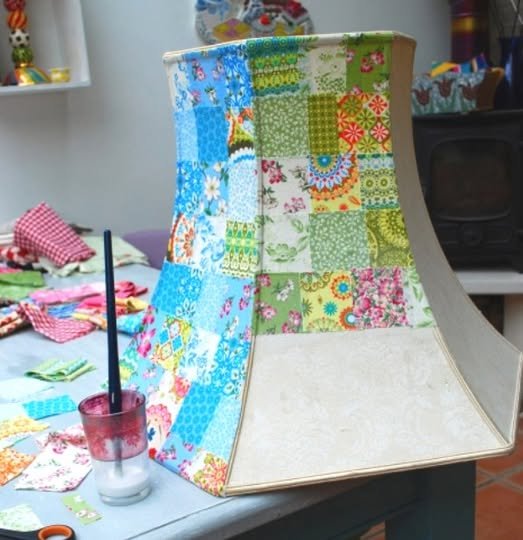
First, you’ll need a lampshade frame. You can either repurpose an old shade or purchase a new one online or from a craft store. Choose a frame that’s sturdy and fits the style of the room where your lamp will go.
Next, gather fabric scraps. These can be leftover pieces from other sewing projects, old clothes, or new fabrics you purchase specifically for this purpose. Use cotton or linen for the best results. These materials are easy to sew and hold shape well.
You’ll also need basic tools like scissors, fabric glue or Mod Podge, a sewing machine (or needle and thread), and measuring tape. Optional but helpful tools include pinking shears to reduce fraying, and an iron to keep fabric neat while sewing.
When it comes to safety, always use flame-retardant materials or treat your finished shade with a fabric-safe flame-retardant spray. Safety should always come first, especially with anything involving light and electricity.
Lastly, consider your color palette. Select fabrics that complement one another and the space where the lamp will live. Whether you want something bold and bright or soft and neutral, planning ahead will give your patchwork lamp a polished look.
2. Designing Your Patchwork Pattern
Now that you’ve collected your materials, it’s time to design the pattern for your patchwork lamp. The pattern is the soul of your piece—it’s what makes your lamp stand out and reflect your personality.
Start by laying out your fabric scraps on a flat surface. Mix and match colors and textures until you find a layout you like. Think about using a repeating color or motif to keep things visually balanced. This part of the process is a lot like quilting, so feel free to get creative.
Once you have a layout you love, take a photo for reference. This helps you keep track as you begin sewing. Decide on shapes—common choices are squares, rectangles, and even hexagons. Keep shapes simple if you’re new to sewing.
Cut the fabric pieces to size using your photo as a guide. Be sure to leave a small seam allowance (around ¼ inch) on all sides for sewing. Use pinking shears to prevent fraying.
Start sewing the fabric pieces together using a sewing machine or hand stitching. Iron the seams flat after each addition to keep the final panel smooth and professional-looking. Continue until your fabric panel matches the dimensions of your lampshade.
Once your pattern is complete, admire your work—it’s already becoming a piece of functional art! Your Patchwork Lamp” Tutorial – Pattern project is beginning to take real shape.
3. Assembling the Patchwork Lamp
With your completed fabric panel in hand, it’s time to turn it into a stunning patchwork lamp. This part of the process involves attaching your fabric to the lampshade frame and making sure it’s all neat and secure.
Begin by placing your fabric panel around the lampshade frame to test the fit. If needed, trim any excess fabric. You want the fabric to fit snugly but not be stretched too tight. Leave extra fabric at the top and bottom for folding over the frame edges.
Apply fabric glue or Mod Podge to the lampshade frame in small sections, starting at one seam. Press the fabric gently into the adhesive and smooth it out to remove bubbles or creases. Work your way around the frame, gluing as you go.
After attaching the full panel, let the glue dry completely. This could take a few hours, depending on the adhesive you used. Be patient—rushing this part could cause wrinkles or peeling later on.
Fold the top and bottom fabric edges over the frame, securing them with glue. You can cut small slits in the fabric if it helps you fold around curved edges. This step gives your lamp a clean, finished look.
Add a decorative trim or bias tape around the top and bottom edges if you’d like. This not only hides the raw edges but also adds an extra design element to your lamp.
Finally, attach your newly crafted patchwork shade to a lamp base and insert a bulb. Choose a low-heat LED bulb to preserve your fabric and keep things safe.
4. Styling and Displaying Your Patchwork Lamp
Once your patchwork lamp is complete, it’s time to style and display it in your home. This is where your creativity shines through in the overall atmosphere it helps create.
Choose a location where the lamp’s light and pattern can be appreciated—on a bedside table, a reading nook, or a hallway console. Make sure the colors and patterns enhance the mood of the room.
Consider pairing your lamp with matching or complementary decor pieces. Throw pillows, wall art, or even furniture accents in similar tones can create a cohesive design theme.
If you want to go further, make a pair of matching lamps or create different patchwork lamp designs for each room. This adds personality and warmth throughout your living space.
You can also switch fabric colors seasonally. Make warm, cozy tones for fall and winter, and bright pastels or florals for spring and summer. Removable shades make it easy to rotate.
Think about the lamp’s lighting effect. Transparent or light-colored fabrics will let more light through, while darker or denser fabrics will cast a more dramatic glow.
Above all, be proud of your work! Handmade items like a patchwork lamp bring beauty and originality to a space that store-bought items often lack. Your lamp is not just decor—it’s a conversation piece.
FAQ – Frequently Asked Questions
Q1: What fabrics are best for a patchwork lamp?
A: Lightweight cottons and linens work best. They are easy to sew, come in a variety of prints, and allow light to pass through nicely.
Q2: Can I make a patchwork lamp without sewing?
A: Yes! You can use fabric glue to attach pieces directly to the lampshade, though it may not have the same finished look as sewn panels.
Q3: Is it safe to use fabric for a lamp?
A: Yes, as long as you use flame-retardant fabrics or treat your finished lampshade with a fire-resistant spray. Always use low-heat LED bulbs.
Q4: Can I use any lamp base with my patchwork shade?
A: Most standard bases will work. Just be sure the shade fits securely and isn’t too close to the bulb to avoid heat buildup.
Q5: How do I clean a patchwork lamp?
A: Dust it gently with a dry cloth or use a vacuum with a brush attachment. Avoid using water or cleaning sprays.
Q6: How long does it take to make a patchwork lamp?
A: For beginners, expect around 4–6 hours spread over a couple of days. More experienced crafters can complete one in less time.
Conclusion
This detailed Patchwork Lamp” Tutorial – Pattern has guided you through every essential step, from choosing fabrics and designing your pattern to assembly and display. By now, you’ve learned how to bring your creative vision to life with a lamp that is both practical and uniquely yours.
Patchwork lamps are a fantastic way to reuse fabric scraps, experiment with color and texture, and add a handcrafted touch to your home. They’re also excellent as thoughtful, handmade gifts.
We’d love to hear from you! Please leave your honest feedback and suggestions in the comments below. Have you tried making a patchwork lamp? What challenges or successes did you experience? Your insights help others in the crafting community—and inspire new creations!