If you’re looking for a fun and creative quilting project, a Patchwork Pig is an excellent choice.
The Patchwork Pig combines the charming look of a pig with the artistry of patchwork quilting, creating a whimsical and delightful piece.
Whether you are an experienced quilter or a beginner looking for something new, the Patchwork Pig pattern can bring a unique touch to your quilt collection.
The Patchwork Pig design is incredibly versatile. You can adjust the size of the blocks, play with different fabrics, and customize the quilt to suit any room or occasion. From children’s quilts to decorative wall hangings, the possibilities are endless. One of the great things about the Patchwork Pig pattern is that it allows you to use fabric scraps, making it an eco-friendly option while also being a fun and budget-friendly project.
In this article, we’ll go through the materials you’ll need, the steps to create your own Patchwork Pig, and some tips to help you along the way. Whether you are making a full-sized quilt or a smaller project like a pillow, you’ll find everything you need to create a memorable and lovable Patchwork Pig quilt.
1. Materials Needed for Your Patchwork Pig Quilt
Before you begin creating your Patchwork Pig, it’s important to gather all of the materials you’ll need. Having everything prepared in advance will make the quilting process more enjoyable and help ensure that your project goes smoothly. Below is a list of the essential supplies required to make your Patchwork Pig quilt:
Fabrics
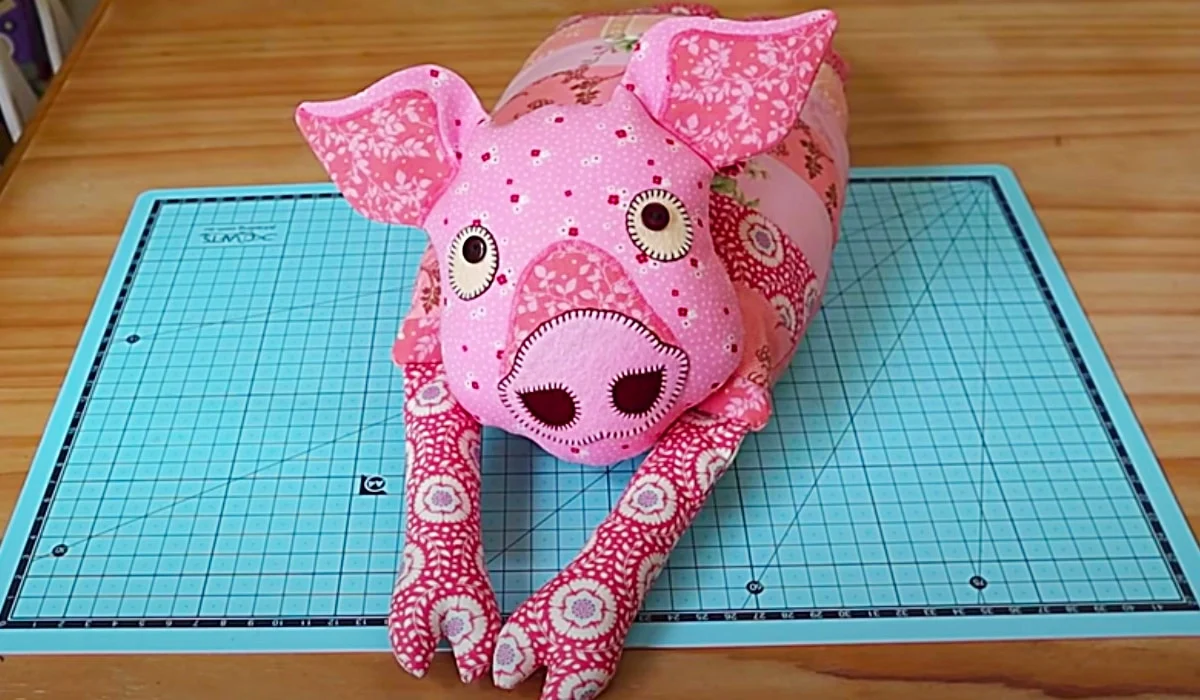
For a Patchwork Pig, you’ll need a variety of fabrics. Typically, you’ll need fabric for the pig’s body, ears, face, legs, and the background. Pink or light-colored fabric is commonly used for the pig’s body, while contrasting fabrics can be used for the ears, snout, and legs. You can get creative by using different patterns such as polka dots, florals, and stripes to add texture and personality to your quilt.
You’ll also need fabric for the background. Solid fabrics like white, cream, or soft pastel shades work well, but you can also choose a patterned fabric if you want to add more dimension to the quilt. Don’t forget to pick a fabric for the quilt’s border as well—this is a great opportunity to add a fun touch that complements the rest of the quilt.
Quilting Tools
You’ll also need a few essential quilting tools to help with cutting, piecing, and sewing your Patchwork Pig. A rotary cutter, cutting mat, and ruler are indispensable for accurately cutting your fabric pieces. A sewing machine is necessary for piecing the blocks together, and you’ll need matching thread to ensure your stitches blend in well with the fabric.
Additionally, a pressing iron is crucial for pressing your seams flat as you work. Pressing the seams helps give your quilt a polished and neat appearance. You may also want pins or fabric clips to hold pieces together while you sew.
Batting and Backing Fabric
Once the quilt top is pieced together, you’ll need batting and backing fabric to complete the quilt. The batting provides warmth and thickness, while the backing fabric forms the underside of your quilt. Choose batting that’s appropriate for the time of year or desired weight of the quilt, and select a backing fabric that coordinates well with the rest of your design.
2. Steps to Create Your Patchwork Pig Quilt
Once you’ve gathered all your materials, it’s time to start assembling your Patchwork Pig quilt. This step-by-step guide will help you navigate the process, from cutting the fabric to quilting the layers together.
Step 1: Cut Your Fabric Pieces
Begin by cutting your fabric into the necessary pieces. The Patchwork Pig pattern typically consists of squares and rectangles, which are then sewn together to form the pig’s body, face, ears, and legs. Ensure you measure your pieces accurately for a precise finish.
Don’t forget to leave some seam allowances as indicated in your pattern. You may also want to cut your fabric in advance so you can easily see how the different pieces will come together.
Step 2: Assemble the Pig’s Body and Features
Once you have your fabric pieces cut, start piecing together the body of the pig. The Patchwork Pig pattern will likely involve several smaller patches sewn together to create the pig’s head, legs, and body. Use your sewing machine to sew the pieces together, ensuring that each seam is pressed flat as you go.
For the pig’s face, ears, and legs, you can either use fabric pieces that are sewn in place or choose to appliqué the features. Appliqué involves stitching fabric shapes onto the quilt top to create detailed features such as the pig’s snout, eyes, and ears. This technique adds texture and visual interest to the design.
Step 3: Attach the Background Fabric
After the pig’s body and features are pieced together, you can now attach the background fabric. The background frames the pig and sets the tone for the overall quilt. Sew the background fabric around the edges of the pig, making sure everything lines up evenly.
If you’d like, you can add a border around the quilt after the background fabric is attached. A border helps frame the quilt and can be a great opportunity to use a complementary fabric that ties the whole design together.
Step 4: Quilt the Layers Together
Once the quilt top is pieced together, it’s time to quilt the layers. Lay the quilt backing fabric on a flat surface, followed by the batting, and then place the quilt top on top. Pin or baste the layers together to keep everything in place as you quilt.
You can quilt by hand or machine, depending on your preference. Machine quilting is faster and allows for straight lines or free-motion quilting for a more creative design. Hand quilting adds a personal touch and can provide a unique texture to the finished quilt.
Step 5: Add the Quilt Binding
After you’ve finished quilting the layers together, it’s time to finish the edges with binding. The binding is a strip of fabric sewn around the edges of the quilt to give it a neat, polished finish. You can make your own binding from coordinating fabric or use pre-made binding strips for convenience.
Sew the binding around the edges, folding it over to the back of the quilt and hand-stitching it in place for a clean, professional look.
Step 6: Final Touches and Care
Once the binding is attached, your Patchwork Pig quilt is nearly complete! Take the time to inspect the quilt for any loose threads or areas that need attention. Wash and dry your quilt according to the care instructions for the fabrics you’ve used to ensure it stays soft and vibrant.
3. Tips for a Perfect Patchwork Pig Quilt
To ensure your Patchwork Pig quilt turns out beautifully, here are some helpful tips and tricks to keep in mind:
Tip 1: Use a Consistent Seam Allowance
A consistent seam allowance is critical for making sure your quilt blocks line up properly. The most common seam allowance for quilting is a quarter-inch. Be sure to measure and use the same seam allowance throughout the quilt to maintain accuracy.
Tip 2: Press as You Go
Pressing your seams as you go is essential for a neat and professional finish. Use a pressing iron to flatten the seams after each step. This will help prevent puckering and ensure that the quilt lays flat.
Tip 3: Keep Your Fabric Pieces Organized
To avoid confusion and mistakes, keep your fabric pieces organized. You can use small containers or bags to separate the different pieces for the pig’s body, face, and background. This will make the piecing process go more smoothly.
Tip 4: Experiment with Fabric Choices
Feel free to get creative with your fabric choices! The Patchwork Pig quilt is a fun project where you can experiment with various prints and colors. Try mixing florals, solids, and polka dots to give your quilt a playful, unique look.
Tip 5: Take Your Time
Quilting is a process that requires patience and attention to detail. Take your time when cutting, piecing, and quilting the blocks. The more time you spend on each step, the better the finished quilt will look.
Tip 6: Have Fun
Above all, quilting should be a fun and enjoyable experience. Don’t stress over perfection; embrace the creative process and enjoy the journey of making your Patchwork Pig quilt.
4. Creative Variations of the Patchwork Pig Quilt
Once you’ve mastered the basic Patchwork Pig quilt pattern, there are plenty of creative ways to customize the design. Here are a few ideas for variations you can try:
Idea 1: Create a Patchwork Farm Animal Quilt
If you love the Patchwork Pig, why not add other animals to your quilt? You could create a whole patchwork farm by adding animals like cows, chickens, and sheep. This would make a fun and colorful quilt for a child’s room or as a gift for a farm animal lover.
Idea 2: Use Bright and Bold Colors
While pink is traditionally used for the pig’s body, don’t be afraid to experiment with bold and bright colors. A patchwork pig made in vibrant hues like purple, turquoise, or lime green could create a fun, modern twist on the classic design.
Idea 3: Add a Patchwork Border
Incorporate more patchwork into the quilt by adding a patchwork border around the quilt top. Use smaller squares or strips of fabric to create a patchwork border that ties the quilt together and adds more interest to the overall design.
Idea 4: Personalize with Embroidery
You can personalize your Patchwork Pig quilt by adding embroidery. Consider stitching the pig’s name, a birth date, or a fun message like “Oink” to give the quilt a special touch.
Idea 5: Make a Mini Quilt or Wall Hanging
If a full-sized quilt feels too ambitious, consider creating a smaller version of the Patchwork Pig quilt as a wall hanging or decorative item. This is a great way to showcase your creativity in a compact, easy-to-display piece.
FAQ – Frequently Asked Questions
1. What is a Patchwork Pig quilt? A Patchwork Pig quilt is a quilt made using patchwork techniques to create a pig design. It involves piecing together fabric blocks to form a pig’s body, ears, face, and legs, often using different fabrics to create texture and interest.
2. How do I make a Patchwork Pig quilt? To make a Patchwork Pig quilt, you need to cut fabric pieces for the pig’s body, face, ears, and legs, then piece them together. Add background fabric and quilt the layers together. Finally, finish the edges with binding.
3. What fabrics should I use for a Patchwork Pig quilt? For a Patchwork Pig quilt, you’ll need a variety of fabrics. Use pink or light-colored fabric for the pig’s body, contrasting fabrics for the ears and face, and a background fabric that complements the design.
4. Can I use scraps for the Patchwork Pig quilt? Yes, the Patchwork Pig quilt is a great way to use up fabric scraps. You can mix and match different patterns and colors to create a unique design.
5. How long does it take to make a Patchwork Pig quilt? The time it takes to make a Patchwork Pig quilt depends on your experience level and the size of the quilt. Generally, it may take several hours to cut the pieces, piece the quilt top, quilt the layers, and attach the binding.
Conclusion
Creating a Patchwork Pig quilt is a rewarding and enjoyable project for quilters of all levels. With the right materials and a little patience, you can craft a whimsical and charming quilt that is sure to be loved by all. Whether you’re a beginner or an experienced quilter, this project offers endless opportunities for creativity. We hope this guide has been helpful and would love to hear your thoughts or suggestions. Happy quilting!