This Patchwork Storage Basket – Tutorial is your ultimate guide to turning scattered fabric remnants into a beautiful, functional organizational tool for your home. We all have those cherished fabric scraps that are too small for a quilt but too pretty to throw away, and this project is the perfect way to give them a new life. By combining the art of traditional patchwork with modern sewing techniques, you can create a sturdy container that holds everything from sewing supplies to children’s toys, all while adding a splash of color to your living space.
In this comprehensive Patchwork Storage Basket – Tutorial, we will focus on the balance between aesthetic design and structural integrity. A common challenge with fabric storage bins is keeping them upright without them collapsing, but we will solve that using specific heavy-duty stabilizers and clever quilting. Whether you are a seasoned quilter or a beginner looking for a practical weekend project, this tutorial will walk you through every seam and corner to ensure a professional, high-quality result that looks great on any shelf.
Mastering the Patchwork Storage Basket – Tutorial allows you to customize your home organization to fit your specific needs and style. You are not just making a basket; you are practicing precision cutting, seam nesting, and 3D construction, which are essential skills for any textile artist. By the time you finish reading, you will understand how to select the right materials, assemble a patchwork panel, and finish your basket with durable handles that make it as portable as it is stylish.
1. Preparing Your Scraps and Essential Materials
The first step in our Patchwork Storage Basket – Tutorial is the selection of your fabric palette. For a truly vibrant look, try to mix and match different prints such as florals, geometrics, and solids while keeping a consistent color theme. Using 100% cotton quilting fabric is highly recommended because it is easy to press and holds its shape well, which is crucial when you are sewing many small pieces together to form a larger panel.
Beyond the decorative top layer, the “secret ingredient” of this Patchwork Storage Basket – Tutorial is the stabilizer. To ensure your basket doesn’t sag, you should use extra-firm fusible stabilizer or a stiff foam like Soft and Stable. This provides the necessary “bone structure” to the fabric, allowing it to stand tall even when empty. You will also need a coordinating lining fabric, preferably something smooth like a cotton broadcloth, to make the interior look just as polished as the exterior.
Your tool kit should include a rotary cutter, a clear acrylic ruler, and a self-healing mat. Precision is vital in patchwork; if your squares are even slightly off, the final basket dimensions will be uneven. A quarter-inch sewing foot for your machine is also a game-changer for this project, as it helps you maintain the consistent seam allowance needed to make all your corners meet perfectly in a clean “plus” sign.
Don’t forget to choose a high-quality polyester thread in a neutral color like gray or tan. Since the basket will likely be moved around and filled with items, the seams need to be strong enough to handle tension. If you plan on adding handles, look for heavy-duty cotton webbing or prepare extra strips of fabric that can be reinforced with interfacing. These small details will ensure your handmade storage solution lasts for years.
Ironing is perhaps the most important part of the preparation phase in this Patchwork Storage Basket – Tutorial. You must press your scraps before cutting and press every single seam as you sew. Nesting your seams—pressing one row to the left and the next to the right—will reduce bulk where the corners meet, making it much easier for your sewing machine to glide over the intersections without skipping stitches.
Finally, consider the scale of your patchwork. For a small desk organizer, 2.5-inch squares (often called “mini charms”) work beautifully. For a larger laundry-style basket, you might prefer 5-inch squares or even “strippy” patchwork. Planning your layout on a flat surface before you start sewing will help you visualize the final product and ensure the colors are balanced across the entire patchwork panel.
2. Sewing the Patchwork Panel and Quilting
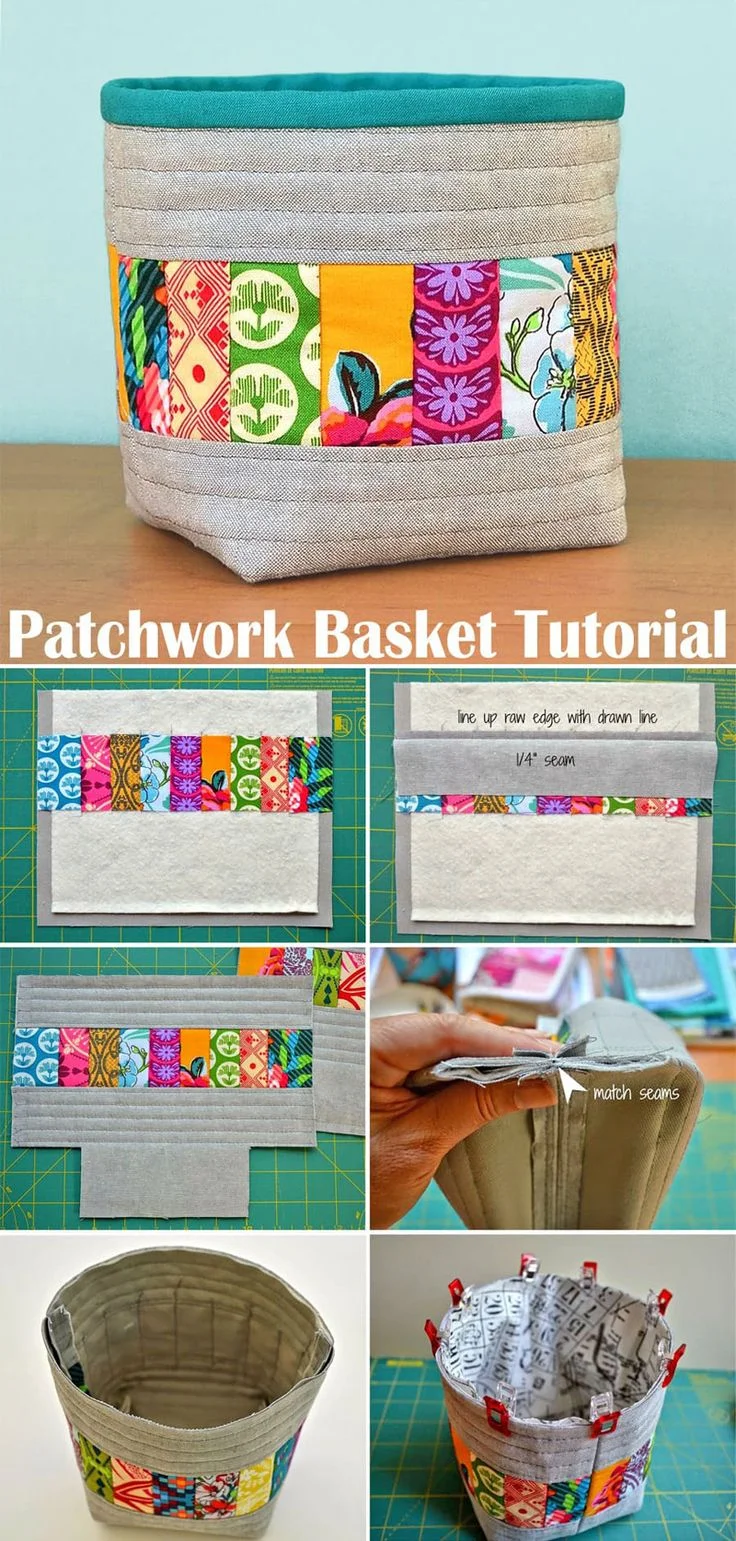
The core of the Patchwork Storage Basket – Tutorial involves assembling your chosen scraps into two large rectangles for the sides and a square for the base. Begin by sewing your squares into rows, and then sew the rows together to form your “fabric sheet.” Take your time to align the intersections; pins are your best friends here to prevent the fabric from shifting under the needle of your sewing machine.
Once your patchwork panels are assembled, it is time to fuse them to your heavy-duty stabilizer. Lay the stabilizer on the wrong side of the fabric and use a hot iron with plenty of steam to create a permanent bond. This step transforms the limp fabric into a sturdy material that feels more like cardboard or leather. This rigidity is what sets a professional patchwork basket apart from a simple fabric bag.
Now comes the fun part: quilting. Even though the stabilizer is fusible, adding quilting lines provides extra security and a beautiful texture. You can follow the “ditch” (the lines between the squares) or create a diagonal cross-hatch pattern. Quilting not only enhances the visual appeal of the Patchwork Storage Basket – Tutorial but also ensures that the fabric and stabilizer never delaminate, even after heavy use.
If you are new to quilting, keep your lines simple. Straight lines spaced about an inch apart are very effective for a modern look. If you have a walking foot, definitely use it for this stage; it feeds the top and bottom layers of the “sandwich” through the machine at the same rate, preventing puckering. This is a key SEO-friendly sewing tip that ensures your project stays flat and professional.
After quilting, trim your panels to the exact final dimensions required for your basket size. Squaring up the edges is essential because the quilting process can sometimes cause the fabric to “shrink” or shift slightly. Using your acrylic ruler, ensure every corner is a perfect 90-degree angle. This precision will make the assembly of the 3D basket much easier in the following steps of this tutorial.
The final preparation for the panel is to stay-stitch around the very edge, about an eighth of an inch from the border. This holds all the threads of your patchwork squares in place and prevents them from unraveling as you handle the pieces during assembly. Your panels are now ready to be transformed from flat art into a functional three-dimensional storage bin.
3. Constructing the Basket Shape and Boxed Corners
The transition from flat panels to a 3D object is the most exciting part of the Patchwork Storage Basket – Tutorial. Place your two side panels right sides together and sew down the side seams and across the bottom. You will now have a flat pouch. To give it depth, you must “box the corners.” This involves pulling the front and back fabric apart at the bottom corners to create a triangle shape.
Measure a specific distance from the tip of the triangle (for example, two inches) and draw a straight line across with a fabric pen. Sew along this line and trim away the excess fabric. Repeat this on the other side. When you turn the bag right side out, you will magically have a flat-bottomed basket that can stand on its own. This boxing technique is a fundamental skill in bag making and home decor sewing.
While the exterior is taking shape, you must repeat the exact same process with your lining fabric. However, a vital trick in the Patchwork Storage Basket – Tutorial is to sew the lining slightly smaller than the exterior. This prevents the inside from being “baggy” or bunching up. Leave a 4-inch gap in the bottom of the lining—this will be the “birth canal” through which you will turn the whole basket right side out later.
If you want to add handles, now is the time to baste them onto the exterior. Position them centered on the side panels, pointing downwards toward the bottom of the basket. Ensure they are level so the basket hangs straight when carried. Using reinforced stitching (like a box with an “X” inside) is a great way to ensure the handles can support the weight of whatever you store inside.
Next, slide the exterior basket inside the lining basket, making sure the “right sides” of the fabric are touching each other. The handles and the patchwork should be sandwiched in the middle. Match up the side seams and pin the top edge generously. This is a thick layer of fabric, so slow down your sewing speed and use a denim needle (size 90/14) if your machine is struggling to pierce the layers.
Sew all the way around the top circular edge. Once finished, reach through the hole you left in the lining and pull the exterior through. This “birthing” process is always a bit messy, but keep pulling until the whole basket is right side out. Tuck the lining inside the basket and give the top edge a good press with your iron to create a crisp, professional topline.
4. Finishing Touches and Customization Ideas
The final step in this Patchwork Storage Basket – Tutorial is topstitching the upper rim. This not only looks beautiful but also holds the lining securely in place so it doesn’t roll outward. Sew a line about a quarter-inch from the top edge, and if you want extra durability, add a second line of stitching a half-inch below the first. This creates a “cuff” look that is very popular in boutique home decor.
Don’t forget to close the hole in your lining! You can do this quickly with a sewing machine, or for a truly invisible finish, use a ladder stitch by hand. Once the hole is closed, push the lining down and smooth it out. Your handmade patchwork basket is now functionally complete, but you can still add personal flourishes to make it unique.
For added organization, you could sew small interior pockets into the lining before assembly. This is perfect if you are using the basket for sewing supplies, as it provides a place for scissors and measuring tapes. Another great idea from our Patchwork Storage Basket – Tutorial is to add a “label holder” or a piece of chalkboard fabric to the front so you can easily identify the contents of the basket.
If you find that your basket is still a bit soft, you can insert a piece of heavy plastic canvas or a thick cardboard square into the bottom. This creates a removable base stabilizer that keeps the bottom perfectly flat even when carrying heavy items. Many professional crafters use this trick to give their fabric bins a more high-end, structured feel.
This Patchwork Storage Basket – Tutorial is also highly scalable. Once you master the basic construction, you can make a “nesting set” of three different sizes. These look incredible on a nursery shelf or as a coordinated set in a craft room. Because you are using scraps, every basket will be a one-of-a-kind piece of art that reflects your personal style and creative journey.
We encourage you to experiment with different types of patchwork. Try Log Cabin blocks, Flying Geese, or even “crumb quilting” for a more eclectic look. The possibilities are endless when you combine the structure of a basket with the infinite variety of patchwork. You now have the skills to organize your home with style, one scrap at a time.
FAQ – Frequently Asked Questions
1. How do I make the basket stand up if I don’t have foam stabilizer?
If you don’t have foam, you can use multiple layers of heavy-duty fusible interfacing or even a layer of felt sandwiched between the fabrics. However, for the best “stand-alone” results, a dedicated bag-making stabilizer is highly recommended.
2. Can I wash my patchwork storage basket?
Yes, if you used cotton fabrics and a washable stabilizer like Pellon Peltex 71F. We recommend hand-washing or a delicate machine cycle and air-drying to maintain the shape. Avoid high heat in the dryer as it can affect the glue in the fusible layers.
3. What is the best size for a beginner’s first basket?
A medium size (around 8x8x8 inches) is usually the easiest to handle. It is large enough that you aren’t fiddling with tiny corners, but small enough that the patchwork assembly doesn’t become overwhelming.
4. How do I prevent my seams from being too bulky at the corners?
The key is to grade your seams. This means trimming the inner layers of the seam allowance shorter than the outer layers. Also, remember to press your seams open or nest them carefully to distribute the bulk.
5. Can I use this tutorial to make a round basket?
The “boxing” technique creates a square or rectangular base. To make a round basket, you would need to sew a circular base to a long rectangular side strip. While the patchwork part remains the same, the assembly geometry is different.
6. Do I need a special needle for the thick layers?
Yes, a size 90/14 or 100/16 Universal or Denim needle is best. Patchwork involves many layers of fabric, and when you add stabilizer and lining, your machine will need a strong, sharp needle to penetrate all layers without breaking.
Conclusion
In this Patchwork Storage Basket – Tutorial, we have journeyed through the entire process of creating a durable and stylish organizational piece from your favorite fabric scraps.
We explored the importance of extra-firm stabilizers, the precision required for patchwork assembly, and the magic of boxing corners to create a 3D shape. By following these steps, you’ve learned how to combine the beauty of quilting with the utility of home storage, resulting in a product that is both a work of art and a practical tool. This project is a wonderful way to reduce waste and bring a “humanized,” handmade touch to your domestic environment.