A Patchwork Table Runner – Pattern is one of the most rewarding projects for any sewing enthusiast looking to add a touch of handmade charm to their dining room decor. Whether you are a seasoned quilter or a complete beginner, understanding the mechanics of a Patchwork Table Runner – Pattern allows you to transform simple fabric scraps into a functional work of art. In this guide, we will explore the intricate details of creating these beautiful home accessories, ensuring you have the knowledge to execute a flawless design from start to finish.
Choosing the right Patchwork Table Runner – Pattern is essential because it dictates the visual flow of your table setting. A well-structured Pattern provides a roadmap, helping you calculate fabric requirements, cutting dimensions, and assembly sequences. By focusing on a Patchwork Table Runner – Pattern, you ensure that your seams align perfectly and your finished product looks professional, durable, and aesthetically pleasing for years to come.
In the world of interior design, a Patchwork Table Runner – Pattern serves as a focal point that ties the room’s colors together. Because these runners are smaller than full-sized quilts, they offer a low-stakes environment to experiment with bold Patchwork techniques and vibrant Patterns. This article will break down everything you need to know about selecting, cutting, and sewing your own Patchwork Table Runner – Pattern while optimizing your workflow for the best results.
1 Understanding the Patchwork Table Runner – Pattern Fundamentals
The foundation of any successful project begins with the Patchwork Table Runner – Pattern itself. A Pattern is essentially a blueprint that outlines how different shapes—usually squares, triangles, or rectangles—fit together to create a cohesive design. When you follow a Patchwork Table Runner – Pattern, you are engaging in a mathematical process that ensures the final dimensions fit your specific table size perfectly.
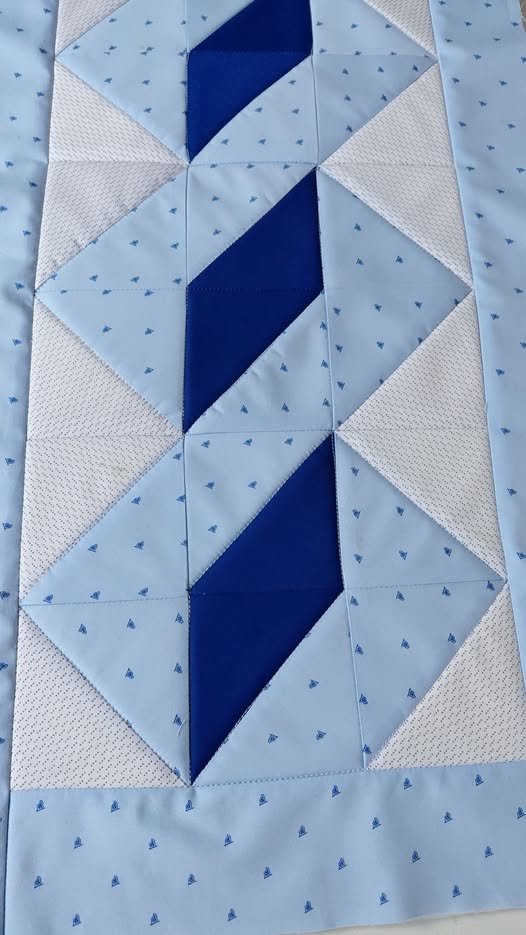
Selecting a Patchwork style is the next step in the creative process. You might opt for a traditional “Log Cabin” Pattern, a “Flying Geese” layout, or a simple “Nine-Patch” design. Each Patchwork Table Runner – Pattern carries a different level of difficulty and a unique visual impact, so it is important to choose one that matches your current skill level while still offering a bit of a challenge.
Fabric selection is where the Patchwork Table Runner – Pattern truly comes to life. Most experts recommend using 100% cotton “quilting weight” fabric because it holds its shape well and is easy to press. When following your Pattern, try to mix “fussy cut” prints with solid colors to make the Patchwork sections pop, ensuring that the overall Table Runner doesn’t look too cluttered or chaotic.
The “Seam Allowance” is a critical technical aspect of any Patchwork Table Runner – Pattern. In the quilting world, the standard is a 1/4 inch seam. If your seams are inconsistent, the Pattern will not align, and the edges of your Table Runner will become wavy. Precision is the secret ingredient that separates an amateur Patchwork piece from a masterpiece.
Beyond the aesthetics, a Patchwork Table Runner – Pattern also includes instructions for the “Batting” and “Backing.” The batting is the middle layer that provides thickness, while the backing is the fabric seen on the underside. Your Pattern will specify how much larger these layers need to be compared to the Patchwork top to account for shifting during the quilting process.
Finally, consider the “Quilting” phase of your Patchwork Table Runner – Pattern. This involves sewing through all three layers to hold them together. You can follow the lines of the Patchwork (known as “stitch in the ditch”) or create a contrasting Pattern of swirls or geometric lines. This step adds texture and ensures your Table Runner is sturdy enough to withstand frequent washing.
2 Selecting Materials for Your Patchwork Table Runner – Pattern
Once you have your Patchwork Table Runner – Pattern ready, you need to gather high-quality tools. A rotary cutter, a self-healing mat, and an acrylic ruler are indispensable for achieving the sharp, straight edges required by a Patchwork design. Without these tools, following a complex Pattern becomes significantly more difficult and prone to errors.
Thread choice is often overlooked but is vital for a lasting Patchwork Table Runner – Pattern. Use a high-quality 50wt cotton thread that matches or complements your fabric. Using cheap thread can lead to breakage or lint buildup in your machine, which can ruin the delicate assembly of your Patchwork pieces and distort the final Pattern dimensions.
Ironing is perhaps the most frequent task when working on a Patchwork Table Runner – Pattern. You must “press” your seams rather than “iron” them—this means lifting the iron and setting it down rather than sliding it. Sliding the iron can stretch the fabric fibers, causing your Patchwork blocks to lose their shape and fail to fit the Pattern requirements.
Templates can also be used to enhance your Patchwork Table Runner – Pattern. If your design involves complex shapes like hexagons or circles, using a plastic or paper template ensures every piece is identical. Consistency is the hallmark of a high-quality Patchwork project, allowing the repetitive nature of the Pattern to create a sense of harmony.
Don’t forget the importance of “Color Theory” in your Patchwork Table Runner – Pattern. Using a color wheel can help you choose complementary or analogous colors that make your Pattern stand out. A dark border often helps “frame” the interior Patchwork, giving the Table Runner a finished and professional appearance that catches the eye.
Lastly, consider the “Binding” of your Patchwork Table Runner – Pattern. The binding is the fabric strip that covers the raw edges of the runner. While it seems like a small detail, the color and width of the binding can significantly alter how the final Pattern is perceived. Many quilters choose a striped or contrasting fabric for the binding to add an extra layer of detail to their Patchwork.
3 Step by Step Assembly of the Patchwork Table Runner – Pattern
The assembly phase of a Patchwork Table Runner – Pattern begins with the “Cutting List.” Carefully follow the dimensions provided in your Pattern to cut all your fabric pieces before you start sewing. Organising these pieces into piles based on their position in the Patchwork design will save you time and prevent you from sewing the wrong pieces together.
Next, “Layout” your pieces on a flat surface or a design wall. This allows you to see how the Patchwork Table Runner – Pattern looks as a whole before the pieces are permanently joined. You can swap fabric positions at this stage to ensure the colors are balanced and that the Pattern flows naturally from one end of the Table Runner to the other.
“Chain Piecing” is a great technique to speed up the construction of your Patchwork Table Runner – Pattern. This involves sewing pairs of fabric together one after another without cutting the thread in between. It is an efficient way to handle the many small pieces often found in a detailed Patchwork design, keeping your workspace organized and your Pattern on track.
As you join your rows to complete the Patchwork Table Runner – Pattern, pay close attention to the “Nesting Seams” technique. By pressing the seams of one row to the left and the next row to the right, the fabric “locks” together at the intersections. This results in perfectly flat corners where the Patchwork elements meet, which is the sign of a well-executed Pattern.
Once the top of the Patchwork Table Runner – Pattern is finished, it is time for the “Quilt Sandwich.” This is the process of layering the backing, batting, and the completed Patchwork top. Use safety pins or fabric adhesive spray to “baste” the layers together, ensuring they don’t shift while you add the decorative quilting stitches defined in your Pattern.
The final step in the assembly is the “Squaring Up” of your Patchwork Table Runner – Pattern. After quilting, the edges might be slightly uneven. Use your ruler and rotary cutter to trim the edges so they are perfectly straight and the corners are exactly 90 degrees. This ensures that when you apply the binding, the Table Runner sits perfectly flat on your table.
4 Advanced Tips for Enhancing Your Patchwork Table Runner – Pattern
To take your Patchwork Table Runner – Pattern to the next level, consider adding “Appliqué” elements. Appliqué involves sewing smaller fabric shapes on top of your finished Patchwork blocks. This adds a three-dimensional quality to the Pattern and allows for more intricate motifs, such as flowers or holiday-themed shapes, to be integrated into the Table Runner.
Another advanced technique is “Foundation Paper Piecing” (FPP). This method involves sewing fabric directly onto a paper Pattern, which allows for incredibly sharp points and complex angles that are nearly impossible with traditional Patchwork methods. FPP is perfect for modern or geometric Patchwork Table Runner – Patterns that require extreme precision.
Experimenting with “Fabric Texture” can also elevate your Patchwork Table Runner – Pattern. While cotton is the standard, incorporating small amounts of linen, silk, or even velvet can add a luxurious feel to the Patchwork. Just be mindful of the different shrinkage rates and heat tolerances of these fabrics when washing and pressing your Table Runner.
Consider the “Scale” of the prints within your Patchwork Table Runner – Pattern. Using a mix of large-scale floral prints and tiny “ditsy” prints creates visual depth. If all the prints are the same size, the Patchwork can look flat. A dynamic Pattern uses scale to lead the eye across the Table Runner, highlighting different sections of the design.
“Custom Quilting” can also transform a simple Patchwork Table Runner – Pattern into a work of art. Instead of basic straight lines, you can use “Free Motion Quilting” to draw designs with your needle. This allows you to emphasize specific parts of the Patchwork, such as swirling around a central star or adding “pebble” textures to the background of the Pattern.
Finally, always “Label” your work. Attach a small fabric tag to the back of your Patchwork Table Runner – Pattern with your name and the date. This turns your Table Runner into a family heirloom. As you master more Patchwork techniques, you will be able to look back at your earlier Patterns and see how much your skills have grown over time.
FAQ – Frequently Asked Questions
1. What is the best size for a Patchwork Table Runner?
The size depends on your table, but a standard Patchwork Table Runner – Pattern is usually 12 to 16 inches wide and at least 12 inches longer than the table so it can hang over the edges.
2. Can I make a Patchwork Table Runner – Pattern without a sewing machine?
Yes, you can hand-sew a Patchwork runner using a “Running Stitch” or “English Paper Piecing.” It takes much longer, but many find the process meditative and the final Pattern very charming.
3. How do I wash my handmade Patchwork Table Runner?
It is best to wash your Table Runner on a cold, gentle cycle and air dry it. This protects the delicate Patchwork seams and prevents the colors in the Pattern from fading or bleeding.
4. What is the easiest Patchwork Table Runner – Pattern for beginners?
The “Charm Square” runner is the easiest. It uses pre-cut 5-inch squares of fabric, meaning you only have to sew straight lines to create a beautiful, colorful Patchwork design.
5. How much fabric do I need for a typical Pattern?
Most Patchwork Table Runner – Patterns require about 1 to 2 yards of total fabric, split between the various colors for the top, plus another yard for the backing and binding.
6. Do I need to pre-wash my fabric?
Pre-washing is a personal choice. Some do it to prevent shrinkage, while others prefer the “crisp” feel of unwashed fabric which makes it easier to cut the Patchwork pieces accurately for the Pattern.
Conclusion
In this article, we have explored the wonderful world of the Patchwork Table Runner – Pattern, covering everything from the basic fundamentals and material selection to the detailed assembly process and advanced decorative techniques. We learned that a successful Pattern relies on precision, color balance, and the right tools.
By mastering the art of Patchwork, you can create unique, personalized decor that brings warmth and style to any home. Whether you are following a traditional Pattern or creating your own, the journey of piecing together a Table Runner is as rewarding as the final result.