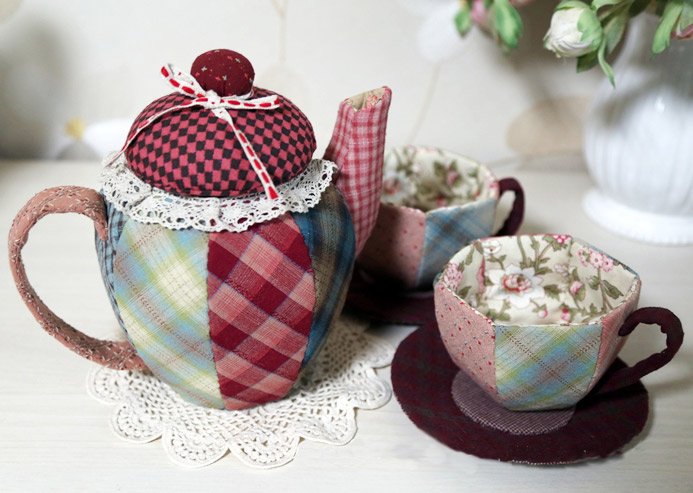
Patchwork Teapot and Cups- Pattern is the perfect project for those who want to blend the warmth of kitchen decor with the intricate beauty of quilting and fabric art. There is something inherently nostalgic about a teapot and its matching cups, and when you recreate this scene using various fabric scraps, you are essentially stitching a story of comfort and domestic charm. Using a Patchwork Teapot and Cups- Pattern allows you to utilize those precious “fat quarters” or leftover strips from previous projects, turning them into a functional piece of art that can serve as a wall hanging, a table runner, or even a decorative potholder.
The technical allure of the Patchwork Teapot and Cups- Pattern lies in its ability to combine straight-line piecing with delicate curves and appliqués. While many quilters are used to standard geometric blocks, the Pattern specifically designed for teapots introduces a more whimsical, representational form that challenges your precision and creative layout skills. Whether you are aiming for a vintage “shabby chic” look with floral calicos or a modern aesthetic with bold, solid colors, following a high-quality Patchwork Teapot and Cups- Pattern ensures that your proportions are correct and your finished project looks professional.
By engaging with a Patchwork Teapot and Cups- Pattern, you are also tapping into a vibrant community of textile enthusiasts who value slow crafting and personalized home styling. This guide is designed to help you navigate the complexities of the Patchwork Teapot and Cups, which refers to the physical assembly of fabric pieces into these classic vessel shapes, and the Pattern, which provides the blueprint and templates required for cutting and sewing. Throughout this article, we will delve into the best practices for fabric selection, technical assembly, and creative finishing touches that will make your project stand out.
1. Preparing the Essentials for Your Patchwork Teapot and Cups- Pattern
The first step in bringing your Patchwork Teapot and Cups- Pattern to life is selecting a cohesive fabric palette that evokes the mood of a cozy tea party. Many successful quilters recommend choosing a “focus fabric” for the body of the teapot and then selecting smaller, complementary prints for the cups. Because the Patchwork Teapot and Cups motif involves relatively small pieces, tiny prints like ditsy florals, dots, or small checks tend to work better than large-scale patterns which might get lost in the seams.
Beyond the aesthetics, the weight of the fabric is crucial for the success of your Patchwork Teapot and Cups- Pattern. High-quality quilter’s cotton is the gold standard because it holds a crease well and doesn’t fray excessively during the piecing process. If you are making a functional item like a tea cozy or a potholder, you might also want to consider using heat-resistant batting inside your Patchwork Teapot and Cups to ensure it provides adequate protection against hot surfaces.
The Pattern you choose will likely require several specialized tools to ensure the curves of the teapot spout and handle are executed perfectly. A rotary cutter with a small blade (28mm) is often easier to use for the tight turns often found in a Patchwork Teapot and Cups- Pattern compared to a standard large blade. Additionally, having a variety of acrylic rulers will help you maintain the squareness of the background blocks that frame your teapot and cups.
Transferring the Pattern onto your fabric requires precision, especially for the “fussy cutting” of specific designs. Many artists use light boxes or window light to trace the Patchwork Teapot and Cups- Pattern templates onto the wrong side of the fabric. Using a water-soluble or heat-erasable marking pen is essential here, as you want your guide lines to disappear completely once the Patchwork Teapot and Cups is fully assembled and pressed.
Interfacing can be a secret weapon when working on a Patchwork Teapot and Cups- Pattern. If your design involves raw-edge appliqué for the spout or handles, a lightweight fusible web will help hold the pieces in place before you stitch them. This prevents the fabric from shifting and ensures that the final Patchwork Teapot and Cups looks exactly like the diagram provided in your Pattern instructions, with no distorted or skewed elements.
Lastly, do not underestimate the importance of your thread choice when starting your Patchwork Teapot and Cups- Pattern. A high-quality 50wt cotton thread in a neutral color like cream or light gray works for most piecing, but you might want to switch to a decorative silk or variegated thread for the topstitching. This adds a layer of “jewelry” to your Patchwork Teapot and Cups, highlighting the unique shapes and the care you put into following the Pattern.
2. Understanding the Geometry and Layout of the Pattern
The core of a Patchwork Teapot and Cups- Pattern is its layout, which usually follows a block-based system or a central medallion style. In a block-based Pattern, each cup and the teapot itself are treated as individual units that are eventually sewn together. This is a great way to manage the project, as you can finish one cup at a time, providing a sense of accomplishment while working toward the larger Patchwork Teapot and Cups composition.
When analyzing the Pattern, you will notice that the teapot is often the “anchor” of the design, being significantly larger than the cups. The Patchwork Teapot and Cups- Pattern must account for “negative space”—the background fabric that surrounds the vessels—to make the shapes recognizable. If the background is too busy, the silhouette of your Patchwork Teapot and Cups will be lost, so solid or low-volume prints are generally recommended for the surrounding areas.
Drafting the spout and handle is the most technical part of the Patchwork Teapot and Cups- Pattern. These are often created using “paper piecing” or “template piecing” because of their irregular shapes. If your Pattern uses Foundation Paper Piecing (FPP), you will sew the fabric directly onto a paper guide, which ensures incredible accuracy even for the skinniest teapot handles, resulting in a crisp and professional Patchwork Teapot and Cups finish.
The “cups” in a Patchwork Teapot and Cups- Pattern offer a wonderful opportunity for symmetry and repetition. You can make all the cups identical for a formal “china set” look, or you can make each one different for a charming “mismatched” kitchen vibe. Most Patterns will provide a single cup template that you can replicate as many times as you like, allowing you to customize the size of your final Patchwork Teapot and Cups project.
Scale is another factor to consider when reading your Patchwork Teapot and Cups- Pattern. Some designs are intended for miniature wall hangings, while others are scaled for full-sized quilts. If you decide to resize the Pattern, remember that the seam allowances (usually 1/4 inch) must remain constant. Shrinking a Patchwork Teapot and Cups design too much can make the small pieces very difficult to handle and sew accurately.
Finally, the Pattern should include a clear diagram for the “assembly flow.” This tells you which pieces to sew together first—for example, sewing the lid to the body before adding the spout. Following the sequence in the Patchwork Teapot and Cups- Pattern prevents you from having to “un-sew” difficult sections and ensures that all raw edges are neatly tucked away within the seams of your Patchwork Teapot and Cups.
3. Stitching Techniques for a Durable Patchwork Teapot and Cups
Once your pieces are cut according to the Patchwork Teapot and Cups- Pattern, the stitching process begins. For the main body of the teapot, a standard straight stitch with a short stitch length (around 1.5 to 2.0) is ideal. This creates a strong bond that can withstand the manipulation required when you are joining the curved sections of the Patchwork Teapot and Cups, preventing the seams from popping open at the stress points.
If your Patchwork Teapot and Cups- Pattern includes curved piecing, you will need to master the art of “pinning and clipping.” When joining a concave curve to a convex one, find the center of both pieces and pin them there first, then pin the ends. This helps distribute the fabric evenly. As you sew your Patchwork Teapot and Cups, move slowly and let the feed dogs do the work, ensuring the Pattern remains true to its intended shape.
Appliqué is a common feature in the Patchwork Teapot and Cups- Pattern, especially for the steam rising from the cups or the decorative motifs on the teapot. You can use a blanket stitch, a zigzag stitch, or a “blind” hem stitch depending on the look you want to achieve. The goal is to secure the edges of the Patchwork Teapot and Cups elements so they don’t fray, while adding a decorative texture that enhances the overall Pattern.
Pressing is just as important as sewing in a Patchwork Teapot and Cups- Pattern. Always press your seams as you go, usually toward the darker fabric to prevent shadowing. For the complex intersections in a Patchwork Teapot and Cups, you might want to press the seams open to reduce bulk. This makes the final quilting process much easier, as your needle won’t have to struggle through multiple layers of fabric and seam allowances.
To give your Patchwork Teapot and Cups a three-dimensional feel, consider “fussy quilting.” This involves quilting around the shapes of the teapot and cups rather than using a generic overall pattern. By following the outlines provided by your Patchwork Teapot and Cups- Pattern, you make the vessels “pop” from the background, giving the finished piece a sculptural quality that is very pleasing to the eye.
Don’t forget the finishing touches specified in your Patchwork Teapot and Cups- Pattern. This might include adding small buttons for the “knob” on the teapot lid or using embroidery floss to add steam lines or floral details. These small embellishments bring the Patchwork Teapot and Cups to life and allow you to put your personal signature on a design that started as a simple paper Pattern.
4. Maintenance and Display of Your Patchwork Art
After completing your Patchwork Teapot and Cups- Pattern, you want to ensure it stays beautiful for years. If the item is intended for use in the kitchen, it will eventually need cleaning. Because of the many seams in a Patchwork Teapot and Cups, hand washing in cool water with a gentle detergent is the safest method. This prevents the agitation of a machine from weakening the delicate points of the Pattern and helps maintain the vibrancy of the fabric.
Proper storage is also key for textiles made from a Patchwork Teapot and Cups- Pattern. If you are storing a quilt or wall hanging, avoid folding it in the same place every time, as this can create permanent creases and weaken the fibers. Instead, roll the Patchwork Teapot and Cups project around a cardboard tube or acid-free tissue paper. This preserves the integrity of the Pattern and keeps the fabric looking fresh and crisp.
Displaying your Patchwork Teapot and Cups can be a great way to brighten up a dining area or kitchen nook. A simple wooden dowel or a decorative quilt hanger works perfectly for wall-mounted pieces. By placing your Patchwork Teapot and Cups- Pattern project in a spot with indirect sunlight, you can prevent the colors from fading while still allowing the intricate patchwork to be a conversation starter for guests.
If you have used the Patchwork Teapot and Cups- Pattern to create seasonal decor, consider making multiple sets. You could have a “spring” teapot with pastels and a “winter” version with deep reds and forest greens. The versatility of the Pattern means you can adapt the same basic shapes of the Patchwork Teapot and Cups to suit any holiday or season, making your home decor feel dynamic and handmade.
For those who enjoy social crafting, your Patchwork Teapot and Cups- Pattern project is the perfect item to bring to a quilting guild or a “show and tell.” Other crafters will appreciate the technical skill required to execute the curves and fine details of the Patchwork Teapot and Cups. Sharing your experience with the Pattern can help others overcome their fear of curved piecing or appliqué, building a supportive network of makers.
Ultimately, the joy of a Patchwork Teapot and Cups- Pattern is in the process as much as the result. Each time you see your finished Patchwork Teapot and Cups hanging on the wall or sitting on your table, you will be reminded of the quiet hours spent selecting fabrics and carefully stitching the Pattern together. It is a testament to your patience and a beautiful celebration of the simple pleasure found in a warm cup of tea and a handmade home.
Frequently Asked Questions (FAQ)
Can I make this pattern if I am a beginner?
Yes, but it is recommended to start with a Patchwork Teapot and Cups- Pattern that uses “raw-edge appliqué” rather than complex curved piecing. This allows you to get the look of the teapot and cups without the technical difficulty of sewing curves, making the project much more accessible for those new to the craft.
What size is a typical Patchwork Teapot and Cups block?
Most Patterns are designed around a 12-inch or 14-inch square block for the teapot, with the cups being smaller 6-inch blocks. However, because it is a Patchwork Teapot and Cups- Pattern, you can often scale the pieces up or down depending on whether you want a mug rug or a full-sized quilt.
How do I handle the curved spout and handle?
The easiest way to manage these in a Patchwork Teapot and Cups- Pattern is to use a stabilizer or “template plastic.” This gives you a firm edge to turn the fabric over if you are doing turned-edge appliqué, ensuring that the curves of your Patchwork Teapot and Cups stay smooth and rounded.
What fabric is best for the “steam” in the pattern?
Many quilters like to use a sheer organza or a very light gray tulle to represent steam in their Patchwork Teapot and Cups- Pattern. You can also use decorative embroidery stitches like the “chain stitch” or “stem stitch” to create a more stylized, artistic version of steam rising from the Patchwork Teapot and Cups.
Does the pattern include seam allowances?
Most professional Patchwork Teapot and Cups- Patterns do include a standard 1/4 inch seam allowance. However, always read the introduction of your Pattern carefully, as some “art quilt” patterns might require you to add your own seam allowance to the templates provided.
Can I use scraps for the Patchwork Teapot and Cups?
Absolutely! In fact, the Patchwork Teapot and Cups- Pattern is one of the best “scrap buster” projects available. Because the individual sections of the Patchwork Teapot and Cups are small, you can use even the tiniest bits of your favorite fabrics to create a “scrappy” and colorful masterpiece.
Conclusion
In conclusion, the Patchwork Teapot and Cups- Pattern is a delightful project that offers a perfect blend of technical challenge and creative expression. We have explored how to select the right materials, the importance of understanding the Pattern geometry, and the specific stitching techniques needed to ensure your Patchwork Teapot and Cups are both beautiful and durable.
From the intricate curves of the spout to the charming repetition of the cups, this project allows you to create a personalized piece of home decor that celebrates the art of quilting and the comfort of the kitchen. Whether you are making a single block or a whole quilt, following a well-structured Patchwork Teapot and Cups- Pattern will lead to a rewarding and successful crafting experience.