Patchwork Vintage and Charming Scissors Holder- Pattern is a delightful and practical project for anyone who loves sewing, quilting, or handmade crafts. This guide will walk you through everything you need to create your own beautifully designed scissors holder while keeping the term Patchwork Vintage and Charming Scissors Holder- Pattern present throughout the article to support SEO best practices. This pattern captures both nostalgia and functionality, making it a favorite among enthusiasts who enjoy creating personalized accessories for their sewing space.
Crafting a Patchwork Vintage and Charming Scissors Holder- Pattern allows you to blend old-fashioned charm with modern sewing techniques. Whether you are aiming for a rustic, classic, or whimsical look, this project gives you full creative freedom to mix fabrics, textures, and color palettes. The patchwork effect adds character, while the structure of the scissors holder ensures your tools stay safe, organized, and easy to access.
Before diving into the step-by-step process, it’s important to acknowledge the appeal of this lovely design. A Patchwork Vintage and Charming Scissors Holder- Pattern serves as both décor and storage, making it ideal for anyone looking to personalize their sewing environment. Handmade accessories bring a warm and inviting atmosphere to your workspace, and this pattern stands out as a simple yet meaningful project. Now let’s explore how to bring this vintage-inspired creation to life.
1. Understanding the Patchwork Vintage and Charming Scissors Holder- Pattern
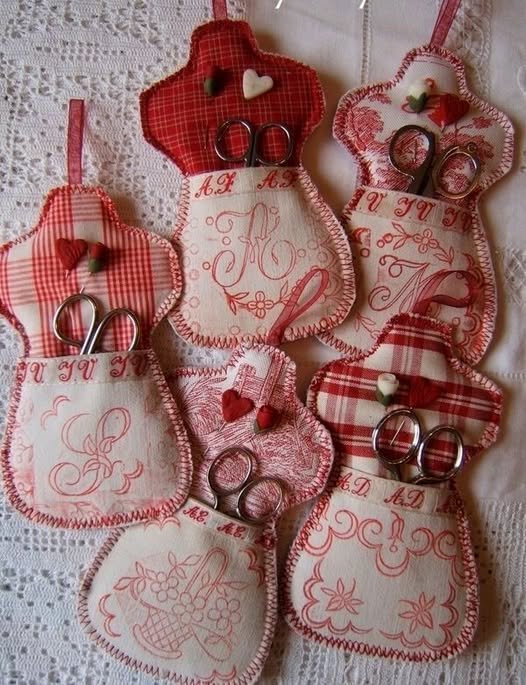
The Patchwork Vintage and Charming Scissors Holder- Pattern starts with a simple structure that resembles a pocket or sheath, designed to hold scissors securely. What sets this pattern apart is its patchwork exterior, which allows you to combine fabric scraps or chosen prints into a beautiful, cohesive design. The patchwork style brings a nostalgic feel reminiscent of classic quilting traditions.
The construction begins with selecting fabrics that complement one another. You can choose vintage floral prints, muted tones, or bold, contrasting fabrics depending on the aesthetic you want. The fabrics you select become a significant part of the charm, adding personality and character to the final piece.
Understanding the shape of the holder is also essential. The typical structure includes a pointed end for the blade and a wider section for the handles. This shape accommodates scissors of various sizes while keeping them protected and easy to retrieve.
Another key element of the Patchwork Vintage and Charming Scissors Holder- Pattern is quilting or stitching the fabric layers together. This helps reinforce the holder, giving it structure and durability. A lightweight batting or felt layer adds stability and ensures the scissors remain cushioned inside.
The pattern also incorporates topstitching, which enhances both aesthetics and functionality. Topstitching keeps layers flat and gives the holder a polished, finished look. Choosing thread that contrasts or blends with your patchwork adds another layer of personalization.
Finally, the closure method—whether a simple fold-over design, a button, or a small flap—contributes to the charm and usability of the piece. These small design decisions allow you to fully customize your Patchwork Vintage and Charming Scissors Holder- Pattern.
2. Materials and Tools Needed for the Patchwork Vintage and Charming Scissors Holder- Pattern
To create a sturdy and beautiful Patchwork Vintage and Charming Scissors Holder- Pattern, gather the right materials before you begin. Start with fabric scraps or small fabric cuts, ideally cotton or linen. These fabrics are easy to work with and press well, making them ideal for patchwork projects.
You will also need batting or felt to provide structure and cushioning for the scissors. This inner layer ensures that the blades do not poke through the holder and protects both the scissors and the fabric from wear. Choose a lightweight or medium-weight batting depending on how firm you want the holder to be.
A reliable sewing machine is recommended for stitching the patchwork pieces and assembling the full structure. While hand sewing is possible, machine stitching provides durability and speed, especially when piecing together multiple fabric squares or rectangles.
Essential tools for this pattern include scissors, rotary cutter, quilting ruler, pins or clips, and an iron. Accurate cutting and pressing are vital to making your patchwork look clean and well-aligned. These tools help maintain consistency and improve the final appearance of your project.
Thread selection also plays an important role. You may choose a neutral-toned thread that blends seamlessly with your fabrics or opt for a contrasting color that highlights your stitching. Strong cotton or polyester thread works best when assembling the Patchwork Vintage and Charming Scissors Holder- Pattern.
Finally, consider optional items like decorative buttons, lace trims, or embroidery floss. These embellishments add charm and enhance the vintage aesthetic, helping you create a truly personalized scissors holder.
3. Step-by-Step Guide to Creating the Patchwork Vintage and Charming Scissors Holder- Pattern
To begin crafting your Patchwork Vintage and Charming Scissors Holder- Pattern, start by cutting small fabric pieces for the patchwork exterior. These pieces can be squares, rectangles, or even irregular shapes depending on your design preference. Arrange them visually before sewing to ensure a harmonious composition.
Next, sew the fabric pieces together using a quarter-inch seam allowance. Press each seam open or to one side to keep the fabric smooth. This step is essential for achieving the neat, polished patchwork look that defines this pattern.
Once your patchwork panel is complete, cut a matching lining fabric and batting piece. Layer the patchwork panel right side up, batting in the middle, and lining fabric right side down. Pin or clip the layers together to prevent movement.
Sew around the edges, leaving a small opening for turning the piece right side out. After stitching, trim excess fabric and clip corners for smooth edges. Then turn the piece right side out, gently pushing out the fabric points to create crisp corners.
Press the entire piece flat and close the opening with a small hidden stitch. Topstitch around the edges to secure the layers and give your holder a finished, professional appearance.
Finally, fold the piece into the scissors holder shape according to the Patchwork Vintage and Charming Scissors Holder- Pattern instructions. Sew along the side edges to create the pocket. Add decorative touches like buttons, trims, or embroidery to complete your charming creation.
4. Customization Ideas for the Patchwork Vintage and Charming Scissors Holder- Pattern
One of the most beautiful aspects of the Patchwork Vintage and Charming Scissors Holder- Pattern is how customizable it is. You can tailor it to suit your personality, sewing room theme, or gifting needs. Start by experimenting with different fabric combinations. Using floral prints, vintage calicos, or retro-inspired patterns enhances the nostalgic charm.
You can also personalize the shape or size of your scissors holder. Some crafters create longer holders for fabric shears, while others design small, compact versions for embroidery scissors. Adjusting the dimensions allows you to create a holder that fits your favorite tools perfectly.
Decorative stitching is another way to add character. Consider using zigzag stitches, decorative machine stitches, or hand embroidery to accent the patchwork seams. These details create visual interest and enhance the handmade feel.
If you enjoy adding embellishments, consider adding lace, ribbons, or appliqués. These decorative touches elevate the vintage look and make the Patchwork Vintage and Charming Scissors Holder- Pattern uniquely yours. Handmade touches like these also make the holder a wonderful gift for fellow crafters.
You can also experiment with closures. A small button and loop, a snap, or even a tie closure adds charm while keeping the scissors secure. These functional details enhance usability and aesthetics.
For a more advanced customization, consider quilting the patchwork panel with intricate free-motion designs. Quilting adds texture, stability, and a luxurious touch, making your scissors holder feel extra special.
FAQ – Frequently Asked Questions About the Patchwork Vintage and Charming Scissors Holder- Pattern
1. Is the Patchwork Vintage and Charming Scissors Holder- Pattern beginner-friendly?
Yes, it is suitable for beginners. The project involves basic sewing and simple patchwork techniques.
2. What type of fabric is best for this pattern?
Cotton and linen work best because they are easy to sew and press, making them ideal for patchwork.
3. Can I use leftover fabric scraps for the patchwork?
Absolutely. Scrap fabric adds charm and uniqueness to the design, making it more personal.
4. Is batting necessary for this scissors holder?
Yes, batting or felt provides structure and helps protect the scissors and the fabric.
5. Can I resize the pattern for different types of scissors?
Yes, the pattern can easily be adjusted to accommodate any scissor size.
6. How can I make my scissors holder more decorative?
You can add embroidery, trims, lace, appliqués, or decorative stitching to enhance the vintage look.
Conclusion
The Patchwork Vintage and Charming Scissors Holder- Pattern is a delightful, practical, and customizable project that brings nostalgia and creativity together.
Throughout this article, you learned about the basic structure of the pattern, the materials needed, detailed instructions for assembly, and a variety of creative customization ideas. Whether you’re crafting it for yourself or as a heartfelt gift, this project offers endless possibilities.