If you love handmade crafts and are always on the lookout for functional yet charming sewing projects, then the Perfect mug bag – Pattern is something you’ll absolutely adore. This pattern allows you to create a stylish and protective bag specifically designed to carry a mug, whether it’s your favorite ceramic coffee cup or a travel mug for tea on the go. It’s practical, giftable, and a joy to make for crafters of all skill levels.
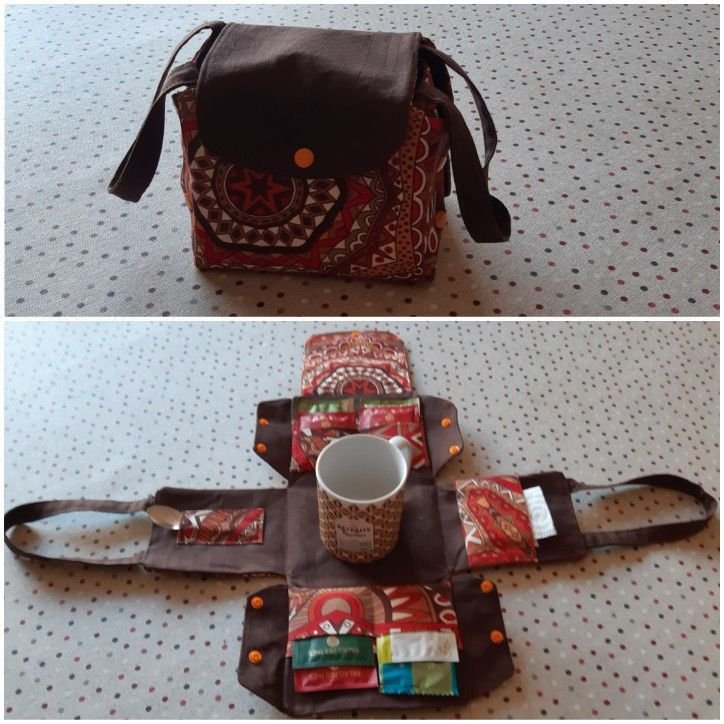
The beauty of the Perfect mug bag – Pattern lies in its balance between simplicity and creativity. It’s compact yet roomy enough to hold not only your mug but also extras like tea bags, sugar packets, or even a small snack. Whether you’re heading to work, attending a sewing group, or visiting a friend, this handy bag makes it easy and safe to take your mug with you.
In this article, we’ll take you through everything you need to know about sewing your own Perfect mug bag – Pattern. We’ll discuss the materials you’ll need, how to assemble it, tips for customization, and more. By the end, you’ll be confident in crafting your own, with some great inspiration to make it truly your own.
1. Why the Perfect Mug Bag – Pattern Is a Must-Try Project
The Perfect mug bag – Pattern isn’t just a fun and functional item to sew—it’s a great project to use up your fabric scraps while creating something beautiful and useful. If you’re someone who enjoys combining practicality with handmade charm, this pattern is ideal.
One of the biggest benefits of this pattern is its versatility. While it’s made to hold a mug, many people find it useful for other small items like cosmetics, sewing supplies, or even as a mini lunch tote. Its small size makes it a quick sew, but its utility ensures it gets used regularly.
Sewing the Perfect mug bag – Pattern also offers the opportunity to practice basic bag-making techniques like adding interfacing, creating boxed corners, inserting a lining, and adding handles. This makes it a great learning project for beginners, and a relaxing one for experienced sewists.
Because it doesn’t require a large amount of fabric, it’s the perfect project to dig into your fabric stash. You can use coordinated prints, bold solids, or mix-and-match styles to make a unique bag every time.
Another great feature is how customizable the bag is. You can add pockets, elastic bands to hold the mug in place, or even a drawstring top to keep everything secure. Personal touches like embroidery, applique, or monograms also make it perfect for gifting.
The Perfect mug bag – Pattern has become increasingly popular in quilting and crafting communities. Its mix of form and function makes it a great item for craft fairs, swaps, or personal use. Once you make one, you’ll likely want to make more for friends and family.
2. Materials and Tools You’ll Need
Before diving into the sewing process, it’s important to gather the right materials for your Perfect mug bag – Pattern. You won’t need much, but choosing quality materials will make your final product sturdier and longer-lasting.
Start with cotton fabric—this is the best choice for both the outer and lining layers of the mug bag. Quilting cotton is especially popular due to its durability and wide range of patterns. You’ll need about a fat quarter for each layer, depending on the size of your mug and how deep you want the bag.
To give the bag structure, you’ll want to use fusible interfacing or fusible fleece. Interfacing adds stiffness while fleece offers both structure and a bit of padding to protect the mug. Choose according to the look and feel you prefer.
Handles are usually made from fabric strips reinforced with interfacing, but you can also use cotton webbing or even recycled purse handles for a more durable touch. Keep the handles short if you want it handheld, or longer if you prefer a shoulder-style mug bag.
Don’t forget coordinating thread, scissors or rotary cutter, pins or clips, a sewing machine, and an iron. These basic tools are essential for a clean, professional finish. A turning tool or chopstick can also be helpful for poking out corners when sewing.
Optional materials can add function or flair. Think elastic for interior straps, bias tape for a finished edge, or Velcro/magnetic snaps for secure closures. You can even add a small button or charm for decoration.
Once you have everything laid out, it’s a good idea to cut your pattern pieces and label them. Prepping everything before sewing speeds up the process and ensures accuracy in assembly.
3. Step-by-Step Assembly Instructions
With your materials in hand, you’re ready to start sewing the Perfect mug bag – Pattern. While there are many variations of the pattern, the basic steps remain similar, giving you a strong foundation for customization later.
Begin by cutting out your fabric and interfacing according to your chosen pattern. Most versions will require two outer pieces, two lining pieces, interfacing or fleece for each layer, and two handles. If you’re adding pockets or internal straps, cut those pieces as well.
Fuse the interfacing or fleece to the wrong side of your outer fabric. Follow the manufacturer’s instructions, using a hot iron and pressing cloth if necessary. This step gives your mug bag the structure it needs to stand up on its own and protect what’s inside.
With right sides together, sew the outer pieces along the sides and bottom, leaving the top open. Repeat this step for the lining, but leave a small gap at the bottom to turn the bag later. Clip corners and press the seams open for a neat finish.
To box the corners and give your bag depth, fold the corners of the outer and lining pieces so the side and bottom seams align. Measure and mark the depth, usually 1.5″ to 2″ from the corner, then sew straight across. Trim the excess fabric.
Prepare your handles by folding each fabric strip in half lengthwise, pressing, then folding the raw edges toward the center and pressing again. Topstitch along both edges. Pin the handles to the outer fabric, aligning with the side seams and basting in place.
Insert the outer bag into the lining, right sides facing. Make sure the handles are tucked inside and that all seams align. Sew around the top edge of the bag, joining the lining and outer fabric. Turn the bag through the gap in the lining, then close the gap with a straight stitch.
Press the top edge of the bag well and topstitch for a clean, professional look. Your Perfect mug bag – Pattern is now complete and ready to use or gift!
4. Creative Customizations and Ideas
One of the best parts of working with the Perfect mug bag – Pattern is how adaptable it is to your style and needs. Once you’ve sewn the basic version, you can explore many fun and functional customizations.
Add an interior elastic strap to secure the mug in place. This is especially useful if your bag will be carried in a larger tote or backpack. A simple piece of wide elastic stitched into the lining can hold the mug snugly and prevent movement.
Pockets are another popular addition. You can add an exterior pocket for a napkin or teabag sachets, or an interior pocket for sugar packets or a small spoon. Patch pockets are easy to sew and add extra utility.
If you want a more polished closure, consider adding a drawstring top, Velcro tab, or magnetic snap. These options help keep the contents of your mug bag secure and give a professional touch to the final product.
Use contrasting fabric or bias tape to make your bag stand out. A brightly colored lining, playful prints, or decorative stitching can elevate a simple bag into a personal fashion statement. Monograms or embroidered initials also make great custom touches for gifts.
For seasonal versions, choose themed fabrics like pumpkins for fall, snowflakes for winter, or florals for spring. A Perfect mug bag – Pattern can be tailored to holidays, birthdays, or even office events—making it a versatile gift idea.
You can also scale the pattern up or down depending on the mug size. Large tumblers, travel mugs, or even insulated bottles can fit with a few adjustments to the pattern dimensions. Keep the same steps, just update the measurements.
FAQ – Frequently Asked Questions
Q1: Is the Perfect mug bag – Pattern beginner-friendly?
Yes! It’s an excellent project for beginners because it involves simple sewing techniques and can be completed in under a few hours.
Q2: What size mug fits in the Perfect mug bag?
Most patterns are designed for standard 11 to 15 oz mugs, but you can easily adjust the size to fit larger or smaller mugs by increasing the width and height of the fabric pieces.
Q3: Can I machine wash the finished bag?
Yes, if you use 100% cotton fabric and washable interfacing or fleece, your mug bag can be machine washed on a gentle cycle. Always air dry to maintain shape.
Q4: How can I make the bag more protective?
Using fusible fleece or adding quilted padding to the outer layer adds more cushion to protect delicate mugs during travel.
Q5: What’s the best fabric for this project?
Quilting cotton is ideal due to its stability and ease of use. You can also use canvas or linen for added durability and structure.
Q6: Can I sell mug bags made from this pattern?
Yes, many pattern designers allow handmade sales from their patterns, but
be sure to check the licensing terms if you’re using a purchased design.
Conclusion
The Perfect mug bag – Pattern is more than just a craft project—it’s a functional, customizable, and thoughtful creation that reflects your personality and style. Whether you make one for yourself, a friend, or a whole batch for a market, you’ll find this pattern fun to sew and endlessly adaptable.
We hope this guide gave you the confidence and inspiration to create your own Perfect mug bag – Pattern. Have you tried this pattern before, or do you have ideas for unique customizations? Leave a sincere comment below with your thoughts and suggestions—we’d love to hear from you!