The Pineapple Quilt Block – Pattern is one of the most visually stunning and rewarding designs in the world of quilting, offering a unique radiating effect that captures the eye immediately. While it may look incredibly complex to a beginner, this classic design is actually a clever variation of the traditional Log Cabin block, built around a central square with layers of “spikes” that create its signature tropical look. Mastering this technique allows quilters to play with high-contrast fabrics and secondary patterns that emerge when multiple blocks are joined together.
In this comprehensive guide, we will explore every detail of the Pineapple Quilt Block – Pattern, ensuring you have the knowledge to create a professional-grade textile piece. Whether you are looking to use up your scrap fabric stash or planning a meticulously coordinated masterpiece, this layout provides the perfect canvas for color theory experimentation. By focusing on precise cutting and consistent seam allowances, you can transform simple cotton strips into a complex geometric wonder that looks like it belongs in a gallery.
Working with a Pineapple Quilt Block – Pattern requires a bit of patience and attention to detail, but the results are well worth the effort. In the following sections, we will break down the essential tools, the step-by-step construction process, and the best ways to optimize your workflow for Google-friendly, high-quality results. Let’s dive into the intricate world of pineapple quilting and discover how this timeless design continues to inspire modern makers across the globe.
1. Essential Tools and Fabric Selection for Your Pineapple Quilt Block – Pattern
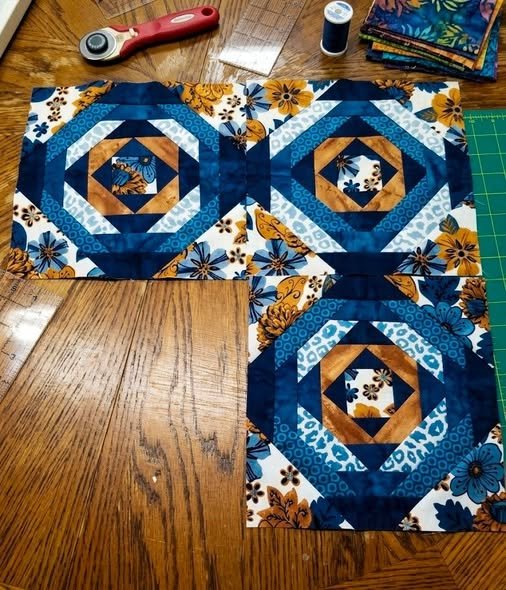
To begin your journey with the Pineapple Quilt Block – Pattern, you must first gather the right materials to ensure accuracy. Because this design involves many small pieces and diagonal seams, having a sharp rotary cutter and a dedicated pineapple quilting ruler is highly recommended. These specialized rulers have markings that help you trim each layer perfectly, preventing the block from becoming distorted as it grows in size.
Fabric choice is the soul of any Pineapple Quilt Block – Pattern. Traditionally, quilters use a central “hearth” square in a bold color like red or yellow, then alternate between light and dark “rounds.” This contrast is what creates the illusion of the pineapple’s skin. Look for high-quality quilting cotton that holds its shape well, as you will be dealing with bias edges that can stretch if the fabric is too thin.
Precision is key when cutting your initial strips for the Pineapple Quilt Block – Pattern. Most patterns suggest using 1.5-inch or 2-inch wide strips, depending on the desired final size of the block. Consistency in your strip cutting will save you hours of frustration during the assembly phase. Using a self-healing cutting mat and a non-slip ruler will ensure every piece is uniform and ready for the sewing machine.
Don’t forget the importance of your sewing machine setup when working on a Pineapple Quilt Block – Pattern. A 1/4-inch presser foot is an invaluable ally, helping you maintain a consistent seam allowance throughout the project. Since this block involves many overlapping seams, using a slightly shorter stitch length can provide extra durability and prevent the seams from popping during the trimming process.
Thread selection also plays a role in the success of your Pineapple Quilt Block – Pattern. Opt for a fine, strong 50-weight cotton thread in a neutral color like grey or tan. Because there are so many layers of fabric meeting in small spaces, a thinner thread helps reduce bulk at the intersections, allowing the block to lay flat once it is finished and pressed.
Lastly, prepare a dedicated pressing station with a reliable steam iron. The Pineapple Quilt Block – Pattern relies on crisp, flat seams to maintain its geometric integrity. You will be pressing after every single round of additions, so having your iron nearby is essential. Many experts recommend using fabric starch to give the strips extra body, making them easier to handle as the block becomes more complex.
2. Step-by-Step Construction of the Pineapple Quilt Block – Pattern
The assembly of a Pineapple Quilt Block – Pattern starts from the center and moves outward in a series of rounds. You begin with a center square, usually 2 or 2.5 inches, and sew four strips to its sides, just like a standard Log Cabin. However, the “pineapple” magic happens when you add the second set of strips at a 45-degree angle, cutting across the corners of the previous round to create those iconic sharp points.
As you build the Pineapple Quilt Block – Pattern, you will notice that it alternates between “square” rounds and “pointy” rounds. It is vital to trim after every round to keep the block square and centered. This is where the specialized ruler becomes your best friend, as it allows you to align the center markings with your middle square, ensuring that the growth of the pattern remains perfectly symmetrical.
The beauty of the Pineapple Quilt Block – Pattern is that it is incredibly forgiving of “ugly” scraps. Even fabrics that look busy or strange on their own can look magnificent when cut into thin strips and placed within this structured layout. Use the color-blocking technique to guide the viewer’s eye; for example, using all white strips for the “corner” sections will create a stunning secondary diamond pattern when the blocks are sewn together.
One common challenge with the Pineapple Quilt Block – Pattern is managing the bias edges. Because you are sewing on the diagonal, the fabric is prone to stretching. To combat this, always place the strip on the bottom and the block on top when feeding them through the sewing machine feed dogs. This helps pull the fabric through evenly without pulling the delicate diagonal seams out of alignment.
For those who struggle with accuracy, foundation paper piecing (FPP) is a fantastic way to execute a Pineapple Quilt Block – Pattern. By sewing directly onto a paper template, you can achieve razor-sharp points and perfect proportions every time. This method is especially popular for smaller, more intricate versions of the design where even a millimeter of error could throw off the entire block’s geometry.
Once you have reached your desired size, the final round of the Pineapple Quilt Block – Pattern usually consists of four triangles at the corners to square the block off. This allows it to be easily joined to other blocks or borders. Take a moment to do a final “master press,” using plenty of steam to ensure the finished quilt block is perfectly flat and ready for the next stage of your quilting project.
3. Creative Color Variations for Your Pineapple Quilt Block – Pattern
Color theory plays a massive role in how the Pineapple Quilt Block – Pattern is perceived. If you want a traditional look, stick to a warm color palette featuring yellows, oranges, and deep greens. However, if you want something modern, try a monochromatic approach using different shades of blue and teal. The repetitive nature of the design makes it look sophisticated regardless of the colors used.
Another popular way to style the Pineapple Quilt Block – Pattern is the “Scrappy” look. By using a different fabric for every single strip, you create a vibrant, high-energy quilt that tells a story of all your past projects. The key to a successful scrappy pineapple quilt is maintaining a consistent value (lightness or darkness) for each round, so the geometric “spikes” remain visible amidst the variety of prints.
You can also experiment with the center square focal point. While many quilters use a solid color, using a small fussy-cut fabric—like a tiny flower or a character—adds a whimsical touch to the Pineapple Quilt Block – Pattern. This draws the eye into the center of the design before it follows the radiating lines outward, creating a dynamic visual experience for anyone viewing the finished quilt.
For a sophisticated, high-contrast effect, consider the “Shadow” version of the Pineapple Quilt Block – Pattern. By using only two colors—typically black and white—you can create an optical illusion that seems to vibrate. This minimalist quilting style is very popular in modern home decor and highlights the mathematical precision of the pineapple layout without the distraction of multiple colors.
Don’t forget the impact of the background fabric in your Pineapple Quilt Block – Pattern. Often, the strips that create the “negative space” are just as important as the “pineapple” itself. Using a subtle grey or cream print instead of a flat solid can add depth and texture to the block, making the colorful spikes pop even more vividly against the muted background.
Finally, consider using gradient or ombre fabrics for your Pineapple Quilt Block – Pattern. These fabrics transition from light to dark within a single yard, and when cut into strips, they create a natural “glow” effect as the colors shift through the rounds. This technique requires a bit more planning during the cutting phase but results in a stunning, professional-looking quilt that appears much harder to make than it actually is.
4. Tips for Perfecting and Finishing Your Pineapple Quilt Block – Pattern
Consistency is the hallmark of a great Pineapple Quilt Block – Pattern. One of the best tips for success is to create a “test block” before cutting into your precious designer fabrics. This allows you to check your seam allowance and ensure your trimming technique is producing the correct size. A small investment of time in a test block can prevent large-scale errors later on.
When it comes to ironing your Pineapple Quilt Block – Pattern, always press your seams away from the center. This reduces bulk and helps the “points” of the pineapple stand out clearly. If you find that the center is becoming too thick with seams, you can “spin” the seams at the intersections. This involves opening a few stitches in the seam allowance to let the fabric fan out, creating a much flatter quilt top.
Storage is an often-overlooked aspect of working on a Pineapple Quilt Block – Pattern. Because these blocks have many small pieces, they can be delicate until they are sewn into a full quilt top. Keep your finished blocks flat in a large box or hanging on a design wall. Avoid folding them, as the bias seams can develop permanent creases or become distorted if left folded for long periods.
As you join multiple blocks together, pay close attention to the points where the Pineapple Quilt Block – Pattern units meet. Use fine pins to align the intersections perfectly. If your trimming was accurate, these points should match up like a puzzle. A well-aligned quilt top is the difference between a “homemade” look and a “handmade” masterpiece that will be cherished for generations.
Consider the quilting motifs you will use once the top is finished. Because the Pineapple Quilt Block – Pattern is so busy and geometric, sometimes “straight-line quilting” or “stitching in the ditch” is the best way to let the pattern shine. Alternatively, a simple all-over swirl or floral design can provide a nice contrast to the sharp angles of the block, adding a soft, tactile element to the piece.
Finally, remember that quilting should be a joy. The Pineapple Quilt Block – Pattern is a journey in precision and color, but it’s also a creative outlet. Don’t be afraid to break the rules or try new fabric combinations. Every quilt you make is a reflection of your unique style, and the pineapple design is one of the most versatile templates available to express that creative quilting spirit.
FAQ – Frequently Asked Questions
1. Is the Pineapple Quilt Block – Pattern suitable for beginners?
While it is more advanced than a basic square quilt, a determined beginner can certainly master it. Using a specialized ruler or foundation paper piecing makes the process much more manageable by handling the complex math and trimming for you.
2. How much fabric do I need for a standard Pineapple Quilt Block – Pattern?
This depends on the size of the block and the number of rounds. Generally, the pineapple design is a “fabric eater” because of the many seams and trimmings. It is best to have at least 1/4 yard of each color or a large pile of 1.5-inch strips ready.
3. Do I really need a special ruler for this pattern?
You can make a Pineapple Quilt Block – Pattern with a standard ruler, but it requires much more careful calculation and manual marking. A dedicated pineapple ruler has built-in guides that make the process significantly faster and more accurate.
4. Can I make this block without a sewing machine?
Yes, it is possible to hand-sew a Pineapple Quilt Block – Pattern, often using the English Paper Piecing (EPP) method. However, because of the high number of seams, most modern quilters prefer using a machine for speed and durability.
5. Why is my Pineapple Quilt Block – Pattern turning out wavy?
Waviness is usually caused by stretching the bias edges during sewing or pressing. To avoid this, try using fabric starch before cutting and avoid “pushing” the iron across the fabric—instead, lift and press straight down.
Conclusion
In this article, we have explored the intricate beauty and technical requirements of the Pineapple Quilt Block – Pattern. We covered everything from the essential tools like specialized rulers and rotary cutters to the step-by-step assembly and the importance of trimming after every round.
We also discussed how color theory and fabric selection can completely transform the look of your project, whether you prefer a traditional, scrappy, or modern aesthetic. By following these SEO-optimized tips and focusing on precision, you can create a stunning quilt that showcases your skills as a maker.