Starting your journey in quilting can be both exciting and intimidating, especially when you’re new to sewing. That’s why this Puff Quilt Tutorial for Beginners – Pattern is the perfect guide to help you create something beautiful, practical, and beginner-friendly.
Puff quilts, also known as biscuit quilts, are soft, puffy, and perfect for adding a cozy touch to any room. With simple techniques and a clear pattern to follow, you’ll be quilting in no time.
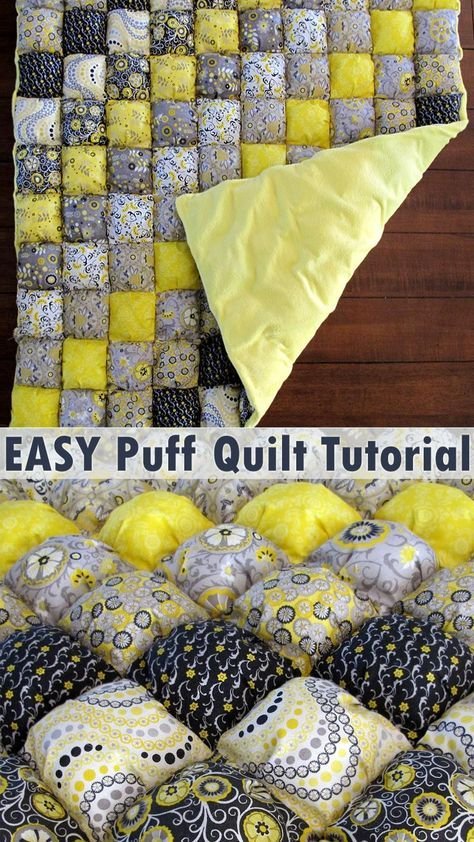
If you’ve never heard of a puff quilt before, it’s a style of quilt that involves sewing together small squares of fabric filled with stuffing. Each square resembles a little pillow, giving the quilt a unique and luxurious texture. The result is a warm, thick quilt that feels like a cloud. What’s even better? You don’t need advanced skills to make one.
Throughout this puff quilt tutorial for beginners – pattern, we’ll go step by step to show you how to create your own. We’ll cover materials, cutting, assembling, and final touches. This project is great for using up fabric scraps or trying out new color combinations. By the end of this guide, you’ll have a beautiful puff quilt and a new crafting skill to be proud of.
1. What is a Puff Quilt and Why Choose This Pattern?
A puff quilt is a unique, plush-style quilt where each square or “puff” is filled with fiberfill or similar stuffing material. It’s ideal for baby quilts, lap blankets, or decorative throws.
Unlike traditional quilts, the puff quilt doesn’t require intricate quilting or batting between layers. Each square is sewn and stuffed individually, making it a more forgiving project for new quilters. This simplicity makes it a popular choice in many puff quilt tutorial for beginners – pattern guides.
Another benefit is its versatility. You can easily customize the size, colors, and textures to match your room or personal taste. Whether you prefer bold patterns or soft pastels, puff quilts adapt beautifully.
Puff quilts are also incredibly warm and thick. Thanks to the individual puff construction, they trap heat effectively, making them ideal for colder seasons or cozy indoor settings.
The pattern we’ll follow in this guide is beginner-friendly, with minimal tools required. You don’t need a quilting machine or advanced sewing techniques—just a basic sewing machine and patience.
If you’re looking to make a heartfelt handmade gift, this puff quilt tutorial gives you a personalized option that friends and family will cherish for years.
2. Materials Needed for Your First Puff Quilt
Before you start cutting and sewing, you need to gather all your materials. The good news is, most of them are affordable and available at any craft store.
First, you’ll need fabric. For a standard baby-size puff quilt (about 36×48 inches), you’ll want around 2.5 yards of your chosen fabrics. Use cotton, as it’s soft and easy to work with, especially for beginners.
You’ll also need polyester fiberfill or any hypoallergenic stuffing. This gives each puff its signature plump shape. One 16 oz bag should cover a small quilt, but it’s always good to have extra.
Thread is another essential. Make sure to use high-quality cotton or polyester thread that matches or contrasts nicely with your fabric for aesthetic appeal.
A rotary cutter, quilting ruler, and cutting mat will help you cut accurate squares. Precision matters in puff quilting, especially when sewing together multiple puffs.
You’ll also need a sewing machine (though hand-stitching is possible if you’re very patient) and some straight pins or clips to hold your fabric in place during assembly.
Finally, for the quilt backing, choose a soft fabric like flannel or fleece. It should be large enough to cover the back of your finished puff quilt and provide added comfort.
3. Step-by-Step Assembly Instructions
Now that you have your materials, it’s time to dive into the fun part—building your quilt. We’ll go through each step of this puff quilt tutorial for beginners – pattern with clear, actionable instructions.
Start by cutting your fabric squares. You’ll need two squares for each puff: one larger (say, 5.5 inches) and one smaller (4.5 inches). The larger one will form the top, and the smaller one acts as the bottom.
Place the larger square face-up and center the smaller square on top, face-down. Pin all four corners, and as you sew around the edges, leave a small opening for stuffing.
As you sew, you’ll need to create pleats or gathers on the larger square to make it fit the bottom one. This creates the puff shape once stuffed. It might take practice, but it gets easier with time.
After sewing three sides, gently fill the puff with stuffing. Don’t overfill—it should be soft and pliable. Then, sew the fourth side closed.
Repeat this process until you have the number of puffs needed. For a 6×8 puff quilt, that’s 48 total squares.
Once all the puffs are made, sew them together in rows, and then attach each row. Finally, attach your quilt backing using a sewing machine or hand-stitching.
4. Tips for Customizing Your Puff Quilt Pattern
Customizing your quilt is one of the most enjoyable parts of the process. It allows you to add your personality and style to every piece you create.
Try mixing and matching fabric colors and textures. Use one solid color for a minimalist look or multiple patterns for a playful design. Just be sure the fabrics are of similar weight.
Consider adding applique or embroidery to individual puffs for extra detail. This makes your quilt truly unique and adds a personal touch, especially for gifts.
Play with quilt size. You can easily scale this puff quilt tutorial for beginners – pattern to make larger throws or smaller baby quilts based on your needs.
Incorporate themed fabrics—like florals, geometric prints, or holiday designs—to make seasonal quilts or themed gifts for birthdays and special occasions.
Add labels or tags to the back with your name or a heartfelt message. It’s a great way to mark your progress as a crafter and makes your work memorable.
Lastly, use coordinating binding around the edges of the quilt to give it a polished finish. It’s a small touch that makes a big difference in the final appearance.
FAQ – Frequently Asked Questions
Q: How long does it take to make a puff quilt?
A: It depends on the size and your experience. A baby-size quilt may take around 6–8 hours total, split over a few days. Larger quilts can take longer but are very doable with consistent effort.
Q: Can I wash a puff quilt in the washing machine?
A: Yes, but use a gentle cycle and cold water. Air drying is recommended to preserve the puffs’ shape and prevent excess wear on the fabric.
Q: What size squares should I use?
A: A common combo is 5.5” top square and 4.5” bottom square. The 1-inch difference allows room for the puff. You can adjust these sizes depending on your desired puffiness and quilt size.
Q: Can I make a puff quilt without a sewing machine?
A: Technically yes, but it will be time-consuming. Hand-stitching is possible, especially for small quilts, but a machine will greatly speed up the process.
Q: Is it okay to mix different types of fabric?
A: It’s best to use similar-weight fabrics like quilting cotton. Mixing stretchy or heavyweight fabrics can cause uneven puffing and may complicate assembly.
Q: Do I need to quilt the layers after sewing the puffs?
A: No. Puff quilts are self-contained. Each puff acts as its own mini-quilted unit, so traditional quilting techniques aren’t necessary after assembly.
Conclusion
Creating your own puff quilt might seem like a big project, but with this Puff Quilt Tutorial for Beginners – Pattern, you now have all the steps, tools, and tips you need to start confidently. From selecting materials to mastering the assembly, every stage of this process brings creativity and satisfaction.
Whether you’re making a quilt for yourself, a loved one, or as a new hobby, this guide has shown that puff quilts are an accessible and rewarding choice. The personalized design options, cozy result, and fun creation process make this a craft worth learning.
If you enjoyed this tutorial, please leave a sincere review or suggestion in the comments. Your feedback helps improve future guides and helps others in their quilting journey as well!