If you’re searching for a charming and festive fall project, creating a pumpkin placemat – pattern is the perfect solution. This delightful craft is not only fun to make, but it also adds warmth and personality to your autumn table setting. Whether you’re a beginner or a seasoned crafter, designing your own pumpkin placemat is a satisfying and practical way to celebrate the season.
The beauty of the pumpkin placemat – pattern lies in its versatility. It can be tailored to suit a wide range of styles—from rustic and farmhouse to modern minimalist. You can use various materials, including fabric, felt, or even yarn, depending on the look you’re aiming for. These placemats also make lovely handmade gifts or can be sold at craft fairs or online during the fall season.
In this article, you’ll learn everything you need to know to design your own pumpkin placemat – pattern from scratch. We’ll cover essential materials, step-by-step instructions, creative design ideas, and tips to make your project both beautiful and functional. Whether you’re making a set for Thanksgiving dinner or just adding a cozy autumnal vibe to your kitchen, this guide is here to help.
1. Choosing the Right Materials for Your Pumpkin Placemat
Selecting the appropriate materials is the first step in bringing your pumpkin placemat – pattern to life. The material you choose will influence the durability, appearance, and texture of your placemat.
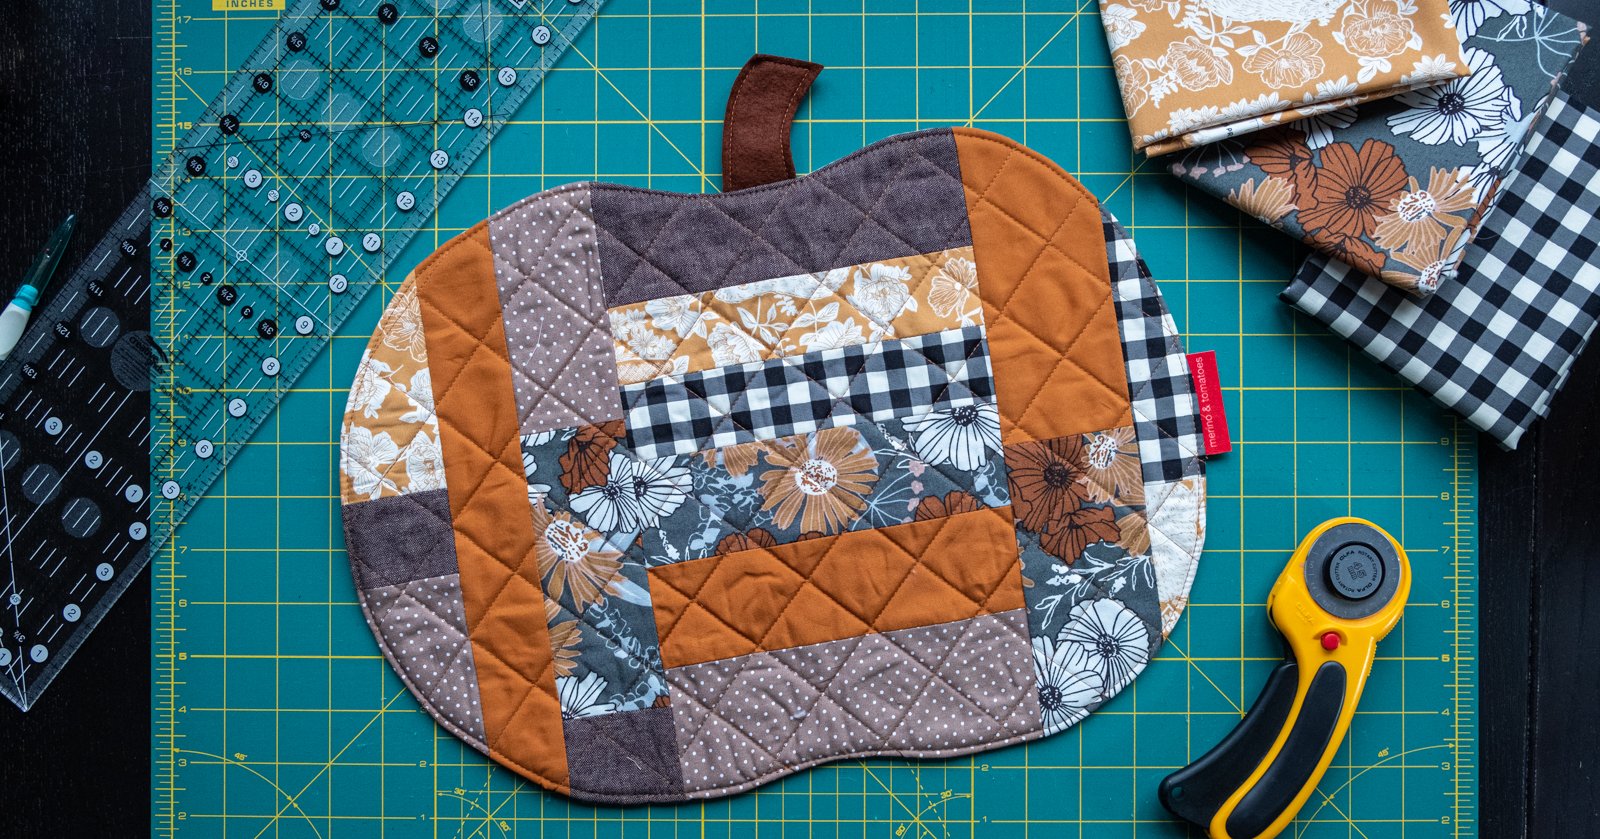
Fabric is a popular choice due to its softness and ease of handling. Cotton and linen blends work especially well, providing both flexibility and structure. Look for fall-themed prints or warm, earthy tones like burnt orange, mustard, and brown.
Felt is another excellent option, especially for beginners. It doesn’t fray, comes in a wide variety of colors, and is easy to cut and shape. Felt pumpkin placemats are ideal for children’s crafts or whimsical designs.
Quilting techniques can elevate your project by adding dimension and texture. Quilted placemats offer added padding and insulation, making them perfect for protecting tables from hot dishes.
Don’t forget about interfacing or a backing material. This helps your placemat stay firm and flat on the table. Fusible interfacing is easy to iron on and adds extra support.
Thread selection matters too. Choose a strong thread in a color that complements your fabric. Decorative stitching with contrasting colors can also enhance the overall design.
Finally, consider any decorative elements like appliqué, embroidery, or fabric paint. These can add detail and personality to your pumpkin motif, making your placemat stand out.
2. Step-by-Step Instructions for Creating a Pumpkin Placemat
Now that you’ve gathered your materials, it’s time to start crafting your pumpkin placemat – pattern. These step-by-step instructions are designed to be beginner-friendly but can also be customized by advanced crafters.
Start by creating or printing a pumpkin pattern. You can find free templates online or sketch your own. Your pumpkin shape can be traditional or stylized, depending on your design preference.
Next, trace the pattern onto your fabric or felt using tailor’s chalk or a washable marker. If you’re making multiple placemats, use the same template to ensure consistency in size and shape.
Cut out the pumpkin shape carefully. If you’re layering fabrics or adding a backing, be sure to cut two identical shapes for each placemat.
For added structure, apply interfacing to one or both layers. This will give your placemat more firmness and help it lie flat on the table.
Now it’s time to sew the pieces together. Place the fabric pieces right sides together and sew around the edges, leaving a small opening. Turn the placemat right side out through the opening, then topstitch around the edge to close it and add a finished look.
Add details and embellishments like stitching lines to mimic a pumpkin’s grooves, leaf shapes at the top, or even a stem using fabric scraps. This is where you can really personalize your pumpkin placemat – pattern.
3. Creative Design Ideas for Your Pumpkin Placemat
Once you understand the basics, the real fun begins—designing your pumpkin placemat – pattern with creativity and flair. There are endless ways to customize your placemat to fit your fall aesthetic.
Try using patchwork techniques with different fabric swatches. This creates a cozy, homespun look and is a great way to use up fabric scraps from previous projects.
Appliqué pumpkins on a rectangle placemat instead of using a pumpkin-shaped base. This gives you the flexibility of traditional placemat dimensions with a festive flair.
Experiment with embroidery details, like adding vines, leaves, or even your family’s initials. Hand stitching adds a touch of craftsmanship that elevates the final product.
Add fall quotes or phrases using iron-on vinyl or fabric paint. Phrases like “Give Thanks” or “Hello Pumpkin” can make each placemat feel extra special and unique.
Go bold with color combinations. While orange is traditional, don’t be afraid to experiment with white pumpkins, deep greens, or burgundy shades for a more modern or elegant look.
Make it functional by adding a reversible design. Use different patterns on each side—perhaps a pumpkin on one and a plaid or leaf print on the other—so you can switch up your table’s look with ease.
4. Tips for Maintaining and Storing Pumpkin Placemats
Once your pumpkin placemat – pattern project is complete, it’s important to take care of your handiwork so it lasts for years to come. Proper maintenance will keep your placemats looking fresh and festive each fall.
Start by checking the care instructions of your chosen fabric before washing. Some materials may shrink or fade if washed improperly, so always use cold water and mild detergent.
If your placemat includes embellishments like appliqué or embroidery, consider hand washing or spot cleaning to preserve the details and prevent fraying or unraveling.
Ironing your placemats before each use can keep them looking crisp. Use a low heat setting and place a cloth between the iron and the placemat to avoid damaging any decorative elements.
For storage, roll or lay your placemats flat. Avoid folding them, as creases can become permanent over time. Store them in a dry place away from direct sunlight to prevent fading.
If you’re storing multiple placemats, use tissue paper between each one to prevent color transfer or tangling of threads and embellishments.
Lastly, inspect your placemats annually. Repair any loose threads or stitches before using them again. A quick maintenance check can extend the life of your pumpkin placemat – pattern creations significantly.
FAQ: Frequently Asked Questions About Pumpkin Placemat – Pattern
Q1: What is the best fabric to use for a pumpkin placemat?
A: Cotton or linen are great choices for durability and ease of use. Felt is also ideal for beginners because it’s easy to cut and doesn’t fray.
Q2: Can I wash my pumpkin placemat?
A: Yes, but it depends on the materials used. Machine-washable fabrics can be cleaned gently, but hand washing is best for decorated or embellished placemats.
Q3: Do I need a sewing machine to make a pumpkin placemat?
A: Not necessarily. You can hand-sew your placemat, especially if using felt or simple designs, although a sewing machine will make the process faster.
Q4: How do I make my placemat heat-resistant?
A: Adding a layer of heat-resistant batting or interfacing can protect your table from hot dishes while maintaining the shape of the placemat.
Q5: Can I make pumpkin placemats with kids?
A: Absolutely! Felt placemats are a fun and safe craft for children. Let them help with tracing, cutting, or decorating with non-toxic paints and glue.
Q6: Where can I find a free pumpkin placemat – pattern template?
A: Many crafting blogs and sewing websites offer free downloadable templates. You can also draw your own to make it truly custom.
Conclusion
Creating a pumpkin placemat – pattern is a heartwarming and rewarding fall craft that anyone can enjoy. From choosing the right materials to adding your own creative flair, each step allows for personalization and expression. These placemats can be used year after year, making them not only a seasonal decoration but also a family tradition in the making.
If you’ve followed along with this guide, you now have the knowledge and inspiration to create your own beautiful pumpkin placemats. We’d love to hear from you—please leave a sincere opinion about your experience and share any suggestions or questions you may have. Your feedback helps improve our guides and inspires other readers too!