The Puzzle Cube Quilt Block – Pattern is one of the most fascinating and visually captivating designs in the world of quilting. Its unique 3D illusion makes it look like cubes popping off the surface of your quilt, offering a blend of geometry, precision, and artistry. This pattern is perfect for quilters who enjoy combining mathematical structure with creative flair. Whether you are making a full quilt, a wall hanging, or a table runner, the Puzzle Cube Quilt Block adds dimension and depth that will impress anyone who sees it.
The appeal of this block lies in its clever arrangement of light, medium, and dark fabrics that create the illusion of three-dimensional cubes. It’s a wonderful project for both intermediate and experienced quilters who want to challenge their piecing skills while producing something that looks intricate and professional. The design is also highly customizable, allowing you to experiment with color schemes to achieve different visual effects—from classic monochrome to vibrant rainbow palettes.
In this guide, we’ll explore everything you need to know to create your own Puzzle Cube Quilt Block – Pattern. You’ll learn how to select fabrics, cut and assemble the pieces accurately, explore creative design options, and discover helpful tips to ensure your blocks fit together perfectly. Let’s dive into this exciting quilting adventure and bring your geometric masterpiece to life!
1. Materials and Fabric Selection
To create a stunning Puzzle Cube Quilt Block – Pattern, fabric selection is the key to achieving the 3D illusion. The magic happens through careful color placement and contrast, so choosing the right shades is essential.
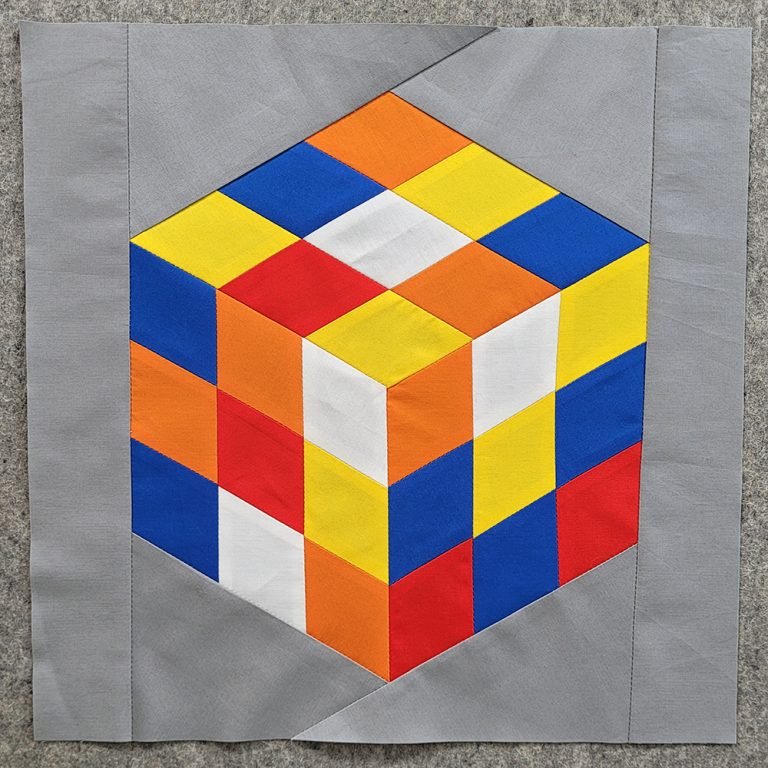
You will need three coordinating fabrics for each cube: one light, one medium, and one dark tone. These shades represent the three visible sides of the cube—light for the top, medium for the front, and dark for the side shadow. The higher the contrast between these tones, the more dramatic and realistic the 3D effect will be.
Solid fabrics work best for this pattern because they emphasize the clean geometric lines. However, you can also experiment with subtle prints that mimic texture, like marbles or batiks, to give your blocks a unique twist. If you prefer a modern or minimalist style, try using grayscale tones. For a playful and colorful design, mix bright hues like turquoise, coral, and mustard.
In addition to fabric, you’ll need standard quilting supplies: a rotary cutter, self-healing cutting mat, quilting ruler, sewing machine, and an iron. Make sure your rotary blade is sharp for precise cuts—accuracy is essential when piecing together the Puzzle Cube Quilt Block.
Before cutting, always press your fabrics to remove wrinkles and ensure clean lines. Wrinkled fabric can throw off your measurements and distort the cube illusion. Using a starch spray can help your pieces hold their shape and make sewing easier.
Lastly, plan your color layout before you start cutting. It can be helpful to sketch your design or use a digital quilting app to visualize how your blocks will look together. Organizing your colors in advance will make the assembly process smoother and more enjoyable.
2. Cutting and Piecing the Block
Once you’ve chosen your fabrics, it’s time to begin cutting and assembling your Puzzle Cube Quilt Block – Pattern. The key to success in this stage is precision. Even small inconsistencies can disrupt the cube illusion, so take your time with each step.
Start by cutting your fabrics into diamond shapes using your quilting ruler. The standard Puzzle Cube Quilt Block is based on 60-degree angles, so you’ll be cutting your diamonds accordingly. Each cube is made from three diamonds—one in each of your chosen tones (light, medium, and dark).
Arrange your diamonds into groups of three, forming a hexagon. This is the foundation of the cube. The placement of the colors is crucial: the light piece should form the top, the medium one the front, and the dark one the side. When positioned correctly, your pieces will naturally create the 3D cube effect.
Sew the three diamonds together along their long edges to create a single hexagon unit. Press the seams open to reduce bulk and ensure the block lays flat. When joining these pieces, use a scant ¼-inch seam allowance for accuracy.
After you have several cube units assembled, you can start arranging them on your design wall or table. You’ll notice how the cubes start to “pop” visually as you group them together. You can alternate cube colors or even invert some to create a mesmerizing optical illusion pattern.
Once all your cubes are arranged, sew the rows together, carefully aligning seams. A consistent seam allowance and proper pressing will help maintain the sharp geometric look that defines the Puzzle Cube Quilt Block – Pattern.
3. Creative Design Ideas and Variations
The Puzzle Cube Quilt Block – Pattern is incredibly versatile and offers endless creative possibilities. You can keep it classic with neutral tones or transform it into a vibrant work of art by playing with color combinations.
For a traditional quilt, stick with shades of gray, blue, and cream. These tones mimic the look of stone or marble cubes, giving your quilt a timeless elegance. If you want a more modern vibe, choose bold, contrasting colors like teal, mustard, and coral. These hues make the cubes stand out vividly and add a playful energy to your design.
Another creative idea is to use a gradient or ombré effect. By using fabrics that gradually shift in tone from light to dark, you can create a quilt that looks like a cascading 3D illusion. This approach adds motion and depth to your design, making it truly eye-catching.
If you enjoy experimenting with textures, consider mixing fabric types. Quilting cotton is the standard choice, but incorporating linen or metallic fabrics can create interesting effects. Just be mindful of stretch and thickness differences when sewing.
You can also vary the size of your blocks. Larger blocks create a bold, modern statement and are easier to piece together, while smaller blocks add intricate detail and texture. Combining both sizes within the same quilt can give a dynamic, multi-layered look.
Lastly, if you’re looking for a unique twist, use negative space creatively. Place your Puzzle Cube Quilt Blocks against a solid background to make them look like they’re floating. This modern quilting technique highlights the cubes while giving your design a clean, airy appearance.
4. Finishing and Quilting Tips
Once your Puzzle Cube Quilt Block – Pattern is assembled, it’s time to focus on the finishing touches that bring your project to life. Proper finishing ensures your quilt looks professional and lasts for years.
After completing your quilt top, press all seams flat and trim any uneven edges. This helps when layering your quilt with batting and backing fabric. Choose a backing fabric that complements your design without distracting from the 3D illusion of the cubes.
When quilting, consider how the stitching will interact with the cube pattern. Straight-line quilting works beautifully for this block because it enhances the geometric structure. You can stitch along the edges of the cubes to emphasize their shape or use diagonal lines to add movement.
If you prefer a softer, more textured look, free-motion quilting is another great option. You can create subtle swirls or abstract patterns that contrast with the block’s sharp geometry, adding visual interest without overpowering the design.
Once your quilting is complete, bind the edges neatly using a coordinating or contrasting fabric. A dark binding can frame your quilt beautifully and make the cubes appear even more three-dimensional.
Finally, take time to admire your work! The Puzzle Cube Quilt Block – Pattern is a masterpiece of precision and creativity. Whether displayed on a wall, draped across a bed, or given as a handmade gift, your quilt is sure to impress and inspire admiration.
FAQ – Puzzle Cube Quilt Block – Pattern
1. Is the Puzzle Cube Quilt Block suitable for beginners?
The Puzzle Cube Quilt Block – Pattern is best suited for confident beginners or intermediate quilters. It requires accurate cutting and piecing, but with patience and practice, anyone can achieve beautiful results.
2. What fabric types work best for this pattern?
Solid cotton fabrics are ideal because they highlight the clean lines and color contrasts needed for the 3D illusion. However, batiks and subtle prints can also work if used carefully.
3. Can I make this block without special rulers?
Yes, but having a 60-degree quilting ruler makes cutting diamonds much easier and more precise. If you don’t have one, you can use a protractor or printable template.
4. How do I avoid my cubes looking flat instead of 3D?
Choose fabrics with strong contrast between light, medium, and dark tones. Proper color placement is key to creating the illusion of depth.
5. What quilting design works best for this block?
Straight-line quilting that follows the cube edges enhances the geometric illusion beautifully. For a more artistic approach, you can try echo quilting or diagonal grid patterns.
Conclusion
The Puzzle Cube Quilt Block – Pattern is a stunning example of how geometry and artistry come together in quilting. With its mesmerizing 3D effect, this pattern transforms ordinary fabric into a dynamic visual experience. Whether you stick to traditional colors or experiment with bold modern tones, each cube tells its own story through the careful interplay of light and shadow.
By following the steps in this guide—choosing the right fabrics, cutting precisely, piecing carefully, and finishing thoughtfully—you’ll create a quilt that’s both technically impressive and artistically expressive.
If you enjoyed this article, please share your honest opinion and suggestions in the comments below. We’d love to hear how your Puzzle Cube Quilt Block – Pattern turned out and see the creative color combinations you used to bring this classic design to life!