Creating a Quick Yo-yo Christmas Tree Made with scraps – Pattern is a wonderful way to turn fabric leftovers into festive decor. Whether you have cotton, flannel, or linen scraps, this pattern celebrates recycling simple materials into something joyous. In this article, I will guide you step by step through crafting your own Quick Yo-yo Christmas Tree Made with scraps – Pattern, helping you understand materials, technique, design, and care.
Every crafter appreciates learning a pattern that is both fast and forgiving. A Quick Yo-yo Christmas Tree Made with scraps – Pattern allows for playful creativity—mismatched colors, whimsical shapes, and charming imperfections. These yo-yo trees bring a handmade warmth to holiday decorations without demanding hundreds of hours. Scrap fabric becomes a canvas for holiday magic.
Optimizing for SEO and online visibility means embedding the phrase Quick Yo-yo Christmas Tree Made with scraps – Pattern in key places. You will see it in headers, within paragraphs, and woven through descriptions of color, technique, and purpose. This ensures that when someone searches for this topic, your content ranks well, while still sounding natural and humanized.
1. Planning Your Materials and Choosing Scraps
When starting your Quick Yo-yo Christmas Tree Made with scraps – Pattern, inventory your fabric scraps. Look for pieces that are clean, unfrayed, and varied in color. Bright greens, reds, and metallics often evoke holiday spirit. But also consider pastels or soft neutrals if your decor leans that way.
Select a yo-yo maker or circular template for cutting the fabric. The size of the circles will determine the fullness and scale of the tree. Larger circles mean fewer yo-yos, smaller circles allow more detail. For a tree about twelve inches tall, circles of two to three inch diameter work well.
When choosing thread, pick strong cotton or polyester that blends or contrasts depending on your design. For stitching the yo-yos, you’ll want a thread that matches the weight of your fabric to avoid breakage when gathering. Metallic thread can add sparkle.
Decide whether you want a freestanding tree, a wall-hanging, or simply a decorative piece. This influences your base: foam cone, wire frame, cardboard form, or simply stacking yo-yos. Your pattern should adapt: more densely packed yo-yos for a standing tree, loosely arranged for a wall decor.
Make sure you have a needle with an eye large enough for your thread, scissors sharp enough for clean cuts, and optionally embellishments like beads, ribbons, or buttons. These details help bring uniqueness to your Quick Yo-yo Christmas Tree Made with scraps – Pattern and make it more visually appealing.
Finally, sketch your design roughly. Plan color gradation—from base to top—or random placement. Decide whether you’ll add a star or topper. Having a vision simplifies the work, even when using scraps.
2. Making the Yo-yos
To follow the Quick Yo-yo Christmas Tree Made with scraps – Pattern, begin by cutting circles. Use a template or cup, tracing onto scrap fabric. Make sure to account for seam allowance: leave about ¼ inch (6 mm) around the circle.
Fold the edge under by pressing, or simply treat the raw edge roughly if the fabric won’t fray. Thread your needle, take running stitches around the edge, and gather tight to form the yo-yo. Knot securely. Your first yo-yos may be imperfect—that’s okay.
Continue making yo-yos until you have enough for your pattern. For a smaller tree, maybe fifteen to twenty; for larger, many more. Save very small scraps for contrast yo-yos or embellishments. Mix sizes if you want dimension.
Arrange yo-yos by size or color gradient. Lay them out on a table or board. Try placing the larger ones at the base of the tree for stability or visual weight, smaller ones toward the top. Step back often to assess balance.
To follow pattern instructions, you may need to stitch yo-yos together. Using a base fabric or felt circle, hot-glue or hand-stitch yo-yos to adhere. When using a 3D form (foam or cone), pin or glue yo-yos closely together, overlapping edges so base is not visible.
Remember that the tightness of gathering will affect shape—too loose and yo-yo splay; too tight and yo-yo will pucker. This is part of mastering the Quick Yo-yo Christmas Tree Made with scraps – Pattern technique.
3. Assembling the Tree
Once the yo-yos are ready, assemble according to your initial plan. If freestanding, secure yo-yos onto your cone or stand. Start at the base, working in rows upward, overlapping slightly for fullness. Use hot glue or strong fabric glue if you prefer speed and stability.
If making a wall-hanging or flat tree, use felt or canvas backing. Pin or stitch yo-yos in place using your layout sketch as guide. Use matching thread or invisible stitches. For better support, stitch through the backing and fabric yo-yo several times.
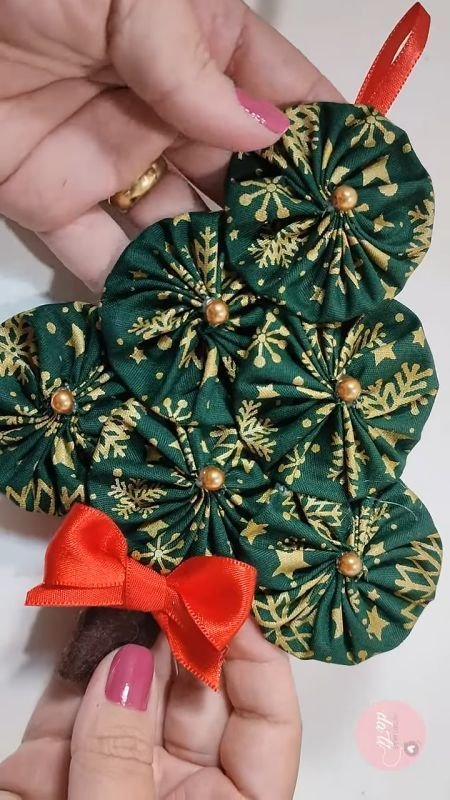
Add embellishments as you assemble: buttons as centers, tiny bows, sequins. These small touches elevate your Quick Yo-yo Christmas Tree Made with scraps – Pattern from homemade to heartfelt gift quality. Choose embellishments that accent, not overwhelm.
Ensure your tree maintains shape: check that corners or edges are well-covered. If base pieces show, add smaller yo-yos or filler scraps. For a cone tree, ensure yo-yos are snugly glued so no gaps. Press felt backing to avoid wrinkles.
If you want lights, consider battery-operated string lights. Weave or pin them around the tree once assembly is nearly complete. The glow may shift colors and shadows, so adjust yo-yos accordingly. Ensure heat safety if using electrical components.
Final touches: add a topper—star, ribbon, or handmade ornament. Perhaps a fabric star made with scraps. The topper finalizes your Quick Yo-yo Christmas Tree Made with scraps – Pattern, making it a centerpiece.
4. Maintenance, Display, and Variations
Your Quick Yo-yo Christmas Tree Made with scraps – Pattern deserves good care. Keep it dry. If fabric scraps are washable materials, avoid getting glue damp. Dust gently using soft brush or using a low vacuum attachment.
Store flat or wrapped carefully during off-season. If you use a foam cone, disassemble or store with protective wrapping to avoid pests or moisture damage. Avoid crushing yo-yos.
Display options: tabletop display, mantelpiece, window sill, or entryway. A wall-hanging tree can use a loop or backing for easy hanging. Freestanding can sit on a decorative plate or stand. Choose lighting complementary to colors.
Variations: change scale—make mini versions for ornaments, large versions for hall decorations. Use holiday-themed fabrics: snowflakes, holly, stripes. Add sound: incorporate bells or chimes. Or make monochromatic designs for modern minimalism.
Different patterns: some prefer pieced yo-yos combining two fabrics; others may use printed fabric with motifs. Your Quick Yo-yo Christmas Tree Made with scraps – Pattern can adapt to texture too—velvet, denim, lace. Experiment and find what you love.
As sustainability trend grows, reusing scraps becomes part of conscious crafting. Your yo‑yo tree is not just decoration—it’s storytelling about resourcefulness, creativity, and love.
FAQ
What is the ideal fabric type for a Quick Yo-yo Christmas Tree Made with scraps – Pattern?
A good fabric is one that doesn’t fray excessively and holds shape when gathered. Cotton quilting fabric, flannel, linen, or lightweight twill work well. Avoid slippery fabrics unless stabilized because they can slip when gathered as yo-yos.
How large should the yo-yos be for the best result?
That depends on the size of the tree you want. For a small tabletop tree, two to three inch diameter circles work. For larger trees, four inches or more. Smaller yo-yos give fine detail, larger ones build bulk more quickly.
Can I wash the finished tree?
Only if materials used are washable and adhesives are permanent. In many cases, it’s better to spot clean. If yo-yos are glued, water can weaken glue. For cloth-stitched trees without glue, gentle hand washing might be possible, but dry thoroughly.
What glue or thread works best?
For glue, hot‑glue works quickly; fabric glue gives more flexibility. For thread, a strong polyester or cotton thread is good. Use a needle appropriate for fabric thickness. Do test stitches before assembling fully.
How do I prevent gaps or bare spots in assembly?
Plan layout with overlapping yo-yos, using smaller pieces to fill in edges. Sketch out rows if needed. During assembly, step back and view from distance; adjust placements. Using densely packed layers helps ensure no backing shows.
Can I adapt the Quick Yo-yo Christmas Tree Made with scraps – Pattern into other decorations?
Yes! Mini yo‑yo trees can become ornaments. Flat yo-yos arranged in wreath shapes, garlands, coasters. The same pattern principle applies: circles cut, gathered, arranged. You can scale and shape depending on decorative objective.
Conclusion
In this article, you have learned how to craft a Quick Yo-yo Christmas Tree Made with scraps – Pattern from planning materials, creating yo-yos, assembling into tree form, to maintaining and varying your design. We covered selecting fabric scraps, making circles, stitching and gathering yo-yos, assembling for different uses, embellishing, and care. Also, you now know how to adapt the pattern in size, texture, and style to suit your space.
I hope you try this project and enjoy the creative process. If you do, please leave an honest opinion and suggestions: what colors you used, what fabrics worked best, what you might have done differently. Your feedback helps not just you, but others exploring their own version of the Quick Yo-yo Christmas Tree Made with scraps – Pattern.