Quilt-As-You-Go – Pattern is one of the most revolutionary techniques in the world of modern quilting, offering a streamlined approach that combines piecing and quilting into one efficient step. If you have ever felt overwhelmed by the prospect of wrestling a massive, heavy quilt through the small neck of a domestic sewing machine, this method is your ultimate solution. By focusing on smaller, manageable sections, the Quilt-As-You-Go – Pattern allows you to maintain high precision and professional tension without the physical strain traditionally associated with large-scale projects.
The beauty of adopting a Quilt-As-You-Go – Pattern lies in its versatility and the immediate gratification it provides to makers of all skill levels. Instead of waiting until the very end to see your quilting stitches come to life, you complete the “sandwiching” process block by block or row by row. This means that by the time your top is finished, your entire quilt is already quilted, leaving only the final assembly and binding to be completed. It is a game-changer for those with limited workspace or anyone who wants to ensure their quilt batting and fabric layers stay perfectly aligned throughout the process.
Whether you are a seasoned quilter looking to save time or a beginner eager to complete your first masterpiece, understanding the nuances of the Quilt-As-You-Go – Pattern is essential. This guide will walk you through the essential terminology, the physical preparation required, and the creative strategies that make this technique so popular in the DIY crafting community. By the end of this article, you will have a comprehensive understanding of how to execute this method with confidence, ensuring your next handcrafted heirloom is both beautiful and structurally sound.
1 Understanding the Quilt-As-You-Go – Pattern Method
The Quilt-As-You-Go – Pattern refers to a specific construction technique where individual pieces of fabric are sewn directly onto the batting and backing simultaneously. Unlike traditional quilting, where you create a “quilt top” first and then add the insulation and backing later, this method integrates all three layers from the start.
Using a Quilt-As-You-Go – Pattern is highly effective for scrap busting and utilizing leftover cotton fabric strips from previous projects. Because you are working on small sections, you can easily manage the stitch-in-the-ditch or decorative quilting lines without the bulk of a king-sized quilt dragging off your table.
One of the primary benefits of this quilting technique is the ability to use your standard home sewing machine for large projects. Since you only ever handle a small portion of the final product at one time, you don’t need a longarm quilting machine to achieve professional-looking results on a large scale.
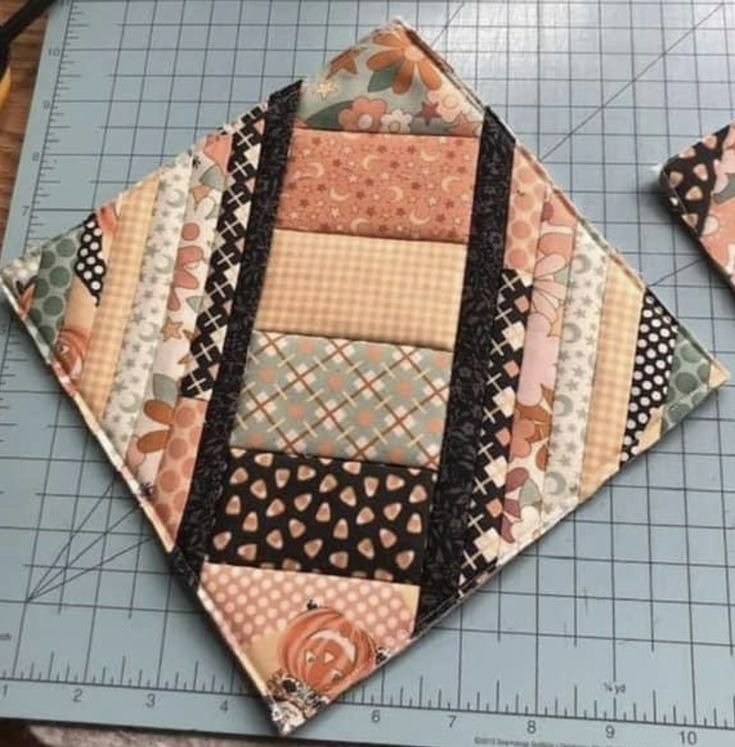
When you follow a Quilt-As-You-Go – Pattern, you often use a “foundation” which is typically the quilt batting itself. You place your first piece of fabric right-side up, then place the second piece right-side down, sew through all layers, and flip the second piece open to reveal a finished, quilted seam.
Modern Quilt-As-You-Go – Pattern designs often incorporate “joining strips” or “sashing” to connect the finished blocks. These strips hide the raw edges where the blocks meet, creating a seamless look on the front while providing a clean, finished appearance on the back of the patchwork quilt.
Many enthusiasts prefer the Quilt-As-You-Go – Pattern because it is incredibly portable. You can prep your blocks, take them on a trip, and quilt them individually, only needing the final assembly phase once you are back in your dedicated sewing room or studio space.
2 Essential Materials for Your Quilt-As-You-Go Project
To successfully execute a Quilt-As-You-Go – Pattern, you need high-quality quilting tools that ensure accuracy. A sharp rotary cutter, a self-healing cutting mat, and a non-slip acrylic ruler are the trifecta of tools that will help you prepare your fabric blocks with perfect 90-degree angles.
Choosing the right quilt batting is crucial for this method because it acts as the foundation for your stitching. Many quilters prefer a low-loft cotton batting or a blend, as it lies flat and doesn’t create excessive bulk when you are joining the quilted sections together.
Your choice of sewing thread also plays a significant role in the durability of your Quilt-As-You-Go – Pattern. A 50-weight cotton thread is usually recommended because it is strong enough to hold the layers together but thin enough to avoid creating thick, unsightly seams at the junctions.
A walking foot is an absolute necessity when working with any Quilt-As-You-Go – Pattern. This specialized presser foot feeds the top and bottom layers of fabric through the machine at the same rate, preventing the “shifting” or “puckering” that often happens when sewing through multiple layers.
Don’t forget the importance of fabric starch or sizing when preparing your materials. Since the Quilt-As-You-Go – Pattern involves a lot of handling of individual blocks, starching your fabric helps maintain the shape of the grains and prevents the edges from fraying or stretching during the quilting process.
Finally, you will need basting spray or fine quilting pins to keep your backing fabric and batting aligned before you start the first stitch. In a Quilt-As-You-Go – Pattern, keeping these initial layers smooth is the secret to a professional finish that looks just as good on the back as it does on the front.
3 Step-by-Step Execution of the Technique
The first step in a Quilt-As-You-Go – Pattern is to cut your backing fabric and batting into squares that are slightly larger than your intended finished block size. This “overcut” accounts for the slight shrinkage that occurs as you add more decorative stitching and compress the fibers of the batting.
Once your foundation is ready, place your central fabric piece in the middle of the batting. In a typical Quilt-As-You-Go – Pattern, you might start with a square or a strip, securing it with a bit of temporary adhesive to ensure it doesn’t move while you align the subsequent pieces of the design.
As you add more strips or shapes, you will sew through the new fabric, the previous fabric, the batting, and the backing all at once. This multi-layer sewing is the core of the Quilt-As-You-Go – Pattern, effectively quilting the project as you build the visual design of the block.
After completing several blocks, the next phase of the Quilt-As-You-Go – Pattern involves trimming them to the exact final size. Using a square ruler, you trim away the excess batting and backing, creating clean edges that are ready to be joined using your chosen sashing method.
Joining the blocks is where the Quilt-As-You-Go – Pattern truly comes together. You can use the “front and back sashing” method, where thin strips of fabric cover the raw seams on both sides, ensuring that the interior of the quilt remains soft and the structural integrity is maintained.
The final step is adding the quilt binding around the perimeter of the entire assembled piece. Because each block was already quilted as part of the Quilt-As-You-Go – Pattern process, you simply finish the edges, and your project is ready for use, display, or gifting to a loved one.
4 Tips for Customizing Your Quilt-As-You-Go Designs
One of the most exciting aspects of the Quilt-As-You-Go – Pattern is the ability to experiment with different quilt block designs within the same project. You aren’t limited to a single repetitive motif; you can change the quilting pattern for every single square to create a “sampler” style look.
To add a modern touch to your Quilt-As-You-Go – Pattern, consider using variegated thread. This type of thread changes color along its length, adding a dynamic and artistic element to your topstitching that can highlight the geometric patterns of your fabric choices.
If you are working on a Quilt-As-You-Go – Pattern that requires a lot of precision, such as a Log Cabin quilt, use a water-soluble marking pen. This allows you to draw guide lines directly on the fabric or batting, which will disappear once the project is laundered, leaving only perfect stitches.
You can also incorporate appliqué into your blocks. Before joining the sections of your Quilt-As-You-Go – Pattern, you can sew on fabric shapes like flowers or stars, which adds depth and texture to the quilt without making the final assembly process any more difficult.
For those who enjoy a more rustic or “shabby chic” look, the Quilt-As-You-Go – Pattern works perfectly with raw-edge techniques. Instead of folding the seams under, you can leave them exposed and let them fray slightly over time, giving the handmade quilt a cozy, lived-in feel.
Always remember that the Quilt-As-You-Go – Pattern is meant to be a stress-free experience. If a block isn’t perfectly square, don’t worry—the beauty of handcrafted textiles lies in their unique character. The more you practice this method, the more intuitive your fabric selection and stitching will become.
FAQ – Frequently Asked Questions
1. Can I use a regular sewing machine for a Quilt-As-You-Go – Pattern?
Yes! In fact, this method is specifically designed to make large quilts possible on a regular domestic machine. Because you work with small sections, you never have to fit a bulky quilt through the machine’s “throat.”
2. What is the best batting for a Quilt-As-You-Go – Pattern?
A thin, stable batting like 100% cotton or an 80/20 cotton-poly blend is usually best. Avoid high-loft polyester batting, as it can be too “puffy” and make it difficult to join the blocks neatly.
3. Do I need to quilt the backing at the same time?
While the most common Quilt-As-You-Go – Pattern method involves quilting through the backing, some variations allow you to quilt just the top and batting, then attach a large single backing at the end. However, the true “as-you-go” method includes the backing for maximum efficiency.
4. How do I hide the seams on the back?
Most quilters use sashing strips to cover the seams on the back. By sewing a strip to the back of the junction and hand-stitching or machine-stitching it down, you create a finished look that hides all raw edges.
5. Is this method faster than traditional quilting?
For many, yes. Because you eliminate the “big quilt sandwich” phase and the struggle of quilting a large piece, the overall process feels faster and much more manageable.
6. Can I use this for any quilt design?
Most designs can be adapted into a Quilt-As-You-Go – Pattern, especially those based on blocks, strips, or rows. Intricate whole-cloth designs are harder to adapt, but nearly any patchwork style works beautifully.
Conclusion
Mastering the Quilt-As-You-Go – Pattern is a transformative journey for any sewing enthusiast. We have explored how this technique simplifies the quilting process by breaking it down into manageable segments, the essential quilting supplies needed for success, and the step-by-step logic that ensures a professional finish. By integrating the quilting and piecing phases, you not only save time but also open up a world of creative possibilities that were previously limited by the size of your machine.
I hope this guide inspires you to start your next creative sewing project with renewed confidence. The Quilt-As-You-Go – Pattern is more than just a shortcut; it is a smart, ergonomic, and highly artistic way to create beautiful home decor and gifts.