The Quilt Garden of Light – Pattern represents one of the most luminous and visually captivating designs in the modern quilting community, blending traditional geometry with a unique play on luminosity. When quilters talk about the Quilt Garden of Light – Pattern, they are referring to a specific arrangement of fabrics and shapes designed to mimic the way sunlight filters through a blossoming flower bed. This particular pattern has gained immense popularity because it doesn’t just create a blanket; it creates a centerpiece that radiates warmth and artistic intention through the careful placement of high-contrast textiles.
Exploring the Quilt Garden of Light – Pattern requires a balance of technical precision and creative intuition, making it an ideal project for those who wish to elevate their sewing skills. The “Garden” aspect of the name refers to the organic, floral-inspired motifs often found within the blocks, while the “Light” refers to the clever use of “fussy cutting” and gradients to simulate a glowing effect. By following a well-structured Quilt Garden of Light – Pattern, even an intermediate quilter can achieve professional-looking results that look as though they are back-lit by a soft morning sun.
In this comprehensive guide, we will delve deep into the mechanics of the Quilt Garden of Light – Pattern to help you master its intricate details. We will focus on two primary concepts: the Quilt Garden of Light, which is the finished textile masterpiece that serves as a functional work of art, and the Pattern, which is the essential technical blueprint providing the measurements, cutting instructions, and assembly diagrams. Whether you are looking to brighten up a dark room or create a meaningful gift, understanding the foundation of this pattern is the first step toward a successful and rewarding quilting journey.
1. Selecting the Perfect Fabric Palette for the Quilt Garden of Light – Pattern
The most crucial step in bringing your Quilt Garden of Light – Pattern to life is the selection of your fabric colors and values. To achieve the signature “glowing” effect that characterizes this pattern, you must choose a range of fabrics that move from very dark to very light. Many designers recommend starting with a deep, “shadow” fabric for the background, such as charcoal or navy, which allows the vibrant colors of the Quilt Garden of Light to pop as if they were illuminated from within.
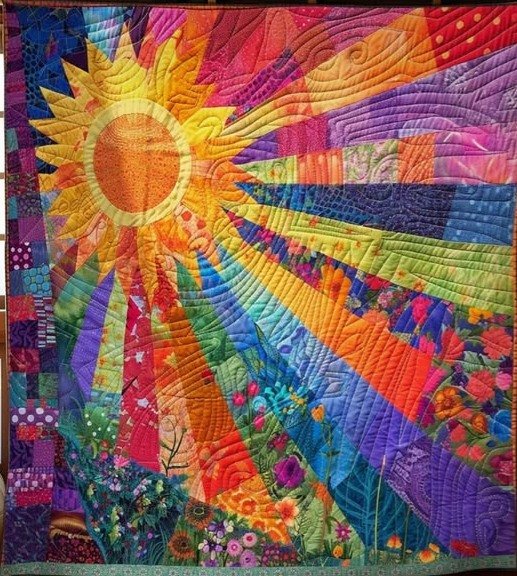
When picking your “light” fabrics for the Quilt Garden of Light – Pattern, look for high-saturation yellows, creams, and pale oranges. These colors should be placed at the center of your blocks according to the pattern instructions to create a focal point of brightness. Using batiks or hand-dyed fabrics can add extra depth to the Quilt Garden of Light, as the natural variations in the dye mimic the dappled light found in a real garden, enhancing the overall theme of the design.
In addition to color, the “Garden” element of the Quilt Garden of Light – Pattern suggests the use of floral or botanical prints. However, it is important to be selective; if the prints are too busy, the geometric structure of the pattern might get lost. Aim for a mix of solid “breathing room” fabrics and subtle tone-on-tone prints to ensure that the eye can easily trace the intricate pathways of the Quilt Garden of Light without becoming overwhelmed by visual clutter.
The Quilt Garden of Light – Pattern often utilizes a “value scale” rather than just a color wheel. This means that the relative lightness or darkness of the fabric is more important than the actual hue. To test this, many quilters take a black-and-white photo of their fabric pull; if the fabrics all look like the same shade of gray, the finished Quilt Garden of Light will look flat. You need a clear distinction between your lights, mediums, and darks to make the pattern work effectively.
Texture also plays a quiet but significant role in the Quilt Garden of Light – Pattern. Consider incorporating fabrics with a slight sheen, like silk blends or high-quality cotton sateens, for the “light” portions of the Quilt Garden of Light. These materials catch real ambient light in your room, further emphasizing the radiant nature of the pattern and giving the finished quilt a sophisticated, multi-dimensional appearance that is truly unique to this specific design.
Finally, always pre-wash your fabrics before starting the Quilt Garden of Light – Pattern. Because this design often pairs very dark fabrics with very light ones, there is a risk of “bleeding” during the first wash. By treating your fabrics beforehand, you protect the integrity of the Quilt Garden of Light, ensuring that your bright whites and yellows stay crisp against the darker garden backdrop, preserving the luminosity that the pattern is famous for.
2. Technical Drafting and Cutting Strategy for the Pattern
The Pattern is the technical heart of your project, and accuracy during the cutting phase is non-negotiable. Most versions of the Quilt Garden of Light – Pattern rely on a series of nested squares and triangles, which require perfectly straight edges and precise 45-degree angles. Using a high-quality rotary cutter with a fresh blade is essential for ensuring that every piece fits together like a puzzle, maintaining the geometric flow of the Quilt Garden of Light.
One of the unique features of the Quilt Garden of Light – Pattern is its reliance on “sub-assemblies.” Instead of sewing one large piece at a time, the pattern typically asks you to create several smaller blocks that are later joined together. This modular approach makes the Quilt Garden of Light easier to manage, but it requires diligent labeling. Using alphabetic or numeric stickers on your cut pieces as suggested by the pattern will prevent confusion during the sewing process.
Fussy cutting is a technique often highlighted in the Quilt Garden of Light – Pattern. This involves placing your template over a specific part of a floral print—such as a single blooming rose or a leaf—to ensure it is centered in the block. While this uses more fabric, it significantly enhances the “Garden” aesthetic of the Quilt Garden of Light. When the pattern calls for fussy cutting, take your time to align the grainline of the fabric to prevent stretching.
Understanding the “seam allowance” provided in the Quilt Garden of Light – Pattern is vital for a flat finish. Most quilting patterns use a strict 1/4-inch seam. If your seams are even a hair too wide, the finished blocks of your Quilt Garden of Light will be too small, and the corners won’t align. Practicing your “scant quarter-inch” on scrap fabric before starting the actual pattern will save you hours of frustration and ripping out stitches later on.
The Quilt Garden of Light – Pattern may also include instructions for specialized rulers, such as a “Tri-Recs” or a “60-degree triangle” tool. These tools are designed to make the sharp, light-ray shapes that are characteristic of the Quilt Garden of Light. If the pattern recommends a specific tool, it is usually worth the investment, as it ensures the points of your stars or petals are sharp and not “chopped off” during the final assembly of the quilt top.
Lastly, stay organized by creating a “project board” for your Quilt Garden of Light – Pattern. As you cut each section, pin the pieces to a piece of foam core or a design wall. This allows you to see the Quilt Garden of Light taking shape in real-time and helps you catch any color placement errors before you commit to sewing. Following the pattern layout visually is just as important as following the written text to ensure the “light” stays centered.
3. Advanced Sewing Techniques for a Flawless Quilt Garden of Light
Once the cutting is done, the assembly of the Quilt Garden of Light – Pattern begins with “chain piecing.” This is a time-saving technique where you feed pairs of fabric through the sewing machine one after another without cutting the thread in between. In a complex pattern like this, chain piecing helps maintain a rhythm, but you must be careful not to mix up the different sections of the Quilt Garden of Light as they come off the machine.
Pressing is perhaps the most underrated skill in the Quilt Garden of Light – Pattern workflow. To get those crisp, flat seams that make the Quilt Garden of Light look professional, you must press your seams as you go. The pattern will often tell you which direction to press (usually toward the darker fabric) to “nest” your seams. Nesting allows the seams to lock together at intersections, resulting in perfectly matched points throughout the Quilt Garden of Light – Pattern.
Dealing with “bias edges” is a common challenge in the Quilt Garden of Light – Pattern. A bias edge is any cut that is diagonal to the fabric’s grain, making it very stretchy. When sewing these sections of the Quilt Garden of Light, avoid pulling or pushing the fabric through the machine; let the feed dogs do the work. Using a bit of spray starch can also help stabilize these edges, ensuring that the pattern doesn’t warp or become “wavy” during assembly.
The “Center Eye” of the Quilt Garden of Light – Pattern is often the most difficult part to sew. It usually involves joining several points together in one spot. To avoid a bulky “lump” in the middle of your Quilt Garden of Light block, try “spinning” your seams. This technique, often explained in advanced pattern guides, distributes the fabric bulk in a circular fashion at the junction, allowing the block to lay completely flat for easier quilting later.
Topstitching or “stitch-in-the-ditch” can be used to add extra detail to the Quilt Garden of Light – Pattern. Once the top is assembled, the way you choose to quilt it can enhance the “light” theme. For example, using a shimmering thread to quilt radiating lines from the center of the Quilt Garden of Light can emphasize the sunburst effect intended by the pattern. This secondary layer of design is what truly brings the garden to life.
If you encounter a mistake while following the Quilt Garden of Light – Pattern, don’t be afraid to use your seam ripper. Because this pattern relies on geometric symmetry, a small error in one block can cascade through the entire Quilt Garden of Light, making it difficult to attach the borders or backing. Patience is a virtue when working on a high-detail pattern, and the final result of a perfectly aligned quilt is well worth the extra effort and attention to detail.
4. Finishing and Caring for Your Quilt Garden of Light Masterpiece
The final phase of the Quilt Garden of Light – Pattern involves the three Bs: Batting, Backing, and Binding. Choosing a high-loft batting can give the “Garden” elements of your Quilt Garden of Light a quilted, 3D look, while a flat cotton batting keeps the quilt slim and modern. The pattern instructions will typically give you the required dimensions for the backing fabric, which should be slightly larger than the quilt top to allow for shrinkage during the quilting process.
Binding is the “frame” for your Quilt Garden of Light – Pattern. Many quilters choose a dark, solid binding to act as a definitive border for the Quilt Garden of Light, keeping the “light” contained within the design. However, a “scrappy binding” made from the leftover fabrics of the pattern can also provide a charming, eclectic finish. Make sure your binding is doubled-fold for durability, as the edges of the quilt see the most wear.
Once your Quilt Garden of Light – Pattern is fully bound and finished, it is time for the final reveal. Before using it, give the Quilt Garden of Light a gentle wash with a “color catcher” sheet. This will remove any remaining starch or markings and will give the quilt that classic, crinkly look that makes handmade items so cozy. The pattern truly comes to life after this first wash, as the fibers relax and the textures become more prominent.
Displaying your Quilt Garden of Light is a joy in itself. Because of the “Light” aspect of the pattern, this quilt looks particularly stunning when draped over a chair near a window or hung on a wall where it can catch the natural light. The Quilt Garden of Light – Pattern is designed to be a conversation starter, and its intricate details will invite people to come closer and examine the craftsmanship and the clever use of color and value.
Maintenance of your Quilt Garden of Light is simple but important. Store the quilt in a cool, dry place, and avoid leaving it in direct, harsh sunlight for extended periods, as this can fade the vibrant fabrics that the Quilt Garden of Light – Pattern relies on. If you are storing it for a long time, fold it with acid-free tissue paper to prevent permanent creases from forming in the Quilt Garden of Light‘s delicate fibers.
The Quilt Garden of Light – Pattern is more than just a project; it’s a legacy piece. Whether you pass it down through generations or donate it to a charity auction, the time and skill invested in following the pattern will be evident to everyone who sees it. The Quilt Garden of Light stands as a testament to your growth as a maker, combining the beauty of nature with the precision of geometry in a way that truly glows with personal pride.
Frequently Asked Questions (FAQ)
Is the Quilt Garden of Light – Pattern suitable for total beginners?
While a dedicated beginner could complete the Quilt Garden of Light – Pattern, it is generally recommended for those who have a few basic quilts under their belt. The pattern involves precise angles and color value management that can be challenging for a first-time sewer.
How much fabric do I need for a standard-size Quilt Garden of Light?
The exact yardage depends on the size of the quilt (Lap, Queen, King), but generally, the Quilt Garden of Light – Pattern requires about 8 to 12 yards of various fabrics. Always refer to the specific pattern instructions for the exact fabric requirements before shopping.
Can I use scraps for the Quilt Garden of Light – Pattern?
Yes! A “scrappy” Quilt Garden of Light can be beautiful. However, to maintain the “Light” effect, you must still organize your scraps by value (light vs. dark) so that the central glow of the pattern is preserved.
What is the best thread to use for this pattern?
A 50-weight cotton thread is the industry standard for the Quilt Garden of Light – Pattern. It is strong enough to hold the seams together but thin enough to not add bulk, which is crucial for the many intersections in the Quilt Garden of Light.
How long does it take to finish the Quilt Garden of Light – Pattern?
For an average quilter, the Quilt Garden of Light – Pattern might take anywhere from 40 to 80 hours from cutting to binding. It is a detailed project that is best enjoyed at a steady, unhurried pace.
Do I need a special sewing machine for the Quilt Garden of Light?
No, any standard sewing machine that can produce a straight stitch will work for the Quilt Garden of Light – Pattern. However, a “walking foot” or an “even feed foot” is highly recommended for the final quilting stage to prevent the layers from shifting.
Conclusion
The Quilt Garden of Light – Pattern is a masterful blend of artistry and technical skill, offering quilters a unique way to explore the relationship between color, value, and light. In this article, we have covered the essential stages of creation, from selecting a high-contrast fabric palette to the technical precision required during cutting and the advanced sewing techniques needed to ensure a flat, professional finish for your Quilt Garden of Light.
We also discussed how to care for your finished pattern to ensure it remains a beautiful part of your home for years to come. By following these steps and respecting the intricate details of the Quilt Garden of Light – Pattern, you will create a textile piece that truly radiates warmth and beauty.