The Quilt Tumbling Block – Pattern is one of the most fascinating and timeless designs in the world of quilting. Its three-dimensional look creates an optical illusion that gives any quilt an impressive and sophisticated appearance. This pattern, also known as the “baby blocks” design, dates back to the 1800s but continues to inspire modern quilters because of its elegance and versatility. The geometric nature of this pattern makes it a true classic that blends both tradition and artistry in one creation.
Making a Quilt Tumbling Block – Pattern may seem complex at first glance, but it is actually an achievable project for quilters of different experience levels. With careful fabric selection and precise cutting, the result is a striking block that looks like cubes tumbling across the surface of the quilt. The illusion of depth comes from the combination of light, medium, and dark fabrics arranged in a specific order to create a 3D effect.
This pattern is a perfect choice for those who appreciate the mathematical beauty of quilting. It demonstrates how color placement and geometry can come together to form visual harmony. Whether you are creating a full quilt, a wall hanging, or a single block as a decorative element, the Quilt Tumbling Block – Pattern will always capture attention and admiration.
1. Understanding the Quilt Tumbling Block – Pattern
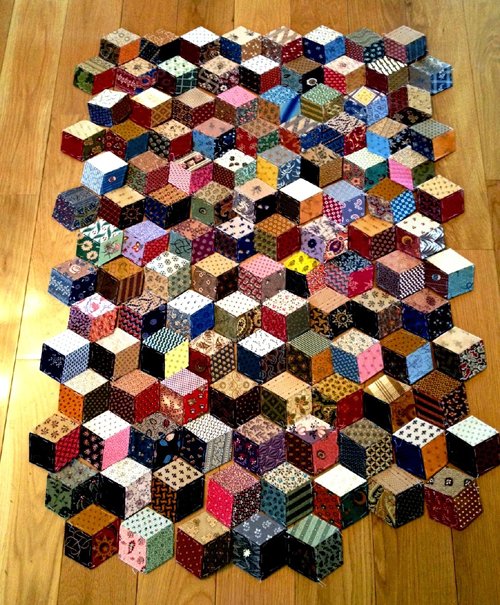
The Quilt Tumbling Block – Pattern is based on a simple geometric principle that creates the illusion of cubes stacked together. Each block is formed from three diamond-shaped pieces, which, when sewn together with precise color placement, form a three-dimensional cube. The pattern looks intricate, but it is built from a repeated arrangement of these simple shapes.
To achieve the best effect, the three diamonds in each cube should be made using light, medium, and dark shades of the same color. This variation in tone gives the illusion of light hitting the cube from one side and casting shadows on the other. The result is a visually dynamic quilt that seems to move as you look at it.
This pattern is not only visually striking but also deeply traditional. The Quilt Tumbling Block – Pattern has been part of quilting history for centuries, used by artisans to showcase precision and creativity. It was especially popular in the Victorian era and has since remained a beloved design among quilters around the world.
Modern quilters love this pattern because of its endless customization possibilities. By changing color combinations or block sizes, you can create completely different moods and effects—from soft and subtle to bold and modern.
The tumbling block design also teaches essential quilting skills, including accurate cutting, piecing, and color value understanding. Working with this pattern helps quilters improve their technical precision while producing something artistically stunning.
Ultimately, the Quilt Tumbling Block – Pattern stands out as a perfect blend of tradition, geometry, and creativity. It’s a timeless choice that continues to evolve with each new generation of quilters.
2. Materials and Tools Needed
To start your Quilt Tumbling Block – Pattern, you’ll need the right materials and tools to ensure clean, professional results. Preparation is key, as precision plays a major role in the success of this geometric design.
Begin with fabric selection. Choose three shades of the same color family—light, medium, and dark—for each set of cubes. For example, light blue, medium blue, and navy create a classic look. You can also experiment with contrasting colors for a more playful or modern aesthetic.
The fabric type should ideally be 100% cotton quilting fabric. Cotton is easy to cut, sew, and press, which ensures sharp, clean lines—essential for this pattern. Make sure to prewash your fabric to prevent shrinkage later.
For tools, you’ll need a rotary cutter, quilting ruler, and cutting mat to achieve precise diamond shapes. A 60-degree ruler is especially useful for cutting the diamonds accurately. Having a reliable sewing machine with a consistent stitch length is also crucial for neat seams.
Thread color should complement your fabric shades but remain neutral enough not to distract from the design. A medium gray or beige thread usually works well for most color schemes.
Lastly, you’ll need an iron for pressing seams, pins or fabric clips for securing pieces, and optionally, a design wall or large surface to arrange your blocks before sewing. Being able to visualize the layout helps you see how the light, medium, and dark shades interact to form the 3D illusion.
3. Step-by-Step Guide to Making the Quilt Tumbling Block – Pattern
Creating a Quilt Tumbling Block – Pattern involves careful cutting, piecing, and attention to detail. Here’s how to make your own stunning block from start to finish.
Step 1: Cut the Diamonds
Using your 60-degree ruler, cut fabric strips of equal width, then sub-cut them into diamonds. Each block requires three diamonds—one light, one medium, and one dark shade. Keep your cuts consistent for perfect alignment later.
Step 2: Arrange the Colors
Lay out your three diamonds in a way that forms a cube. The light piece should represent the top of the cube, the medium shade one side, and the dark piece the shadowed side. Take a moment to ensure that the tones transition smoothly.
Step 3: Sew the Diamonds Together
Join two diamonds along one edge with a ¼-inch seam allowance. Press the seam open or to one side, then attach the third diamond to complete the cube shape. Accuracy here is crucial for maintaining the 3D illusion.
Step 4: Assemble the Blocks
Repeat the process to make multiple blocks. Arrange them on a flat surface to see how they fit together. The cubes should appear to “tumble” across the quilt as the pattern grows.
Step 5: Join Rows and Columns
Sew the blocks together row by row, matching points carefully at each intersection. Consistent seam allowance and pressing are key to achieving a clean, professional look.
Step 6: Add Borders and Finish
Once your main quilt top is assembled, add borders, batting, and backing fabric. Quilt through all layers using straight-line or free-motion stitching to enhance the 3D texture of your Quilt Tumbling Block – Pattern.
4. Creative Ideas and Modern Variations
The Quilt Tumbling Block – Pattern offers endless room for creativity. You can experiment with colors, layouts, and textures to give your quilt a unique twist while maintaining the traditional essence of the design.
One creative approach is to use gradient fabrics that shift gradually from light to dark. This technique enhances the cube effect and gives your quilt a more fluid, modern look.
You can also use patterned fabrics instead of solids for added visual interest. Florals, stripes, or abstract prints can bring depth and movement to the tumbling blocks. Just ensure that the prints don’t overpower the cube illusion.
Another idea is to create color mosaics by alternating different color sets throughout the quilt. For example, using blue, red, and yellow cube sets in different sections can produce a vibrant, eye-catching design.
If you prefer a minimalist approach, stick to monochrome tones such as black, gray, and white. This gives your Quilt Tumbling Block – Pattern a sleek, modern aesthetic that fits contemporary décor.
Finally, you can vary the block size to create dynamic visual effects. Larger blocks make bold statements, while smaller ones give a more intricate, delicate appearance. No matter the choice, each quilt tells a unique story through its colors and geometry.
FAQ – Quilt Tumbling Block – Pattern
1. Is the Quilt Tumbling Block – Pattern suitable for beginners?
Yes. While it looks advanced, the pattern is achievable for beginners who practice accurate cutting and consistent seam allowances.
2. What is the best fabric for this pattern?
100% cotton quilting fabric is ideal due to its stability, ease of sewing, and ability to hold shape well.
3. How can I make the 3D illusion more realistic?
Use distinct light, medium, and dark shades of the same color. The contrast between these values creates depth and realism.
4. Can I make this pattern using scraps?
Absolutely. The Quilt Tumbling Block – Pattern is perfect for using up fabric scraps, as long as you group them by color value.
5. What quilting techniques work best for finishing?
Straight-line quilting enhances the geometric look, while free-motion designs add artistic texture to the final quilt.
6. How do I keep points aligned when sewing blocks?
Pin carefully at intersections and use a ¼-inch seam allowance. Press seams consistently after each row to keep the layout neat.
Conclusion
The Quilt Tumbling Block – Pattern is a timeless quilting design that beautifully combines geometry, creativity, and craftsmanship. Its 3D illusion continues to captivate quilters and art lovers alike. With thoughtful color selection, precise piecing, and attention to detail, anyone can master this classic pattern and create something truly remarkable.
This guide has covered everything you need to know—from understanding the pattern’s structure to exploring creative variations. Whether you’re making a traditional quilt or experimenting with modern colors, the tumbling block design remains a stunning choice for any project.
If you enjoyed learning about this pattern, please leave your honest opinion and suggestions below. Share your experience and how you personalized your Quilt Tumbling Block – Pattern—your insight might inspire other quilters to try this classic design and make it their own.