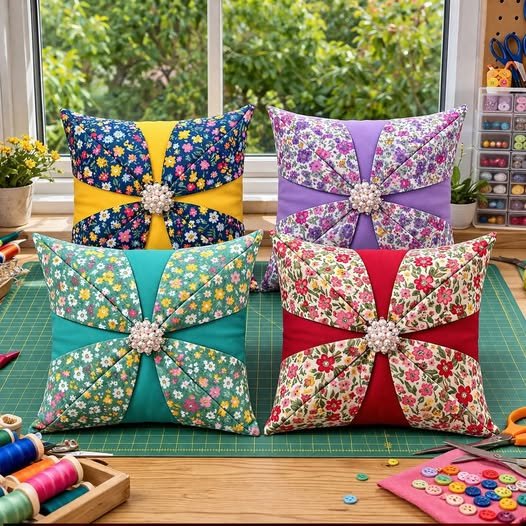
This Quilted Floral Pillow – Tutorial will guide you through the rewarding process of blending delicate botanical aesthetics with the timeless art of quilting to create a stunning piece of home decor. Making a quilted floral pillow is more than just a sewing task; it is a way to infuse your living space with a touch of handmade elegance and personal charm. Whether you are a seasoned quilter or a beginner looking for a creative outlet, this project offers the perfect balance of technical skill and artistic expression.
By following this Quilted Floral Pillow – Tutorial, you will learn how to select the right fabrics and master the precision needed for beautiful patchwork designs. Floral patterns bring a sense of nature and softness to any room, making these pillows excellent gifts or accent pieces for your sofa. We will focus on high-quality construction methods to ensure your finished project is not only beautiful but also durable enough to withstand daily use.
In the world of handmade textiles, the Quilted Floral Pillow – Tutorial stands out because it allows for endless customization. You can choose vibrant, modern florals for a bold look or soft, vintage prints for a farmhouse feel. Throughout this guide, we will explore the essential tools and steps required to transform simple fabric scraps into a professional-looking quilted cushion cover that looks like it came straight from a high-end boutique.
1. Selecting the Perfect Materials for Your Quilted Floral Pillow
The foundation of a successful Quilted Floral Pillow – Tutorial begins with your fabric selection. For a truly professional finish, opt for 100% cotton quilting fabric as it is easy to handle and maintains its shape well under the sewing machine. Look for a mix of large-scale floral prints and smaller supporting patterns to create visual depth in your quilted design.
You will also need a high-quality cotton batting or fleece to provide that signature quilted texture. This middle layer is what gives your floral pillow its loft and softness. Choosing a lightweight batting ensures the pillow remains comfortable while still highlighting the intricate quilting stitches you will add later.
Don’t forget the importance of your thread choice. A 50wt cotton thread is often recommended for patchwork and quilting because it is strong but thin enough to allow seams to lay flat. Matching the thread color to the background of your floral print helps the stitches blend in, or you can choose a contrasting color to make the quilting pattern pop.
Essential tools are the backbone of any sewing tutorial. Ensure you have a rotary cutter, an acrylic ruler, and a self-healing cutting mat. These tools allow for the precise geometric cuts necessary for a clean quilted pillow cover. Accuracy in the cutting stage makes the assembly process much smoother and more enjoyable.
For the backing of your pillow, consider using a sturdy linen blend or a coordinating solid cotton. An envelope-style closure is a popular choice for this Quilted Floral Pillow – Tutorial because it eliminates the need for zippers while providing a clean, finished look. This makes the pillow cover easy to remove and wash when needed.
Finally, gather your basic sewing notions like fine glass-head pins, fabric shears, and a disappearing ink fabric marker. Having everything organized before you start your floral quilting project will help you maintain a steady creative flow. Preparation is the secret ingredient to a masterpiece in the world of textile arts.
2. Cutting and Preparing Your Floral Fabric Pieces
Precision is the most critical element when you start the cutting phase of this Quilted Floral Pillow – Tutorial. To begin, you will need to cut your main floral motifs into specific squares or rectangles based on your desired layout. Using a fussy cutting technique allows you to center a specific flower within a square, making the floral design the focal point of each block.
Once your focal pieces are ready, cut your background fabric and accent strips. Consistent seam allowances are vital, so most quilters rely on a standard 1/4 inch seam allowance. Keeping your cuts straight and your measurements exact will ensure that all the pieces of your quilted floral pillow fit together perfectly like a puzzle.
Organization is key during this step of the Quilted Floral Pillow – Tutorial. Lay out your cut pieces on a design wall or a flat table to visualize the final arrangement. This allows you to balance the colors and patterns, ensuring that no two identical floral prints are touching, which creates a more professional and harmonious patchwork layout.
After you are satisfied with the layout, it is time to prepare the “quilt sandwich.” This involves layering the pillow front fabric, the batting, and a scrap piece of muslin for the back. Use curved safety pins or a temporary spray adhesive to baste these layers together. Proper basting prevents the fabric from shifting while you are performing the quilted stitching.
Marking your quilting lines is a helpful step for beginners. You can use a Hera marker or a fabric pencil to draw a grid or follow the lines of the floral pattern. This guidance ensures that your decorative stitching remains straight and even, which is a hallmark of a high-quality handmade quilted pillow.
Before you head to the sewing machine, double-check your measurements one last time. It is much easier to recut a small piece of floral fabric now than to try to fix a misaligned seam later. Taking your time during the preparation phase of the Quilted Floral Pillow – Tutorial will result in a much more polished and satisfying final product.
3. Stitching the Patchwork and Quilting the Design
Now we move into the heart of the Quilted Floral Pillow – Tutorial: the assembly. Start by sewing your fabric pieces into rows using a straight stitch. Press your seams carefully with a hot iron. In quilting, “pressing” is different from “ironing”; you should press the iron down and lift it up to avoid stretching the cotton fabric out of shape.
Once your rows are assembled, sew the rows together to complete the pillow top. This is where your floral patchwork truly begins to take shape. Ensure that the corners of your squares line up perfectly by pinning at every intersection. A well-aligned quilted block is a sign of great craftsmanship.
After the top is finished, it is time for the actual quilting. This Quilted Floral Pillow – Tutorial recommends a “stitch in the ditch” method or a simple diagonal grid. These techniques secure the layers together and add that beautiful quilted dimension to your floral design. The texture created by the stitches makes the floral motifs appear to lift off the fabric.
If you are feeling adventurous, you can try free-motion quilting. This allows you to “draw” with your sewing machine, following the curves of the flowers in your floral print fabric. This adds a custom, artistic touch to your quilted pillow that cannot be replicated by a factory machine.
During the quilting process, always work from the center of the pillow outward. This technique pushes any excess fabric or bubbles toward the edges, where they can be trimmed away later. Maintaining a consistent stitch length will give your Quilted Floral Pillow – Tutorial project a high-end, professional appearance.
Once the quilting is complete, trim the edges of your “quilt sandwich” so they are perfectly square. This process, known as squaring up, is essential for ensuring your pillow cover fits your pillow form correctly. A sharp rotary cutter and a large square ruler are the best tools for this task.
4. Finishing the Edges and Assembling the Pillow Cover
The final stage of the Quilted Floral Pillow – Tutorial involves turning your quilted panel into a functional cover. For the back of the pillow, take your two rectangles of backing fabric and create a hem on one long edge of each. These will overlap to form the envelope closure, making it easy to insert a pillow form.
Place your quilted floral front piece face up on your workspace. Then, lay the two backing pieces face down on top of it, ensuring the hemmed edges overlap in the middle. Pin the layers securely around all four sides. This construction method hides all the raw edges inside the pillow for a clean finish.
Sew around the entire perimeter of the square using a reinforced stitch. It is a good idea to backstitch over the areas where the backing fabric overlaps, as these spots will experience the most stress when you are putting the pillow insert inside. A strong seam ensures your quilted floral pillow lasts for years.
Clip the corners of the fabric diagonally, being careful not to cut through the stitching. This removes bulk and allows you to achieve sharp, crisp corners when you turn the pillow cover right side out. Use a dull tool, like a chopstick or a point turner, to gently push the corners out.
Give the entire cover a final press with your iron. This sets the seams and makes the quilted texture look its best. Now, simply slide your pillow form through the envelope opening. You will see how the floral patterns and the quilting work together to create a beautiful, tactile piece of art.
Congratulations on completing this Quilted Floral Pillow – Tutorial! You now have a unique, handcrafted home accessory that showcases your sewing skills. Whether you keep it for yourself or give it as a thoughtful gift, this quilted floral project is a testament to the beauty of handmade crafts.
FAQ – Frequently Asked Questions
What size pillow form should I use for this tutorial?
Most standard quilted pillows are designed for an 18×18 inch or 20×20 inch form. It is often recommended to make your cover the same size as the form for a plump, professional look, or 1/2 inch smaller if you prefer a very firm feel.
Can I wash my quilted floral pillow?
Yes! Because we used 100% cotton fabric and quality batting, you can wash the cover. Turn it inside out and use a cold, gentle cycle. Air drying is best to preserve the integrity of the quilting stitches and the vibrancy of the floral prints.
Do I need a special sewing machine for quilting?
No, a standard domestic sewing machine is perfectly fine for this Quilted Floral Pillow – Tutorial. A walking foot is highly recommended, however, as it helps feed all the layers of the quilt sandwich through the machine evenly.
What is the best batting to use for a pillow?
A low-loft cotton or bamboo batting is ideal. It provides enough definition for the quilted design without making the pillow too stiff or bulky to sew.
How do I choose coordinating floral fabrics?
Try to find a “hero” print (the main floral) and then pull colors from that print for your secondary fabrics. Mixing a large floral with a geometric print or a small polka dot creates a balanced patchwork aesthetic.
Conclusion
In this Quilted Floral Pillow – Tutorial, we have covered everything from selecting high-quality cotton fabrics to the final assembly of an envelope-style cover.
You have learned the importance of precision cutting, the art of creating a quilt sandwich, and the techniques required to add beautiful quilted textures to your favorite floral prints. This project is an excellent way to practice your sewing skills while creating something functional and decorative for your home.