The Rabbit Pillow – Pattern is an enchanting DIY project that brings a touch of whimsy and handcrafted comfort to any nursery, bedroom, or cozy reading nook. Creating a plush companion using a specialized Rabbit Pillow – Pattern allows crafters to move beyond generic store-bought decor and venture into the world of personalized textile art. This specific pattern is designed to be both functional as a supportive cushion and adorable as a decorative accent, making it a favorite for those who enjoy sewing for children or creating heartfelt handmade gifts.
Working with a Rabbit Pillow – Pattern offers a unique opportunity to experiment with various textures and fabric types, from soft minky and faux fur to classic breathable cotton. The architecture of a Rabbit Pillow – Pattern typically involves a central cushioned body and distinctive long ears, which provide the iconic silhouette of a bunny. Because the Rabbit Pillow – Pattern is versatile, it can be scaled up for a large floor lounger or scaled down for a travel-sized neck pillow, proving that a single well-designed template can serve multiple purposes in a modern home.
In this extensive guide, we will explore the essential steps to successfully executing a Rabbit Pillow – Pattern, ensuring that your finished product is safe, durable, and aesthetically pleasing. We will focus on the technical definition of the Rabbit Pillow, which is the final three-dimensional stuffed object, and the Pattern, which represents the two-dimensional blueprint and instructional sequence. By following these professional sewing and drafting techniques, you will transform basic raw materials into a high-quality Rabbit Pillow – Pattern masterpiece that stands the test of time and frequent snuggles.
1. Choosing the Best Fabrics for Your Rabbit Pillow – Pattern
The primary consideration when starting your Rabbit Pillow – Pattern is the tactile quality of the exterior fabric. Since this item is intended for lounging or sleeping, selecting a high-quality natural fiber or a premium synthetic plush is essential for long-term comfort. Many creators prefer using flannel or organic cotton for the main body of the Rabbit Pillow – Pattern because these materials are gentle on the skin and easy to maintain through regular washing cycles.
If you want a more luxurious feel for your Rabbit Pillow – Pattern, consider using minky fabric or short-pile faux fur. These materials mimic the softness of a real bunny, adding a sensory layer to the Rabbit Pillow that children especially love. However, keep in mind that these fabrics can be slippery during the sewing process, so your Rabbit Pillow – Pattern instructions might suggest using extra pins or a walking foot on your sewing machine to keep the layers aligned perfectly.
The interior of the ears in a Rabbit Pillow – Pattern provides an excellent opportunity for “fussy cutting” or using contrasting prints. You can use a floral liberty print or a geometric cotton to line the ears, creating a visual pop against the solid color of the head. This design choice is a hallmark of a professional Rabbit Pillow – Pattern, as it adds character and a “designer” look to the finished cushion that distinguishes it from mass-produced items.
Safety is paramount, especially if the Rabbit Pillow – Pattern is intended for a toddler or infant. Always ensure that the fabrics you choose are colorfast and non-toxic. Avoid using fabrics with loose glitter or sequins that could detach and become a choking hazard. A well-constructed Rabbit Pillow – Pattern prioritizes the health of the user by recommending materials that do not shed fibers excessively, ensuring a clean and safe environment for rest.
Durability should also be a factor in your material selection for the Rabbit Pillow – Pattern. Because pillows are often tossed around or used for pillow fights, a medium-weight woven fabric is often better for the structural parts than a thin jersey knit. If you do choose a stretchy fabric for your Rabbit Pillow – Pattern, consider applying a lightweight fusible interfacing to the back to prevent the pillow from losing its shape or becoming “lumpy” once the stuffing is added.
Finally, consider the environmental impact of your Rabbit Pillow – Pattern project. Using upcycled fabrics from old sweaters or high-quality linens can give your pillow a rustic, eco-friendly charm. Many modern Rabbit Pillow – Pattern enthusiasts are turning to sustainable hemp or bamboo blends, which offer natural antibacterial properties. Regardless of the textile you choose, pre-washing is a vital step in the Rabbit Pillow – Pattern workflow to prevent future shrinkage after the item is fully assembled.
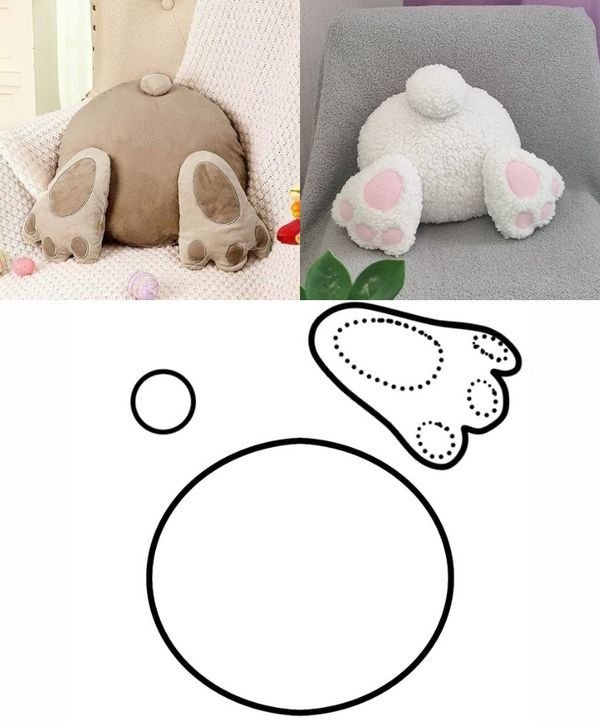
2. Mastering the Anatomy and Drafting of the Pattern
The Pattern itself is a collection of geometric shapes that must be cut with precision to ensure the Rabbit Pillow looks symmetrical. A standard Rabbit Pillow – Pattern consists of two main body pieces (front and back), four ear pieces (two outer and two inner), and sometimes a separate gusset for a deeper, boxier shape. Understanding how these pieces fit together is the first step in translating the flat Pattern into a voluminous, huggable form.
When drafting or printing your Rabbit Pillow – Pattern, always verify the scale and seam allowances. A common mistake is forgetting that the finished Rabbit Pillow will be slightly smaller than the paper template once the seams are sewn. Most professional Rabbit Pillow – Pattern designs include a 1/2 inch or 5/8 inch seam allowance, which provides enough “bite” for the fabric to hold together securely even under the pressure of dense stuffing.
The placement of the ears is the most critical technical detail in a Rabbit Pillow – Pattern. The template should have specific “notches” or markings indicating exactly where the ears should be sandwiched between the front and back body pieces. If the ears are placed too high, the Rabbit Pillow – Pattern looks like a cat; if they are too low, it loses its bunny-like charm. Following these markers precisely is what gives the Rabbit Pillow its personality.
Another technical aspect of the Rabbit Pillow – Pattern is the “opening for turning.” This is a 3-to-4-inch gap left unsewn, usually at the bottom or side of the pillow. The Pattern instructions will advise you to backstitch heavily at the start and end of this gap to prevent the seams from ripping when you turn the heavy fabric right-side out. This small detail is essential for a clean, professional-looking Rabbit Pillow – Pattern result.
If you are designing your own Rabbit Pillow – Pattern, remember the rule of curves. Sharp, tight curves on the ears or the chin of the bunny require clipping and notching after sewing. This technical step, which should be outlined in any good Rabbit Pillow – Pattern, allows the fabric to spread or fold neatly inside the seam, preventing the edges from looking “bumpy” or distorted once the pillow is stuffed and finished.
Lastly, consider the “grain line” of the fabric as indicated on your Rabbit Pillow – Pattern. Cutting the pieces on the straight grain ensures that the pillow doesn’t twist or skew over time. If you ignore the grain line markings on the Pattern, your Rabbit Pillow might end up looking tilted or asymmetrical after a few weeks of use. Precision in the drafting and cutting phase is the secret to a high-end Rabbit Pillow – Pattern outcome.
3. Sewing Techniques and Assembly for the Rabbit Pillow
Assembly begins by preparing the ears of the Rabbit Pillow – Pattern. You will sew the inner and outer ear pieces together, turn them right-side out, and give them a crisp press with a steam iron. Some Rabbit Pillow – Pattern variations suggest adding a layer of crinkle paper or quilt batting inside the ears to give them a distinct texture or a gentle “flop” that adds to the sensory appeal of the final Rabbit Pillow.
Once the ears are ready, they are basted onto the front body piece of the Rabbit Pillow – Pattern, pointing downward toward the center of the face. This “sandwich” method is a classic sewing technique. You then place the back body piece on top, right sides together, and sew around the entire perimeter, leaving only the designated gap. This stage of the Rabbit Pillow – Pattern requires a heavy-duty needle if you are working with thick fabrics like fleece or denim.
After sewing, the moment of truth in the Rabbit Pillow – Pattern process is “the turn.” Carefully pull the fabric through the opening to reveal the right side. Use a point turner or a blunt knitting needle to gently push out the curves of the ears and the rounded edges of the head. Taking your time during this step of the Rabbit Pillow – Pattern ensures that the silhouette matches the original design and that no fabric is caught in the seams.
The next step is “stuffing” the Rabbit Pillow – Pattern. For a professional finish, use premium polyester fiberfill or shredded memory foam. The trick is to use small clumps of stuffing at a time, pushing them into the furthest corners of the ears and head first. If you add too much stuffing at once, your Rabbit Pillow – Pattern will look lumpy; small, consistent additions create a smooth, firm surface that is comfortable for leaning against.
Closing the opening is the final sewing task in the Rabbit Pillow – Pattern. While you can use a sewing machine, a hand-sewn “ladder stitch” or “invisible stitch” is the preferred method for a high-quality finish. This technique hides the thread completely, making the Rabbit Pillow look seamless and store-bought. A well-executed closure is the hallmark of a crafter who has mastered the technical requirements of a Rabbit Pillow – Pattern.
If your Rabbit Pillow – Pattern includes facial features like eyes or a nose, these should ideally be applied before the final assembly. Embroidery or felt appliqué are the safest options for a children’s pillow. However, if the pillow is for an adult, you might choose to use safety eyes or decorative buttons. Regardless of the style, ensuring these features are centered according to the Rabbit Pillow – Pattern template is vital for the bunny’s overall expression and symmetry.
4. Maintenance and Creative Variations for your Pillow
To keep your Rabbit Pillow – Pattern project looking new, proper care is essential. If you used washable cottons and polyester fill, you can usually spot clean or machine wash the pillow on a gentle cycle inside a pillowcase. However, if your Rabbit Pillow – Pattern includes delicate fabrics like silk or wool, hand washing is a must. Regular “fluffing” helps the stuffing redistribute, maintaining the iconic shape defined by the Pattern.
One of the best things about a Rabbit Pillow – Pattern is its adaptability. You can create a “Seasonal Bunny” by changing the fabrics to match the time of year—think velvets for winter or light linens for spring. You can also modify the Pattern by adding a small pocket on the back, turning the Rabbit Pillow into a “Tooth Fairy” pillow where children can leave their lost teeth for a magical surprise.
For a more modern aesthetic, you can simplify the Rabbit Pillow – Pattern by using a monochromatic color scheme. A minimalist gray or cream linen bunny with no facial features can look very sophisticated in a contemporary living room. This “Scandi-style” approach to the Rabbit Pillow – Pattern focuses on the silhouette and the quality of the fabric rather than the cuteness of the animal, making it a versatile decor piece.
If you have leftover scraps from your Rabbit Pillow – Pattern, consider making matching “mini-bunnies.” You can shrink the Pattern by 50% on a photocopier and create small ornaments or keychain charms. This is a great way to reduce waste and create a coordinated set of gifts. Using the same fabrics as the large Rabbit Pillow – Pattern creates a cohesive look that is visually satisfying and professionally curated.
Gift-giving is a major motivation for many who use a Rabbit Pillow – Pattern. You can personalize the pillow by embroidering a name or birth date onto the bunny’s ear. This turns a simple Rabbit Pillow into a cherished heirloom. When people see the level of detail and the custom fit of the Pattern, they will appreciate the time and effort that went into creating such a unique, handcrafted item.
Finally, remember that the Rabbit Pillow – Pattern is a living document. Don’t be afraid to make notes on your paper template about what worked and what didn’t. Perhaps you want the ears to be longer next time, or you found that a certain stitch length worked better for your fabric. By treating the Rabbit Pillow – Pattern as a starting point for your own creativity, you will continue to grow as a maker and produce even more beautiful work in the future.
Frequently Asked Questions (FAQ)
What is the best stuffing for a Rabbit Pillow – Pattern?
High-quality polyester fiberfill is the most common choice because it is hypoallergenic, washable, and retains its loft well. For a heavier, more “weighted” feel, some crafters use a mix of fiberfill and clean plastic pellets in the base of the Rabbit Pillow to help it sit upright.
Can I sew a Rabbit Pillow – Pattern by hand?
Yes, it is entirely possible to sew a Rabbit Pillow – Pattern by hand using a backstitch for the seams. While it will take significantly longer than using a machine, hand-sewing allows for great precision, especially around the tight curves of the ears.
Is a Rabbit Pillow – Pattern suitable for beginners?
Absolutely. Because the shapes are relatively large and the assembly logic is straightforward, a Rabbit Pillow – Pattern is an excellent project for someone new to sewing. It teaches fundamental skills like sewing curves, turning, and stuffing.
How much fabric do I need for a standard Rabbit Pillow?
Usually, 1/2 yard to 3/4 yard of main fabric is sufficient for a standard-sized Rabbit Pillow – Pattern. You will also need a small scrap (about 1/4 yard) of contrasting fabric if you choose to line the ears with a different print.
How do I make the ears stand up in the Rabbit Pillow – Pattern?
To make the ears stand upright, you can insert a layer of stiff craft foam or heavy-duty interfacing inside them. Some Rabbit Pillow – Pattern designs also use a thin, plastic-coated wire for “posable” ears, though this is not recommended for toys intended for very young children.
Can I sell items made from this Rabbit Pillow – Pattern?
This depends on the specific licensing of the Pattern you are using. Many designers allow you to sell finished products on a small scale (like at craft fairs), but they usually prohibit the resale or distribution of the digital or paper Rabbit Pillow – Pattern itself.
Conclusion
In summary, the Rabbit Pillow – Pattern is a delightful project that combines the technical challenges of sewing with the joy of creating something truly cuddly. We have explored the importance of selecting soft, durable fabrics, the technicalities of drafting a precise Pattern, and the essential assembly steps—from sewing the ears to the final invisible stitch.
By following this guide, you can create a Rabbit Pillow that is not only a beautiful decorative piece but also a durable companion for years to come. The versatility of the Rabbit Pillow – Pattern ensures that you can customize it for any age or decor style, making it a staple in your sewing repertoire. We hope you enjoyed this tutorial and feel inspired to start your own project. Please leave your sincere opinion and any suggestions for new patterns you would like to see in the comments below!