The Railroad Quilt Block Pattern is a classic design that has captivated quilters for generations.
Known for its simple yet striking geometry, this pattern consists of alternating stripes, giving the illusion of railroad tracks when stitched together.
It’s a favorite among quilting enthusiasts because it offers both versatility and elegance. Whether you’re a beginner or a seasoned quilter, the Railroad Quilt Block Pattern is an excellent choice for your next project.
Creating a quilt using the Railroad Block pattern is not just about following a set of instructions. It’s an opportunity to engage with a craft that has deep historical roots while allowing you to express your creativity. This pattern can be customized in countless ways, depending on the fabric choices and the size of the quilt you want to make. By understanding the key elements of the Railroad Quilt Block Pattern, you can create a beautiful and meaningful quilt.
In this article, we will take you through the essential steps of creating a Railroad Quilt Block Pattern, from selecting your fabrics to assembling your blocks and putting the final quilt together. Along the way, we’ll highlight some tips and techniques to ensure that your quilt turns out just the way you envision. Let’s dive in and explore how to bring the timeless Railroad Quilt Block Pattern to life!
1. What is a Railroad Quilt Block Pattern?
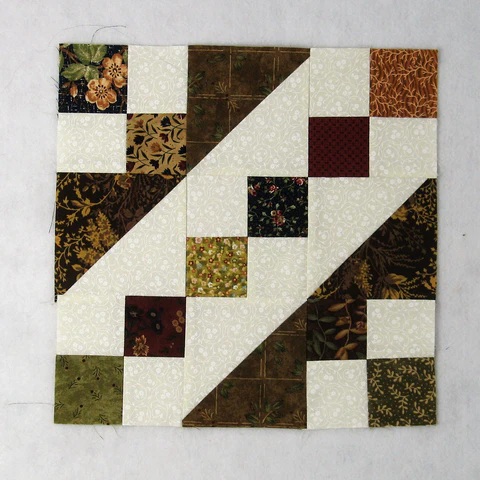
The Railroad Quilt Block Pattern is a traditional design characterized by a series of strips that resemble the parallel tracks of a railroad. This pattern can be constructed using squares, rectangles, and sometimes triangles, depending on the variation of the pattern. It’s a relatively simple block to create, which makes it ideal for beginners and intermediate quilters alike.
The design typically features strips of fabric arranged in parallel lines, which are then sewn together in a way that mimics the look of railroad tracks. These strips are often sewn in alternating directions or colors to create a visually appealing effect. The block can vary in size, but it usually maintains its characteristic appearance of long, linear sections of fabric.
One of the most appealing aspects of the Railroad Quilt Block Pattern is its versatility. It can be used to create large quilts, small wall hangings, or even table runners. The design can also be adapted to fit different themes and color schemes. Whether you’re aiming for a modern look or a more vintage feel, the Railroad Quilt Block Pattern offers endless possibilities.
The simplicity of the pattern means it can be easily customized with different fabrics and colors. You can experiment with solid colors, prints, or even fabric scraps to create unique designs that reflect your personal style. As you work through the pattern, you’ll quickly discover the joy of combining different fabrics to achieve a cohesive and striking quilt.
2. Choosing the Right Fabrics for Your Railroad Quilt Block Pattern
Choosing the right fabrics for your Railroad Quilt Block Pattern is one of the most important steps in creating a beautiful quilt. The fabric you choose will set the tone for the entire quilt, so it’s essential to pick colors and patterns that complement each other. Start by deciding on a color palette for your quilt. Traditional Railroad Quilt Block Patterns often use a mix of dark and light colors, creating a striking contrast.
Once you have your color palette, it’s time to select your fabrics. Consider using a mix of prints and solids to add visual interest to your quilt. Solid fabrics can help highlight the lines of the railroad tracks, while patterned fabrics can introduce texture and depth. Don’t be afraid to mix different types of fabric, such as cotton, linen, or flannel, to create a quilt with unique character.
Keep in mind the size of your quilt when selecting fabrics. If you’re making a large quilt, you may need to purchase more fabric to ensure you have enough to complete all the blocks. For smaller quilts or wall hangings, you can experiment with fabric scraps or smaller cuts. Be sure to prewash your fabrics before you start cutting to prevent shrinkage and ensure consistent results.
If you’re looking to add a touch of modernity to your Railroad Quilt Block Pattern, consider incorporating bold prints, geometric designs, or even novelty fabrics. The beauty of this pattern lies in its ability to adapt to any fabric choice, allowing you to create a quilt that feels both timeless and contemporary.
3. How to Assemble the Railroad Quilt Block Pattern
Assembling the Railroad Quilt Block Pattern requires precision and attention to detail. Begin by cutting your fabric strips according to the dimensions specified in the pattern. The strips should be of uniform width to ensure they align properly when sewn together. Using a rotary cutter and mat can make this step more efficient and precise.
Next, arrange your fabric strips in the desired pattern. You can follow the traditional method of alternating light and dark strips or experiment with different colors and textures to create a more personalized design. Once you have your strips in place, begin sewing them together, ensuring the seams are aligned perfectly. A quarter-inch seam allowance is standard for most quilting projects, so be sure to maintain consistency throughout the process.
After sewing your strips together, press the seams flat to eliminate any puckering. This step is crucial for ensuring the quilt lays flat when finished. Depending on your pattern, you may need to trim the edges of the blocks to ensure they are the correct size before joining them into rows.
Once your blocks are complete, it’s time to join them into a quilt top. Lay the blocks out in the desired arrangement and sew them together row by row. Take your time with this step to ensure the quilt top is even and the blocks align properly. Don’t forget to press the seams as you go to maintain the quilt’s smoothness.
4. Final Steps: Quilting and Binding Your Railroad Quilt
After assembling your quilt top, it’s time to move on to the final steps: quilting and binding. First, layer your quilt top with batting and a quilt backing fabric. Baste the layers together using pins, safety pins, or a basting spray to hold everything in place while you quilt.
You can quilt your Railroad Quilt Block Pattern by hand or machine, depending on your skill level and preferences. If you’re using a sewing machine, a walking foot can help feed the layers evenly through the machine. For hand quilting, use a quilting hoop to keep the fabric taut as you stitch. The quilting design can be as simple or as intricate as you like. Some quilters prefer to outline the railroad tracks, while others may choose to add additional stitching to create texture and visual interest.
Once the quilt is quilted, it’s time to add the binding. Cut strips of fabric to create a border around the quilt, and sew the strips together to form one continuous piece. Attach the binding to the quilt, folding the edges neatly as you go. This final touch adds a polished look to your quilt and helps to secure the layers together.
After attaching the binding, your quilt is ready to be enjoyed! Whether it’s displayed on a wall, draped over a bed, or given as a gift, the Railroad Quilt Block Pattern is sure to be a cherished creation.
FAQ: Frequently Asked Questions About Railroad Quilt Block Pattern
1. What is a Railroad Quilt Block Pattern?
A Railroad Quilt Block Pattern is a traditional quilt block design that uses parallel strips of fabric to create a visual effect resembling railroad tracks. It is simple to create and offers endless possibilities for customization.
2. How do I choose the right fabric for this quilt block pattern?
Choosing fabric for a Railroad Quilt Block Pattern involves selecting a color palette and mixing solid and patterned fabrics. You should consider the quilt’s size and ensure the fabrics work together visually.
3. Can I create a large quilt with the Railroad Quilt Block Pattern?
Yes, the Railroad Quilt Block Pattern is versatile and can be used to create quilts of any size, from small wall hangings to large bed quilts.
4. Is this pattern suitable for beginners?
Absolutely! The Railroad Quilt Block Pattern is an excellent choice for beginners due to its simple design and easy-to-follow construction steps.
5. What is the best way to press quilt seams?
Press seams flat using an iron. This helps to prevent puckering and ensures the quilt lays flat when finished.
Conclusion
In this article, we’ve explored the Railroad Quilt Block Pattern in detail, from choosing fabrics to assembling and quilting your blocks. This timeless pattern offers endless creative possibilities, allowing you to craft a quilt that reflects your personal style. Whether you’re a beginner or an experienced quilter, the Railroad Quilt Block Pattern is a great project to try.
We hope this guide has inspired you to start your next quilting project. We’d love to hear your thoughts and suggestions! Please feel free to share your experiences and leave a comment below.