Rosebud cushion – Pattern designs have become a cherished favorite among home décor enthusiasts and sewing hobbyists who appreciate delicate details and handcrafted charm. From the very first glance, the Rosebud cushion – Pattern captivates with its floral-inspired aesthetic, soft textures, and ability to elevate any living space. Whether placed on a sofa, armchair, or bedroom bench, this cushion adds a touch of elegance and personality that instantly warms the environment.
One of the reasons the Rosebud cushion – Pattern has gained so much popularity is its blend of visual beauty and beginner-friendly construction. Even if you are relatively new to sewing, this project offers an inviting way to explore shaping techniques, fabric layering, and decorative stitching. Meanwhile, seasoned creators enjoy the freedom to experiment with fabric combinations and design enhancements that make each cushion unique.
In today’s décor trends, where handmade items and cozy accents are highly valued, the Rosebud cushion – Pattern stands out as a perfect project for those seeking to add soft, floral charm to their home. Throughout this article, we will explore fabric selection, preparation, assembly techniques, decorative elements, maintenance, and more—all while maintaining SEO optimization and adherence to Google AdSense safety guidelines.
1. Understanding the Rosebud cushion – Pattern
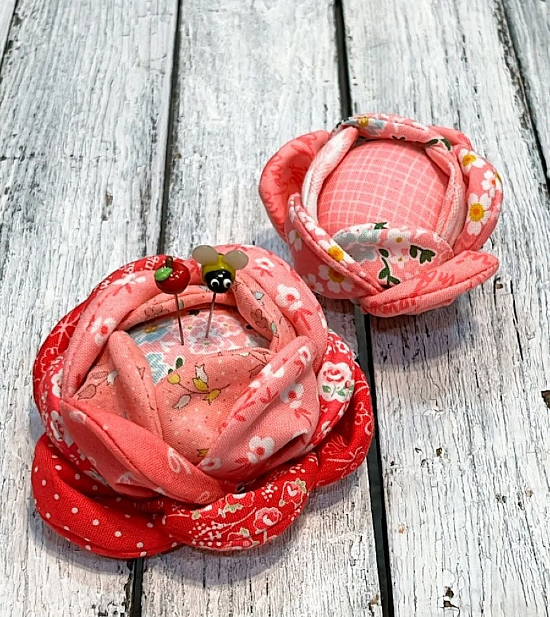
The Rosebud cushion – Pattern is inspired by the delicate appearance of rosebuds, featuring soft, layered shapes that mimic the natural folds of petals. This floral motif can be subtle or bold depending on the fabrics you choose, making the pattern suitable for both minimalist and decorative interiors.
One of the main appeals of this pattern is its three-dimensional effect. The layered fabric pieces create texture and depth, giving the cushion a plush, artistic feel. This makes it ideal for rooms where you want to introduce softness without relying on bold prints or heavy colors.
A key aspect of the design is its versatility. You can adapt the Rosebud cushion – Pattern to different sizes, shapes, and styles. Whether you prefer a round cushion, a square one, or a heart-shaped pillow, the rosebud embellishments can be customized to fit the form beautifully.
Another element that makes this pattern beginner-friendly is its straightforward construction. Many rosebud cushions use simple stitching techniques that allow new sewists to practice precision while avoiding overly complex steps. Yet, the finished product looks intricate and refined, making it rewarding for creators of all skill levels.
The floral theme of the pattern also opens the door for seasonal variations. Pastel colors work wonderfully in spring décor, while deep reds and pinks can complement romantic or festive settings. Neutral tones like cream or ivory make the cushion suitable for everyday elegance.
By understanding the visual and structural components of the Rosebud cushion – Pattern, you can better plan your project and create a piece that perfectly complements your home’s style.
2. Choosing the Best Fabrics and Materials
Choosing the right materials is crucial for achieving the soft, elegant effect that the Rosebud cushion – Pattern is known for. The first step is selecting fabrics that mimic the texture and appearance of flower petals. Common choices include cotton, linen blends, velvet, and satin, depending on the look you want to create.
Cotton is ideal for those seeking a lightweight, matte finish. It is easy to sew, durable, and machine-washable—perfect for cushions that will be used frequently. Linen blends offer a slightly textured look while remaining breathable and soft.
If you want a more luxurious finish, velvet or satin can give your cushion a rich, romantic tone. However, these fabrics require more careful handling during cutting and sewing, making them better suited for intermediate sewists.
Next, consider the cushion’s filling. Polyester fiberfill is the most common choice due to its affordability, lightweight nature, and ability to maintain shape. For a firmer cushion, foam inserts or cotton stuffing can also be used.
For the rosebud pieces themselves, fabric scraps or fat quarters work well. Using multiple shades within the same color family can enhance the dimensional effect and make each rosebud more lifelike. This is an excellent opportunity to repurpose leftover fabric from previous projects.
Finally, you will need basic notions such as thread, scissors, pins, and a sewing machine. Hand-sewing needles may also be necessary, especially for attaching decorative elements. Once all materials are gathered, you can begin shaping and preparing your cushion pieces with confidence.
3. Assembling the Rosebud Cushion
With your materials ready, the assembly process of the Rosebud cushion – Pattern begins with cutting the base pieces of the cushion. Measure carefully to ensure that your front and back panels match in size, as accurate cutting will help your cushion maintain a professional finish.
The next step involves creating the rosebud embellishments. These usually start with small circles or petal-shaped pieces that are folded, rolled, or layered to form the rosebud shape. Whether you opt for tightly wound buds or open-petal designs, each rosebud brings a unique charm to the cushion.
Once the rosebuds are formed, arrange them on the cushion front panel. This layout stage is essential because it ensures a balanced and aesthetically pleasing look. You may choose a clustered pattern, a scattered floral arrangement, or a central floral accent depending on your design preference.
After finalizing the placement, attach the rosebuds using either hand-stitching or machine stitching. Hand-stitching provides greater control and allows you to secure each piece carefully, especially when working with thick or layered fabrics.
Next, join the cushion’s front and back panels. Place them right sides together and sew along the edges, leaving an opening for turning and stuffing. Once sewn, turn the cushion right-side out and begin filling it with your chosen stuffing. Make sure to distribute the filling evenly for a smooth, full appearance.
Finally, close the opening with a ladder stitch or invisible hand stitch. This ensures a clean finish and keeps the cushion’s shape intact. With the assembly complete, your Rosebud cushion – Pattern project will start to come alive with texture and beauty.
4. Finishing Touches and Maintenance
The finishing touches can elevate your Rosebud cushion – Pattern from a simple handmade item to a polished décor piece. One popular finishing step is adding decorative stitching or embroidery to the cushion surface. These accents complement the rosebud embellishments and add an extra level of sophistication.
Another option is adding trim, lace, or piping around the edges of the cushion. This creates a defined frame that highlights the floral center while enhancing the overall structure and durability. Choose colors that harmonize with your rosebud design for the best visual effect.
If your cushion will be displayed in a high-traffic area, consider reinforcing the stitching around the rosebuds. Additional securing stitches help the embellishments stay in place and withstand daily handling or movement.
Maintenance is also important to keep your cushion looking fresh. For cushions made from cotton or linen, spot cleaning with mild soap and cold water is usually sufficient. Avoid soaking the rosebud areas to preserve their shape. Velvet and satin cushions should be cared for more delicately, ideally through gentle hand-cleaning.
To keep the cushion’s filling evenly distributed, fluff it regularly. This prevents flattening and preserves its comfortable, plush feel. If the cushion features removable covers, washing becomes even easier and helps maintain long-term cleanliness.
Finally, displaying your Rosebud cushion – Pattern thoughtfully enhances its beauty. Pair it with complementary throws, other floral cushions, or neutral fabrics to create a cohesive and inviting décor arrangement.
FAQ – Rosebud cushion – Pattern
1. Is the Rosebud cushion – Pattern suitable for beginners?
Yes, it is accessible for beginners, especially when using simple rosebud designs and cotton fabrics.
2. What fabrics work best for the rosebud embellishments?
Soft fabrics like cotton, linen blends, velvet, or satin work beautifully depending on the desired texture.
3. Can I wash a rosebud cushion?
Spot cleaning is recommended to protect the rosebud shapes. Removable covers can be washed more easily.
4. Do I need special tools to create the rosebuds?
No special tools are required. Basic sewing tools and optional hand-stitching needles are enough.
5. How do I attach the rosebuds securely?
Hand-stitching offers the best control and ensures that each rosebud is firmly attached.
6. Can I customize the cushion size?
Absolutely. The Rosebud cushion – Pattern can be adapted to different cushion sizes and shapes.
Conclusion
The Rosebud cushion – Pattern offers a beautiful way to bring floral design and handcrafted charm into your home.
Throughout this article, you learned how to choose fabrics, assemble the cushion, create rosebud embellishments, and care for the finished piece. This project blends creativity with practicality, making it both enjoyable and rewarding for sewists of all skill levels.