The Sawtooth Patchwork Quilt Block – Pattern is a timeless design that has earned its place in quilting history. Recognized by its dynamic star-like shape and striking angles, this quilt block offers both visual impact and simplicity, making it a favorite for beginners and experienced quilters alike. Its geometric beauty and versatility allow it to shine in both traditional and modern quilt layouts.
Whether you’re working on a full-sized bed quilt or a small wall hanging, mastering the Sawtooth Patchwork Quilt Block – Pattern opens the door to countless design possibilities. It can serve as the focal point of your project or be combined with other blocks to create intricate patterns. With the right fabrics and precise cutting, this block transforms fabric scraps into a work of art.
In this guide, we’ll explore how to make the Sawtooth Patchwork Quilt Block – Pattern, from choosing materials to construction techniques. You’ll also learn how to customize it, where to find patterns and inspiration, and get answers to frequently asked questions. Let’s dive into this classic and captivating quilt block.
1. What Is the Sawtooth Patchwork Quilt Block – Pattern?
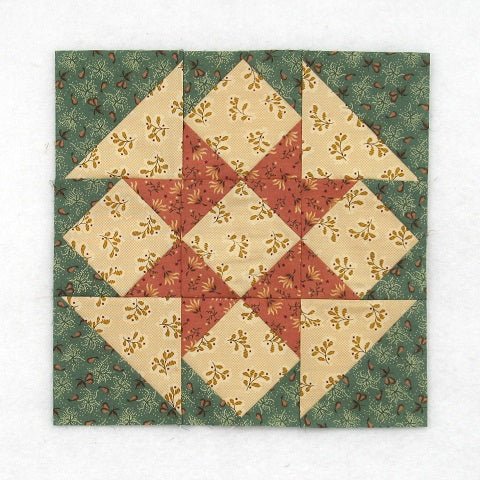
The Sawtooth Patchwork Quilt Block – Pattern is most commonly known for its star motif, featuring a central square surrounded by triangle points that resemble jagged teeth. This “sawtooth” effect gives the block its distinctive name and charm. It’s a foundational block in traditional American quilting.
Typically, the block is constructed from a combination of half-square triangles (HSTs) and a central square. This simple structure makes it easy to assemble, yet it offers plenty of room for color and fabric experimentation. Whether you’re using solids, florals, or batiks, the sawtooth design complements a wide variety of fabric styles.
One of the most iconic versions is the Sawtooth Star Block, which places a single colored square in the center and uses contrast triangles around it to create a bold, starburst look. But the basic sawtooth format can also be adapted into borders, medallions, or used as a repeating unit across an entire quilt.
The pattern has deep roots in quilting tradition, often appearing in historical quilt samplers and early Americana designs. Yet, despite its vintage origins, it fits perfectly into modern quilts thanks to its clean lines and graphic appeal.
Part of what makes this pattern so appealing is its balance of simplicity and sophistication. It’s quick to make and perfect for practicing accurate piecing and pressing, but the final result looks intricate and polished.
Whether you’re working on a baby quilt, table runner, or a king-size bedspread, the Sawtooth Patchwork Quilt Block – Pattern is a reliable and stylish choice that adapts beautifully to any project size or theme.
2. Materials and Tools You’ll Need to Start
To begin your journey with the Sawtooth Patchwork Quilt Block – Pattern, it’s important to gather the right tools and materials. Proper preparation ensures clean results and a smooth quilting experience.
Start with quality cotton quilting fabric in at least two contrasting colors—one for the center square and star points, and another for the background. High-contrast fabric combinations make the sawtooth edges stand out more clearly.
You’ll also need a rotary cutter, self-healing cutting mat, and clear quilting ruler. These tools are essential for accurate cutting, especially when working with small pieces that require precision.
A sewing machine with a ¼-inch seam foot is recommended. Accuracy in seam allowances is critical in quilting, and the quarter-inch foot helps maintain consistent seams for perfect alignment.
Don’t forget thread, preferably 100% cotton, and in a neutral color that blends with your fabric. Pre-wound bobbins save time, especially if you’re sewing multiple blocks at once.
Keep a hot iron and pressing board nearby. Pressing (not ironing) your seams after each step ensures crisp, flat blocks that fit together beautifully when assembled into the quilt top.
Lastly, it’s helpful to have quilter’s pins or clips, a marking pen for drawing diagonal lines on your squares (used in making HSTs), and a printed or digital version of the sawtooth pattern to follow along during construction.
3. Step-by-Step: How to Sew the Sawtooth Patchwork Quilt Block
Creating the Sawtooth Patchwork Quilt Block – Pattern involves assembling a central square and surrounding it with flying geese or HSTs to form the “teeth” of the block. Here’s a simplified overview of the process.
Begin by cutting your fabric pieces. For a basic 12-inch finished block, you’ll typically need one 6.5″ center square, four 3.5″ squares for the corners, and eight 3.5″ x 3.5″ squares to make the triangle points. Precision in cutting is key to getting sharp edges and even seams.
The triangle units that form the points are often made using the “four-at-a-time” flying geese method. This technique allows you to create multiple triangle units quickly and with fewer seams, improving accuracy and efficiency.
Lay out your cut pieces before sewing to get a feel for the block’s design and confirm color placement. This step helps avoid mistakes and allows you to adjust fabrics for better contrast or visual balance.
Begin sewing by assembling the flying geese units, using the stitch-and-flip method or no-waste technique. Press seams carefully toward the darker fabric to reduce bulk and keep the block flat.
Attach two flying geese units to each side of the central square to complete the top and bottom rows of your block. Then sew the corner squares and remaining triangle units to create the top and bottom rows, joining all rows to complete the block.
Double-check your finished block against the pattern size. A correct Sawtooth Patchwork Quilt Block – Pattern should lie flat, measure squarely, and have points that don’t get cut off when sewn into a quilt.
4. Design Ideas and Creative Variations
The beauty of the Sawtooth Patchwork Quilt Block – Pattern lies in its flexibility. Once you’ve mastered the basic layout, there are countless ways to make the design your own and match it to your personal quilting style.
You can experiment with scrappy blocks, using a variety of fabrics for each triangle point. This is a great way to use leftover fabric and add a touch of whimsy to your quilt without following a strict color palette.
Consider making the center square a fussy-cut design. Choose a fabric print that showcases a motif, like flowers, animals, or holiday themes. This adds a personalized element to each block.
Another creative approach is to alternate the direction of the sawtooth points across your quilt, creating movement and dynamic flow within the layout. This variation is especially striking in modern quilts.
Try using gradients or ombré fabrics to make the block look like it fades from light to dark. This creates visual interest and a subtle sophistication that can elevate even the simplest layout.
For a more minimalist look, go for monochrome or two-tone color schemes. A black-and-white or navy-and-cream block can look both classic and modern, depending on how it’s used.
Lastly, you can use the Sawtooth Patchwork Quilt Block – Pattern in combination with other traditional blocks like the Nine Patch, Log Cabin, or Hourglass to create complex, sampler-style quilts with depth and variety.
FAQ – Frequently Asked Questions About Sawtooth Patchwork Quilt Block – Pattern
Q1: What is the finished size of a standard Sawtooth block?
A: The most common size is 12″ x 12″, but it can easily be scaled up or down depending on your project.
Q2: Can beginners make a Sawtooth Patchwork Quilt Block?
A: Yes, the block is beginner-friendly, especially when using simple flying geese techniques. It’s a great project to learn piecing accuracy.
Q3: What’s the best method to make the triangle points?
A: The no-waste flying geese method is fast, efficient, and reduces fabric waste while ensuring consistent size.
Q4: How many blocks do I need for a full-size quilt?
A: This depends on the block size and desired quilt dimensions. For a queen quilt using 12″ blocks, you’d typically need 49 blocks (7×7 layout).
Q5: How do I avoid cutting off the triangle points?
A: Always use a ¼” seam allowance and press seams carefully. Align triangle points just shy of the edge to maintain sharp points after sewing.
Q6: Can I use pre-cuts like fat quarters or charm packs?
A: Absolutely. Fat quarters are ideal for variety and charm packs can be used for smaller versions of the block or center square accents.
Conclusion
We’ve explored every step of creating the Sawtooth Patchwork Quilt Block – Pattern, from materials to methods, design variations, and frequently asked questions. This classic block not only adds visual impact to your quilt but also helps you build essential skills in accurate piecing, color coordination, and layout design.
Whether you’re crafting a vintage-style sampler or a sleek modern wall hanging, the Sawtooth Patchwork Quilt Block offers both
tradition and creativity. It’s a versatile and satisfying pattern that belongs in every quilter’s skill set.
If you enjoyed this guide, please leave a sincere opinion and any suggestions for future quilting tutorials or patterns you’d like to see. Your feedback helps support the quilting community and improves the content we provide. Happy quilting!